Burek

I tried filo pastry last year and it was a bit of disaster so I had in my todo list to try again. And this weekend, it was the time for it. I felt like to eat some good burek so I needed filo pastry for it. So the ingredients and process is the same as before but I will copy anyway:

Filo Pastry Ingredients:

  • 500g plain wheat flour
  • 250ml whole milk
  • 100ml vegetable oil
  • 10ml vinager
  • 5g salt
  • unti-stick mix: 200g thin corn flour + 100g plain flour

Filo Pastry Process:

  • In a bowl, add milk, oil, vinager and salt. Mix well. Then add the 500g flour. Mix again until all combined.
  • Knead the mix on your work surface for 10 minutes or so until you have a smooth dough.
  • Wrap up in plastic film and let it rest for 1h on your work surface.
  • Prepare the anti-stick mix: combine the corn and wheat flour.
  • Dust your work surface with the anti-stick mix.
  • Divide the dough in 20 small pieces. Highly recommended to use a scale.
  • Each piece, create a ball and let it rest in a baking try. Cover the try with a kitchen towel or plastic film.
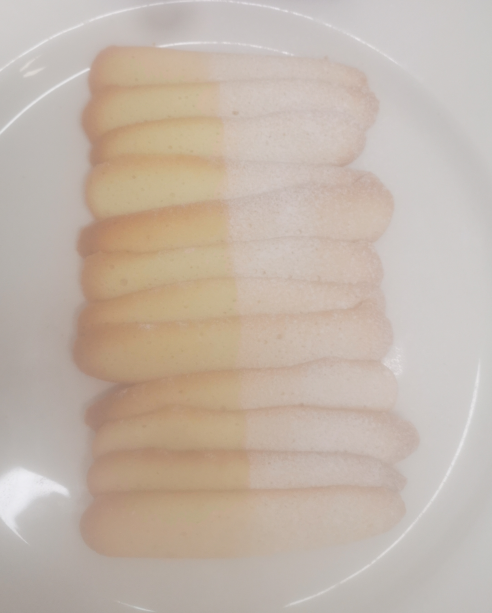
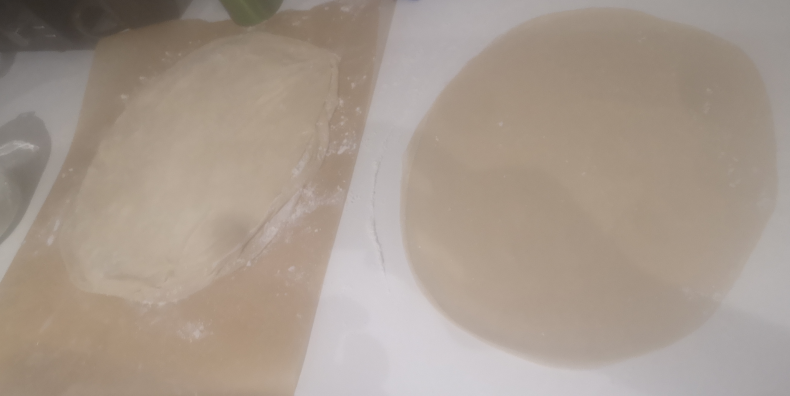
  • Then starts the “difficult” part. Pick one ball, use a bit of the anti-stick mix in your rolling pin and on the ball. Spread the ball in a circle around 13cm diameter or so. It should just a couple of moves in each direction. Then be generous with the anti-stick mix, as we need to create a stack of 10 pieces and it is critical so they dont stick. Put the first piece with anti-stick mix on top. And repeat the same process with other 9 balls.
  • Once you have the 10 pieces together, you have to spread all of them at the same time. Again be sure you have plenty of anti-stick mix in your work surface, rolling ping, etc.
  • Spread slowly in all directions, turning the stack, being careful that all layers spread equally.Likely you get up to 3 or 4 times bigger than the original form.B But dont over stretch it, if you do, the layers will join and will be difficult to separare later.
  • Now you have to remove each layer from the stack. Be careful, it should be paper thin!
  • In baking paper, with a layer of anti-stick mix, put each layer adding extra anti-stick mix on top. Again, be generous with the anti-stick mix! After adding the 10th layer, use another piece of baking paper and now roll everything together slowly. If you want to keep it in the freezer of fridge, then wrap the roll with plastic film.
  • Repeat the same process with the final 10 balls.
  • So at the end you end with two packets with 10 layer each.
This time it was much better!

Burek Ingredients:

  • 200g ricotta cheese or mascarpone
  • 800g sour cream
  • 5 eggs
  • 1 tsp dry yeast
  • salt to taste
  • 20 layers of filo pastry
  • sunflower oil for spreading between layers

Burek Process:

  • Preheat oven at 200C
  • Grease a baking tray with a bit of sunflower oil.
  • Add cheese, sour cream, eggs, yeast and salt in a bowl and mix until runny.
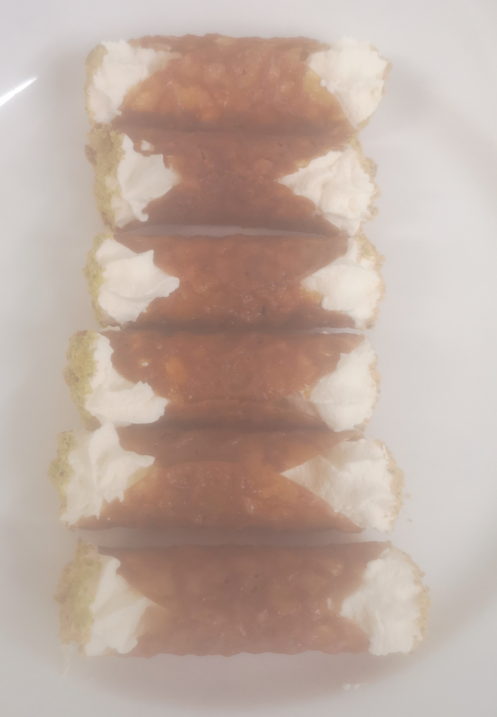
  • Brush two sheets of pastry indiviually with oil and place into the tray
  • Spread a thin layer of the filling onto the pastry.
  • Repeat the process of adding two oiled layers of pastry and then a layer of cheese filling until everything is used up.
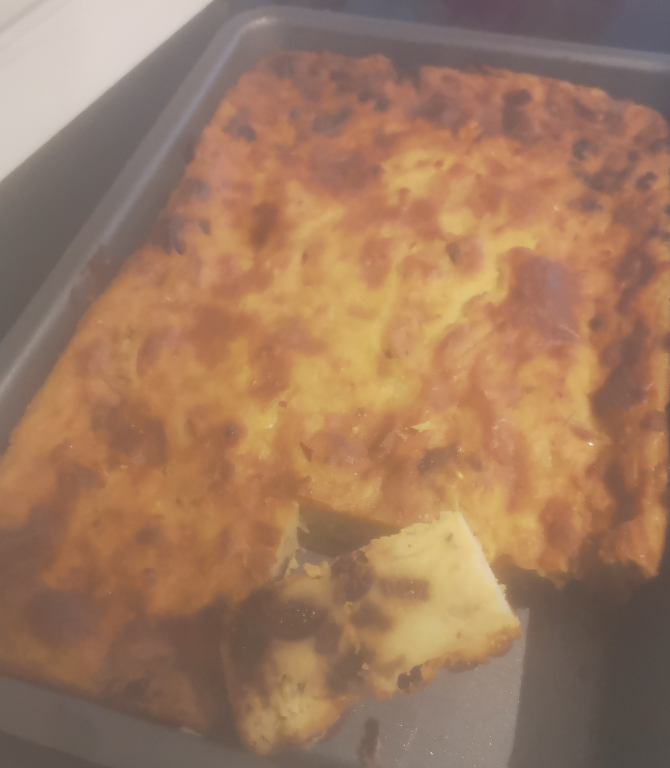
  • With a fork or knife make a few holes in the top as the pastry will raise quite a bit!
  • Put burek in the oven for 30-40 minutes or golden on top.
  • Remove from oven and let it rest.

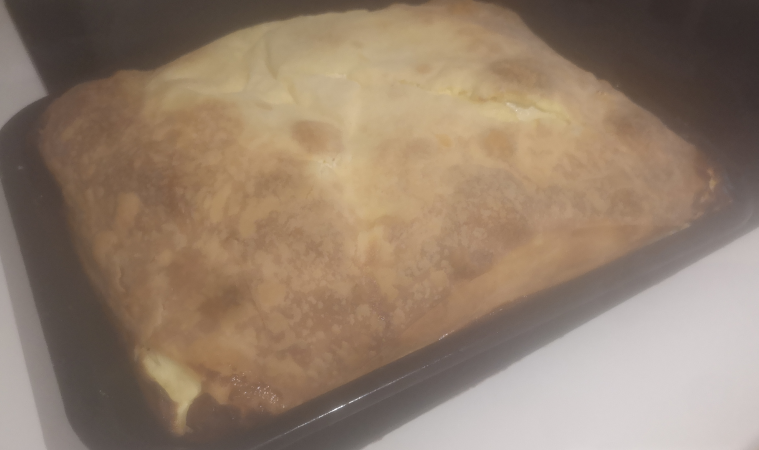
This time the filo pastry was FAR MUCH better than last year. I didnt make the same mistakes for a change 🙂

Although I did the filo pastry the day before. I think I should have add a bit more anti-stick mix between the layers when doing the packets.

Regarding the burek, it tasted good. I think it needed a bit more salt. As well, the filo pastry taste it was very different from the shop bought one. It tasted a lot to bread, so it surprised me.

Anyway, I need to do it more often.

Zucchinipuffer / Courgette Fritter

Last weekend I spent it with Q, and we had a great time. I tried a couple of new things food-wise that really impressed. This is one of them.

Initially I thought it was a burger but then my friend told me that it was zucchini/courgette. So we gave it a try, and it was really good (and we were a bit hungry too 🙂 So I tried to find something in the Internet and I went for this recipe:

Ingredients:

  • 2 medium zucchini/courgette shredded (you can try 3)
  • 1 small onion shredded or 4-5 spring onions chopped
  • 1 small potato shredded
  • 3 eggs
  • 1/2 bunch of dill
  • 1/2 bunch of parsley
  • 100g feta cheese
  • 150g plain flour
  • salt + pepper
  • sunflower oil for frying.

Process:

  • Squeeze the liquid from the zucchini. Leave the zucchini in a bowl
  • Add onion, potato to the zucchini.
  • Add finely chopped dill and parsley to the zuchini
  • Whisk the eggs a bit and add it to the mix.
  • Add the feta cheese shredded too with your fingers.
  • Mix all well. Add salt and pepper. Taste it.
  • Add the flour and mix well. You should have a nice butter.
  • In a deep pan, heat up the sunflower oil. Once it is hot, put a big spoon of the butter and deep fry until golden. Turn over and do the same.
  • Remove the fritter from the pan and put it on paper towels to absorbe the oil
  • Repeat the process until the butter is over.

This is my butter:#

And this is after frying:

To be honest, I think it didnt’t taste like the ones I tried last weekend, but it was good enough! Maybe more salt/pepper and one more courgette (total 3) and a bit less dill/parsley?

The Silk Roads

It has taken a bit more time than usual but really enjoyed this book. I learned a lot of new facts. I love history and in school we were very focus in European history and neglected greatly all other parts of the world. In this book you can read about the importance of the routes between Europe and Asia along the centuries. Because all great empires were supported through commerce. From the constant battles between Ancient Greece and Persia, Rome, the pressure of the mongol empires from the East, Christianity, Byzantium, the rise of Islam and its lighting spread from Arabia to westerm Europe and the far east, the religion wars, crusaders, etc. It is interesting Vikings travelled “south” to commerce with the east, mainly with slaves captured in the way down. That slaves were the most profitable business. That the word”slave” comes from “slav” so those were the tribes mainly captures to become slaves and sold to the current empire and business centers between Europe/Asia. That luxury was a main drive in business: obviously silk and spices. How the discovery of America by the Spaniards was a waste of resources in European wars, and crashed South American population and culture. How Christian religion looked somewhere else at that time (link1 link2) apart from Dominican Bartolome de Las Casas. Funny enough the next-to-come empires (Dutch and English) did the same… And is funny too how tolerant was Islam for centuries and intolerant Christianity (has changed this?)

Then it comes the last couple of centuries.The heavy industrialization, the desire to maintain the status-quo, etc. For me was mind-blowing the approach for the WW1 and WW2. WW1 was to maintain the empires against the new forces: Germany and Russia. The goal was mainly keeping the East under control (India during English Empire time – that is bigger than current one..) and the new gold, petrol (Persia aka Iran, Mesopotamia aka Irak, etc). But the war was mainly fought in mainland Europe… Then you see the lack of scruples from Britain and then America dealing with the countries in the East. Then you can understand all the mess we see in Irak, Iran, Afghanistan… And Ukraine. Germany tried to conquest URSS during WW2 to get Ukraine as it was considered the granerie of Europe… and the south part of URSS so it could control the petrol supplies too. As well, you see the times when Iran and Israel were friends xD. Funny enough all the nuclear technology in Iran is from USA. USA got involved in Afganistan when the URSS invaded it (I will always remember the movies Rambo III and Red Scorpion) I think nobody from the army watched those movies…

I leave a lot of things behind but it is a great book. I read it as ebook but it is worth have it in paper. Very likely will get the next book.

Blueberry Muffins

This makes approx 6 muffins.

Ingredients:

  • 110g plain flour
  • 110g butter
  • 65g caster sugar
  • 2 free-range eggs mixed
  • 1 1/2 tsp baking powder
  • 100g blueberries (fresh or frozen)
  • pinch of nutmeg
  • Muffin cases

Process

  • Pre-heat oven at 200C
  • Cream the butter and sugar. It should double in size and it should look like a cream. You shouldnt feel the sugar granes. This is slow and a bit painful 😛
  • Slowly, add 1/4 of egg to the cream, mix until all combined. Add another 1/4 of egg, mix until all combined. Repeat until all egg is in.
  • Add the flour, baking powder and nutmeg. Mix all well.
  • Cover the mix and let it rest for 10 minutes.
  • Prepare two cases per muffin if you dont have special muffin tray.
  • Take a piping bag, you dont need any special head. Put the mix into the bag. Cut the tip of the bag, it should be 1.5cm max diameter.
  • Pipe the mix vertically! (very important) on the bottom of the cases. Fill a bit less than half the case.
  • Add blueberries on top of each dollop of mix. 5-6 blueberries.
  • Then add another layer of mix on top of the blueberries. Remember to pipe vertically!. Fill until the top of the case. Add again 5-6 blueberries.
  • Put the muffins in the oven for 20 minutes aprox or until golden on top.
  • Before removing from oven, use a tooth stick and check it comes out clean.
  • Let it cool for a bit.
  • Optionally, you can use a bit of icing sugar on top for decoration.

Scones

This makes aprox 6 scones

Ingredients

  • 225g self-raising flour
  • 2 tsp baking powder (double effect: fizzy with water -> bubbles -> in the oven expand)
  • pinch salt
  • 25g caster sugar
  • 50g unsalted butter
  • 150ml whole milk
  • 1 egg bitten for washing

Decoration:

  • Clotted Cream
  • Jam
  • icing sugar

Process:

  • Prepare a baking tray. Wash with a bit of melted butter, then spread some flour and finally smack the tray to remove the flour. You should have a light dusted tray.
  • Pre-heat oven at 220C
  • Sift flour, baking powder and salt in a bowl. Stir in the sugar.
  • Add the butter and “rub” with the flour mix until it looks like breadcrumbs. Tosh a bit the bowl and check there is no butter pieces.
  • Add the milk bit a bit. Mixing with one hand.
  • Put the dough on the work surface and knead it for 7-8 minutes. It is a very wet dough so use a scrapper to help you. At then it should be a bit more manageable , then form a ball with your hands and let it rest for 20 minutes.
  • Roll out the dough on a lightly floured surface. Put flour on your rolling pin and spread the dough until it is aprox 2cm thick. If it is thinner than this, the scone will not rise much!.
  • Use a pastry cutter of 8-10cm diameter. Cut the dough with one strong move, dont twist it! Remove the cutter, and do the same in different part of the dough until you can use it anymore. Remove the leftover dough with the help of a spoon or similar without breaking the scone shape.
  • If you have dough left, repeat the process. Spread to 2cm thick, use cutter, etc
  • Transfer the scones to the tray. Wash only the top with the egg wash. Rest for 10 minutes.
  • Wash again the top of the scones and transfer to the oven.
  • Bake for 10-12 minutes until the top is golden brown. Use a tooth pick to be sure the inside of the scone is baked. The pick should come out clean.
  • Let the scone cool down.
  • For serving, use a bread knife and cut approx by the middle. You can use anything you like, the typical fillings is clotted cream and jam!
  • You can spread some icing sugar on top for decoration

Langues de chat

Ingredients:

  • 100g butter
  • 125g icing sugar
  • 100g flour
  • 3 egg whites
  • 1/2 vanilla paste

Process:

  • Pre-heat oven at 180C
  • Cream butter and icing sugar with your hand.
  • Add the egg whites in three times. Mix with your hand.
  • Add the flour bit a bit and keep mixing.
  • Add the vanilla, mix a bit.
  • Prepare a piping bag with a small nozzle. As usual, twist the bag with your index finger in the nozzle so it keeps the form, fold the pipe to the middle and then add the cream.
  • On the back of a tray, wash it with a bit of butter, add flour and then smack it with one hit so it get a soft non-sticky cover.
  • Using a butter block, make two vertical lines using thumb and index finger.
  • ^^ This is the same as the eclairs ^^
  • Pipe the cream horizontally, hold the pipe with your left hand and squeeze with the right. Be sure the lines are uniform (parts with more cream than other, etc), the cream doesnt have bubbles.
  • Then trim the edges with a sharp knife, the lines should be well inside the tray. This is important because once in the oven, they will expand and you dont want the biscuit bend down the tray edge.
  • Bake for 10 minutes aprox, until the biscuit edges are golden brown.
  • Remove from oven and let them cool down
  • Optionally, you can dust half of the biscuit with icing sugar.

The biscuits were tasty but the form was really bad. My piping wasnt good I think as some parts had more cream and they expanded more. Need to try again!

Brandy Snaps

Brandy Snap Ingredients:

  • 55g butter
  • 55g demanara sugar
  • 55g golden syrup (put 10sec in microwave once ready to use it so it is liquid)
  • 50g plain flour
  • 1/2 tsp ground ginger
  • 1/2 tsp lemon (stops crystalizing the sugar)
  • optional: Silpat matt (Non-Stick Silicone Baking Mat)

Process:

  • Pre-heat oven at 180C.
  • In sauce pan, put butter, sugar and syrup. Heat gently at low heat, until everything is disolved. Don’t boil it!!! Stir with a spoon, until you dont feel the grains of sugar. If should look like “caramel”. It will take 10-15 minutes. Dont rush it.
  • Let the sugar mix to cool down for 1-2 minutes, add the flour and ginger. Mix well but just a bit. You dont want to split the mix.
  • Add the lemon, mix well but like above.
  • In the baking try with non-sticking paper or similar, drop 4 small balls of “caramel”. Around 1/2 tsp. It looks small but then in the oven they will spread out a lot. They need to become flat, and “toasted”. A bit less than 10 minutes.
  • When the circules have a nice brown color, remove the try from the oven.
  • Wait 30 sec or so. Then with a circle cookie cutter, cut a circumference from each melted caramel. If it is too soft, wait for a bit, then remove the sides around the cutter with the handle of a fork or spoon. The “cookie” should be pliable.
  • Use the handle of the whisk, with a bit of oil, and put the “cookie” to form a “canoli”. Try to connect the sides. Wait until the “cookie” is a bit hard and remove from the handle. Let it rest in a cooling rack
    • Very likely from the 4 caramel melts, one or two will be hard and you will not be able to cut it or put the cookie in the handle without breaking it. If you think they are going to break, put them back in the oven for 1 minute and will be come soft again. So start the process again, use cutter, help with fork to remove excess sides, then handle to form a “canoli”.
    • Once you have all “canoli” resting, make the filling below:

Cream Ingredients:

  • 200ml double cream
  • 1 tsp icing sugar
  • 1/2 tsp vanilla paste

Cream process:

  • Whisk the cream, sugar and vanilla until it starts to become solid. Don’t go to stiff peaks!!! This is not merengue. If you do, once you try to pipe it, the cream will spilt in something similar to butter and water.
  • Use a cross end for the pipe. As usual, twist the bag with the index finger so it stays, the put the cream in the bag, twist the bag until all cream is together and then pipe one hand in the bottom and the other squeezing.
  • Fill each canoli a bit from each side.
  • Optional, dip each side in pistachio

I tried one after cooling down and I felt it was too sweet. But maybe because I ate a bit of the “cookie” leftover that are nearly purely sugar.

The next day, I tried another and felt much better. The cream is not sweet at all so it balance the “biscuit”.

CCNA DevNet Notes

1) Python Requests status code checks:

r.status_code == requests.codes.ok

2) Docker publish ports:

$ docker run -p 127.0.0.1:80:8080/tcp ubuntu bash

This binds port 8080 of the container to TCP port 80 on 127.0.0.1 of the host machine. You can also specify udp and sctp ports. The Docker User Guide explains in detail how to manipulate ports in Docker.

3) HTTP status codes:

1xx informational
2xx Successful
 201 created
 204 no content (post received by server)
3xx Redirect
 301 moved permanently - future requests should be directed to the given URI
 302 found - requested resource resides temporally under a different URI
 304 not modified
4xx Client Error
 400 bad request
 401 unauthorized (user not authenticated or failed)
 403 forbidden (need permissions)
 404 not found
5xx Server Error
 500 internal server err - generic error message
 501 not implemented
 503 service unavailable

4) Python dictionary filters:

my_dict = {8:'u',4:'t',9:'z',10:'j',5:'k',3:'s'}

# filter(function,iterables)
new_dict = dict(filter(lambda val: val[0] % 3 == 0, my_dict.items()))

print("Filter dictionary:",new_filt)

5) HTTP Authentication

Basic: For "Basic" authentication the credentials are constructed by first combining the username and the password with a colon (aladdin:opensesame), and then by encoding the resulting string in base64 (YWxhZGRpbjpvcGVuc2VzYW1l).

Authorization: Basic YWxhZGRpbjpvcGVuc2VzYW1l

---
auth_type = 'Basic'
creds = '{}:{}'.format(user,pass)
creds_b64 = base64.b64encode(creds)
header = {'Authorization': '{}{}'.format(auth_type,creds_b64)}

Bearer:

Authorization: Bearer <TOKEN>

6) “diff -u file1.txt file2.txt”. link1 link2

The unified format is an option you can add to display output without any redundant context lines

$ diff -u file1.txt file2.txt                                                                                                            
--- file1.txt   2018-01-11 10:39:38.237464052 +0000                                                                                              
+++ file2.txt   2018-01-11 10:40:00.323423021 +0000                                                                                              
@@ -1,4 +1,4 @@                                                                                                                                  
 cat                                                                                                                                             
-mv                                                                                                                                              
-comm                                                                                                                                            
 cp                                                                                                                                              
+diff                                                                                                                                            
+comm
  • The first file is indicated by —
  • The second file is indicated by +++
  • The first two lines of this output show us information about file 1 and file 2. It lists the file name, modification date, and modification time of each of our files, one per line. 
  • The lines below display the content of the files and how to modify file1.txt to make it identical to file2.txt.
  • - (minus) – it needs to be deleted from the first file.
    + (plus) – it needs to be added to the first file.
  • The next line has two at sign @ followed by a line range from the first file (in our case lines 1 through 4, separated by a comma) prefixed by “-“ and then space and then again followed by a line range from the second file prefixed by “+” and at the end two at sign @. Followed by the file content in output tells us which line remain unchanged and which lines needs to added or deleted(indicated by symbols) in the file 1 to make it identical to file 2

7) Python Testing: Assertions

.assertEqual(a, b)	a == b
.assertTrue(x)	        bool(x) is True
.assertFalse(x)	        bool(x) is False
.assertIs(a, b)	        a is b
.assertIsNone(x)	x is None
.assertIn(a, b)	        a in b
.assertIsInstance(a, b)	isinstance(a, b)

*** .assertIs(), .assertIsNone(), .assertIn(), and .assertIsInstance() all have opposite methods, named .assertIsNot(), and so forth.

Pinza Veneta

This is a typical cake from the Veneto region in Italy. I tasted it in Venice and wanted to try myself at some point, and that happened this weekend.

I used this video and this blog as inspiration.

Ingredients:

  • 1 litre whole milk (have some more extra just in case)
  • 200g corn flour (semolina)
  • 70g 00′ flour (plain can work too)
  • 80g butter
  • 100g sugar
  • 50g walnuts (chopped) – optional
  • 70ml Sambuca (didnt have Grappa)
    • 1 tsp fennel seeds (I used caraway as I didnt have fennel)
    • 1 tsp anis seeds
    • 1 orange: zest + juice
    • 1 lemon: zest
    • 2 apples chopped in small pieces
  • 8 dried figs chopped
  • 50g raisins

Process:

  • Pre-heat the oven at 180C.
  • Prepare a tray and spread some butter.
  • Soak the raisins, seeds, orange and lemon zest, juice and figs in Sambuca
  • In a big pan, bring to boil the milk. Immediately add corn and flour whisking without stopping to avoid lumps. Put at low heat now!
  • If it is too thick, you can add more milk. (I think I used 1.2l milk at the end and still quite thick!!!)
  • Cook for a couple of minutes at low heat, keep whisking, don’t burn it!
    • Remove from heat and add butter, sugar, and the mix fruit with sambuca. Add walnuts.
    • Mix all well with a spoon.
    • Pour in the tray. Level it with the spoon.
    • Put in the oven for 50-60 minutes.
    • Should be brown on top and quite moist inside if you dip a knife on it. The knife shouldnt come out clean.
    • Remove from oven and let it cool down for 1h at least before trying. The polenta is very moist so it takes time to get “solid”. Next day is even better taste!

This is the result!

It wasnt as the one I tasted in Venice but still was pretty good!

ARP Storms – EVPN

We have had an issue with broadcast storms in our network. Checking the CoPP setup in the switches, we could see massive drops of ARP. This is a good link to know how to check CoPP drops in NXOS.

N9K:# show copp status
N9K# show policy-map interface control-plane | grep 'dropped [1-9]' | diff

Having so many ARP drops by CoPP is bad because very likely good ARP requests are going to be dropped.

Initially i thought it was related to ARP problems in EVPN like this link. But after taking a packet capture in a switch from an interface connected to a server, I could see that over 90% ARP traffic coming from the server was not getting a reply…. Checking in different switches, I could see the same pattern all over the place.

So why the server was making so many ARP requests?

After some time, managed to help help from a sysadmin with access to the servers so could troubleshoot the problem.

But, how do you find the process that is triggering the ARP requests? I didnt make the effort to think about it and started to search for an easy answer. This post gave me a clue.

ss does show you connections that have not yet been resolved by arp. They are in state SYN-SENT. The problem is that such a state is only held for a few seconds then the connection fails, so you may not see it. You could try rapid polling for it with

while ! ss -p state syn-sent | grep 1.1.1.100; do sleep .1; done

Somehow I couldnt see anything anything with “ss” so tried netstat as it shows you too the status of the TCP connection (I wonder what would happen is the connection was UDP instead???)

Initially I tried “netstat -a” and it was too slow to show me “SYN-SENT” status

Shame on me, I had to search how to get to show the ports quickly here:

watch netstat -ntup | grep -i syn_sent | awk '{print $4,$5,$6,$7}'

It was slow because it was trying to resolve all IPs to hostname…. :facepalm. Tha is fixed with “-n” (no-resolve)

Anyway, with the command above, finally managed to see the process that were in “SYN_SENT” state

This is not the real thing, just an example:

#  netstat -ntup | grep -i syn_sent 
tcp        0      1 192.168.1.203:35460     4.4.4.4:23              SYN_SENT    98690/telnet        
# 

We could see that the destination port was TCP 179, so something in the node was trying to talk BGP! They were “bird” processes. As the node belonged to a kubernetes cluster, we could see a calico container as CNI. Then we connected to the container and tried to check the bird config. We could see clearly the IPs that dont get ARP reply were configured there.

So in summary, basic TCP:

Very summarize, TCP is L4, then goes down to L3 IP. For getting to L2, you need to know the MAC of the IP, so that triggers the ARP request. Once the MAC is learned, it is cached for the next request. For that reason the first time you make a connection is slow (ping, traceroute, etc)

Now we need to workout why the calico/bird config is that way. Fix it to only use IPs of real BGP speakers and then verify the ARP storms stop.

Hopefully, I will learn a bit about calico.

Notes for UDP:

If I generate an UDP connection to a non-existing IP

$ nc -u 4.4.4.4 4000

netstat tells me the UDP connection is established and I can’t see anything in the ARP table for an external IP, for an internal IP (in my own network) I can see an incomplete entry. Why?

#  netstat -ntup | grep -i 4.4.4.4
udp        0      0 192.168.1.203:42653     4.4.4.4:4000            ESTABLISHED 102014/nc           
# 
#  netstat -ntup | grep -i '192.168.1.2:'
udp        0      0 192.168.1.203:44576     192.168.1.2:4000        ESTABLISHED 102369/nc           
# 
#
# arp -a
? (192.168.1.2) at <incomplete> on wlp2s0
something.mynet (192.168.1.1) at xx:xx:xx:yy:yy:zz [ether] on wlp2s0
# 

# tcpdump -i wlp2s0 host 4.4.4.4
tcpdump: verbose output suppressed, use -v[v]... for full protocol decode
listening on wlp2s0, link-type EN10MB (Ethernet), snapshot length 262144 bytes
23:35:45.081819 IP 192.168.1.203.50186 > 4.4.4.4.4000: UDP, length 1
23:35:45.081850 IP 192.168.1.203.50186 > 4.4.4.4.4000: UDP, length 1
23:35:46.082075 IP 192.168.1.203.50186 > 4.4.4.4.4000: UDP, length 1
23:35:47.082294 IP 192.168.1.203.50186 > 4.4.4.4.4000: UDP, length 1
23:35:48.082504 IP 192.168.1.203.50186 > 4.4.4.4.4000: UDP, length 1
^C
5 packets captured
5 packets received by filter
0 packets dropped by kernel
# 
  • UDP is stateless so we can’t have states…. so it is always going to be “established”. Basic TCP/UDP
  • When trying to open an UDP connection to an external IP, you need to “route” so my laptop knows it needs to send the UDP connection to the default gateway, so when getting to L2, the destination MAC address is not 4.4.4.4 is the default gateway MAC. BASIC ROUTING !!!! For that reason you dont see 4.4.4.4 in ARP table
    • When trying to open an UDP connection to a local IP, my laptop knows it is in the same network so it should be able to find the destination MAC address using ARP.