Manson AI: You need friction
AI Agent: narrow focus: goal, proof, steps
Bear Grylls’ Morning Routine: Cold (never get used to), bared foot, strength training, 30 minutes
RoCE networks for distributed AI training at scale: I have managed to read the paper ! Although in the AI word, two years is an eternity, I think it is still interesting.
1) Network Topology: backend network only for GPUs (RDMA nics), non-blocking. Frontend network: data ingestion, checkpointing, logging.

Pod = AI zone
 leaf = RTSW, DAC cables, shallow buffer
 spine = CTSW, deep buffers. fiber between leaf-spine.
SuperSpine = ATSW, oversubscribed, connect AI zones

intra-node -> nvlink
ROCE: cpu offloading, ethernet (standard)

collective communication library serves as the sw abstraction between training workloads and the NIC
                                 schedules verbs calls over QP (Queue Pairs)
 parallelism strategy determines collective: allreduce, allgather, alltoall
 choice logical topology:

------------------

2) Routing: work load. low entropy flows (few flows) -> ECMP bad (5-tuple udp: src/dst ip, src/dst port, protocol), burstiness, elephant flows
--

 RTSW uplinks 1:2 under-subscribed! -> expensive (short-term)
 1) QP scaling: use destination QP of Roce packet using the UDF capability in switch to increase entropy -> Enhanced ECMP -> short-term
 2) Central TE controller -> long-term: CP real-time topology end-to-end cluster,
                                        flow matrix (flow bps) + CSPF (constrained SPF)
                                        write in switches dataplane
                                     DP: TE overrides default BGP routing policy in leaf. Use Exact Match table.
                           Not good with multiple link failures. Doesnt scale
 3) Flowlet switching: try to improve 1 and 2. hw assistant schema. put packets in different ports in ECMP
     out-of-order: move packets only after 1/2 RTT
     load-aware path assignment: better than TE

------------------

3) Transport: congestion management. Start with DCQCN. packet drops on ACK/NACK can cause prolonged Local ACK timeout (LAT)
--
 Tuning DCQCN not great (strict ECN -> minimize PFC (can lead to head-of-line blocking)

 200G, we stayed with relaxed ECN marking, allowing for buffer build up in the CTSW, while keeping default DCQCN settings.
 400G We proceeded without DCQCN. just PFC for flow control
 re-design collective library: two-stage copy

------------------

4) Operations:
 Change QoS priority of Clear to Send (CTS) messages. In RTSW ASIC, modify dsCP marking for ACK  messages
 Tuning VOQ in CTSW
 obeservability: OOS: out of seq.
                 Link flaps
                 Local ACK timeouts (LAT)
                 PFC watchdog: catch any long-duration PFC pause (>200ms)
                 buffer utilization RTSW
                 reachibility (pings)
                 constant latency monitoring loaded and unloaded (catch regressions)
                 base lines!!!
Perplexity: Hosting Qwen on Blackwel:
AWS RNG – Random Graph Network: The paper is totally out of my space, but the concept looks brutal. With an operations hat, how you troubleshot it? (ping, traceroute, link congestion, data flows patterns, etc)
MRC1 and MRC2 (OCI): Why we need planes (breakouts) and not just a big plane.
As SerDes speeds continue increasing, every microsecond of congestion creates much larger pressure inside the fabric. A 100G transport domain may be manageable. A 400G domain amplifies the same congestion into roughly 4x pressure. An 800G domain, and eventually a 1.6T domain, becomes much harder to coordinate.
This pressure appears as larger switch buffer requirements, larger congestion domains, harder retransmission coordination, larger cache pressure, larger synchronization storms, and harder thermal and power scaling inside ASICs.
At hyperscale, switch ASIC cache and transport coordination become fundamental scaling bottlenecks. Increasing switch buffer size is extremely difficult: high-speed SRAM is expensive, larger cache arrays consume significant power, thermal density rises quickly, die area scaling becomes inefficient, and routing complexity increases dramatically.
Splitting transport into many smaller lanes naturally reduces these pressures. Reliability improvements then emerge as a byproduct, because congestion, retransmission, and buffering become more distributed.
THE QUESTION: which breakout keeps the fabric at the shallowest practical Clos depth while keeping plane count and operations manageable? -> less hops, less switches, less latency
Slurm: I like the “Slurm vs. Kubernetes”
Slurm Workload Manager (short for Simple Linux Utility for Resource Management) has become a cornerstone of large-scale computing. Originally created in the early 2000s to support large-scale high-performance computing (HPC) environments, Slurm is now widely recognized as the de facto scheduler for HPC clusters. Today, it orchestrates jobs across thousands of servers and GPUs in some of the world’s most advanced computing environments.
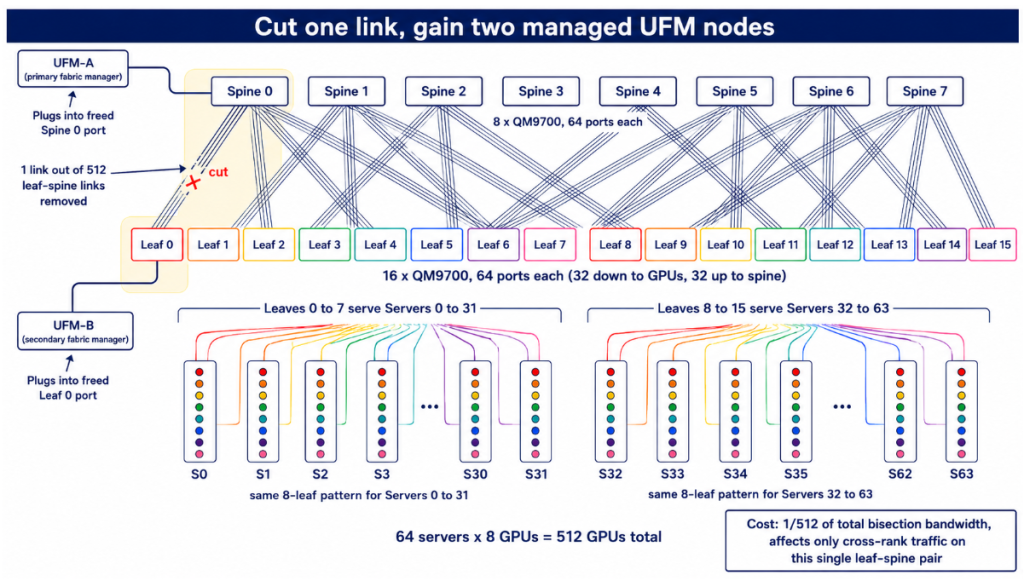
Interview Question: 512 GPU, non-blocking (full bisection) and 2xUFM! I really liked this. I think for once I understand the rail-optimize (fat-tree = leaf-spine). Just break one leaf-spine link, beautiful!!!
800VDC: Next step in electrical infra in DC space.
Approach woman: curiosity and no performance. Practice. Be at peace with uncomfortable and akwardness. Rejection as learning