AWS owns its networking stacks:
NVIDIA releases MRC: Multipath Reliable Connection – I assume they need to do something to compete with UltraEthernet
OSPF shutdown router: I would have test this. In my opinion, the key thing is although the router LSA1 is in the neighbors LSDB, SPF is ignoring it. Still quite interesting, you always learn/re-learn something.
Mark Manson – 10y therapy: I like the very beginning and then when Chris says you have to through shit to understand those rules and appreciate them.
JEPA (Joint Embedding Predictive Architecture): LeCun against LLM. Proof.
Microsoft Ultra Ethernet: The first is a bit more interesting as you can see the flows
Tech Field Day 2025 – Arista AI
GTC2026 CoreRabbit.
AWS SRD: Why AWS doesnt use infiniband
Calypso Submarine Cable: Interesting to visualize your global network infrastructure
TRAP: How to remember/learn
- Test: desirable difficulties. Testing helps to retain.
- Retain: reviewing timing (RemNote)
- Associate: with something you already know
- Perform: Use it, build.
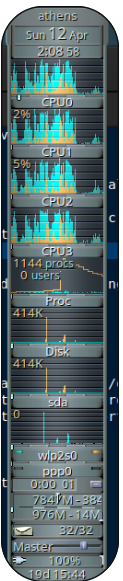
Linux SWAP: Because I have many open tabs, sometimes I kill my laptop, it is a bit old but I have 8GB RAM.
When Chrome spikes memory, the kernel may struggle to reclaim fast enough, leading to:
- Many processes waking → “procs” spike
- Heavy disk I/O → swap/page reclaim
- System stalls → direct reclaim + possible OOM pressure
As I use ZFS, the recomendation is not create extra SWAP in there. So create just 1G from my main volume:
Create logical volume:
sudo lvcreate -L 1G -n swap athens-vgFormat + enable:
sudo mkswap /dev/athens-vg/swap
sudo swapon /dev/athens-vg/swap
Persist:
echo '/dev/athens-vg/swap none swap sw 0 0' | sudo tee -a /etc/fstabresult:
# swapon --show
NAME       TYPE      SIZE USED PRIO
/dev/dm-2  partition 976M   0B   -1
/dev/zram0 partition 3.8G 2.7G  100
#
# lvs
  LV      VG        Attr       LSize   Pool Origin Data%  Meta%  Move Log Cpy%Sync Convert
  home    athens-vg -wi-ao----  22.00g
  root    athens-vg -wi-ao---- <27.94g
  storage athens-vg -wi-ao---- 186.00g
  swap_1  athens-vg -wi-ao---- 976.00m
#
I installed too earlyoom (this avoids full system lockups by killing memory hogs earlier) and zram-tools (use compressed RAM as swap)
root@athens:/boot# dpkg -l | grep zram
ii zram-tools 0.3.7-1 all utilities for working with zram
root@athens:/boot# dpkg -l | grep earlyoom
ii earlyoom 1.9.0-1 amd64 Early OOM Daemon
# systemctl status earlyoom
● earlyoom.service - Early OOM Daemon
     Loaded: loaded (/usr/lib/systemd/system/earlyoom.service; enabled; preset: enabled)
     Active: active (running) since Thu 2026-04-30 08:19:50 BST; 1 week 3 days ago
 Invocation: e3dc68822a604ac6befe12fa2f44b650
       Docs: man:earlyoom(1)
             https://github.com/rfjakob/earlyoom
   Main PID: 1176 (earlyoom)
      Tasks: 1 (limit: 10)
     Memory: 628K (max: 50M, available: 49.3M, peak: 3M)
        CPU: 10.274s
     CGroup: /system.slice/earlyoom.service
             └─1176 /usr/bin/earlyoom -r 3600

May 08 09:06:59 athens earlyoom[1176]: mem avail:  4112 of  6185 MiB (66.48%), swap free: 3678 of 4899 MiB (75.09>
May 08 10:06:59 athens earlyoom[1176]: mem avail:  3741 of  6029 MiB (62.06%), swap free: 3996 of 4899 MiB (81.57>
May 08 15:21:37 athens earlyoom[1176]: mem avail:  3821 of  6005 MiB (63.63%), swap free: 3546 of 4899 MiB (72.39>
May 08 22:52:18 athens earlyoom[1176]: mem avail:  3909 of  5998 MiB (65.17%), swap free: 3719 of 4899 MiB (75.92>
May 09 09:46:15 athens earlyoom[1176]: mem avail:  3855 of  6055 MiB (63.66%), swap free: 3994 of 4899 MiB (81.53>
May 09 17:39:36 athens earlyoom[1176]: mem avail:  3211 of  5856 MiB (54.83%), swap free: 4054 of 4899 MiB (82.75>
May 09 18:39:37 athens earlyoom[1176]: mem avail:  2400 of  5291 MiB (45.37%), swap free: 3890 of 4899 MiB (79.41>
May 09 21:15:33 athens earlyoom[1176]: mem avail:  1925 of  4791 MiB (40.18%), swap free: 4398 of 4899 MiB (89.79>
May 09 22:15:34 athens earlyoom[1176]: mem avail:  2899 of  6040 MiB (48.00%), swap free: 4074 of 4899 MiB (83.17>
May 10 09:00:46 athens earlyoom[1176]: mem avail:  2563 of  5991 MiB (42.79%), swap free: 4315 of 4899 MiB (88.08>
#
# sudo systemctl status zramswap
● zramswap.service - Linux zramswap setup
     Loaded: loaded (/usr/lib/systemd/system/zramswap.service; enabled; preset: enabled)
     Active: active (exited) since Thu 2026-04-30 08:19:50 BST; 1 week 3 days ago
 Invocation: 9f4e1a2534c8409292782da4512fbae9
       Docs: man:zramswap(8)
   Main PID: 1198 (code=exited, status=0/SUCCESS)
   Mem peak: 3.8M
        CPU: 58ms

Apr 30 08:19:50 athens systemd[1]: Starting zramswap.service - Linux zramswap setup...
Apr 30 08:19:50 athens zramswap[1248]: Setting up swapspace version 1, size = 3.8 GiB (4113920000 bytes)
Apr 30 08:19:50 athens zramswap[1248]: no label, UUID=0728b3a9-007b-4d71-8255-009f509bca63
Apr 30 08:19:50 athens systemd[1]: Finished zramswap.service - Linux zramswap setup.
#
# zramctl
NAME       ALGORITHM DISKSIZE   DATA  COMPR  TOTAL STREAMS MOUNTPOINT
/dev/zram0 lz4           3.8G 886.9M 264.6M 449.4M         [SWAP]
#
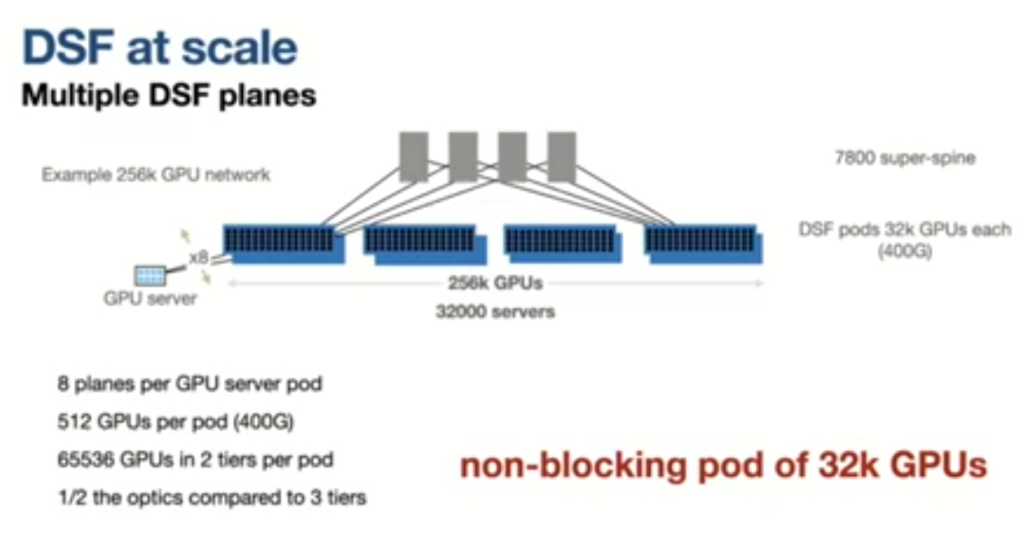
Scale-up vs Scale-out: Still keep forgetting the diff