Reading in a chat roon, somebody posted this. I thought this is so current, but realized it is from 1988 and from John Carpenter. In my mind he only filmed horror movies but this one looks like it has something else. Will watch it next week.
Author: flipaoXIX
3phase-PDU
This is a very interesting blog entry from Cloudflare about PDU deployments in DCs and the theory behind. Nowadays nearly everything is cloud oriented. But we forget they still need to be deployed physically. In a old job, going dense in physical setups, requires more power and 3-phase PDUs where a must. The blog is quite good explaining the reasons to move to 3-phase and the challenges to balance the power. When you buy “colo”, you buy space and power, and that is not cheap.
Kubernetes-Docker-ASICs
This week I read that kubernetes is going to stop support for Docker soon. I was quite surprised. I am not an expert so it seems they have legit reasons. But I haven’t read anything from the other side. I think it is going to be painful so I need to try that in my lab and see how to do that migration. It has to be nice to learn that.
In the other end, I read a blog entry about ASICs from Cloudflare. I think without getting too technical it is a good one. And I learn about the different type of ASICs from Juniper. In the last years, I have only used devices powered by Broadcom ASICs. One day, I would like to try that P4/Barefoot Tofino devices. And related to this, I remember this NANOG presentation about ASICs that is really good (and fun!).
Shortbread
This is a very tasty biscuit and very simple to make. Just three ingredients plus a pinch of salt: flour, sugar and butter. I tried a couple of weeks ago for the base of a cake and really liked the buttery flavour. This biscuits are supercheap so not sure how much real butter they have. Last week I tried this recipe and I failed miserably. So I decided to try again but using a video so I can be sure the dough has the expected texture. So I tried this video. And it was quite good!
Ingredients:
250g unsalted butter – room temperature
125g custer suggar
375g plain flour
pinch of salt
Process:
Mix everything in a bowl using your hands until getting a solid ball. Then you can spread with a rolling pin. I like thick, so a bit less than a finger. Then cut them in the shape you prefer. Use a fork to make some holes. Dust a big of sugar on top. Put in the fridge while preheat the oven at 175C. Once it is hot, put inside until slightly golden. Let them cool down in a rack. It is ok if they look soft.

This time they looked nice! Maybe I should have remove them a bit earlier from the oven.

To be honest, the taste wasn’t as buttery as the ones from the shop (the ingredients list wasnt 3…) but I am quite happy with them. Only 3 (basic) ingredients. Pretty quick to bake. And still had a dough ball in the fridge because my try was small. So you can have biscuits quickly next weekend.
Bash-Cookbook-P1
I have reading this book (1st edit – quite old) in the last months after breakfast. So I am taking some notes. I think they are things useful and I should use them. So try to write, understand, remember and use.
I am using bash 5.1.0(1)-rc3
$ bash --version
GNU bash, version 5.1.0(1)-rc3 (x86_64-pc-linux-gnu)
1- Quoting
Shell quoting: Enclose a string in single quotes unless it contains elements that you want the shell to interpolate
$ echo John has $100 note?!
John has 00 note?!
$ echo "John has $100 note?!"
John has 00 note?!
$ echo 'John has $100 note?!'
John has $100 note?!
You can’t embed a single quote inside single quotes even with a backslash. Nothing is interpolated inside single quotes. Workaround is using double quotes with escapes or, escaping a single quote outside of surrounding single quotes.
$ echo 'John doesn't have $100 notes'
^C
$
$ echo "John doesn't have $100 notes"
John doesn't have 00 notes
$
$ echo "John doesn't have \$100 notes"
John doesn't have $100 notes
$
$ echo 'John doesn'\''t have $100 notes'
John doesn't have $100 notes
$
2- Standard Output/Input
Redirect output from “ls”: It can be confusing when redirecting output from “ls” to a file and then read it as you dont see the expected format. Using “-C” you ensure the redirection will be based on “Colummns”. By default (-1), the output will be based on lines.
$ ls -ltr
total 92
-rw-r--r-- 1 tomas tomas 72533 Jul 27 2016 jabber.py
-rw-r--r-- 1 tomas tomas 16087 Jul 27 2016 anotify.py
drwxr-xr-x 2 tomas tomas 4096 Dec 10 2017 autoload
$ ls
anotify.py autoload jabber.py
$ ls > /tmp/test.txt
$ cat /tmp/test.txt    --> You would expect just one line like "ls"????
anotify.py
autoload
jabber.py
$
$ ls -C > /tmp/test2.txt
$ cat /tmp/test2.txt   --> Yes, this is the same output of standard "ls"
anotify.py autoload jabber.py
$ ls -C
anotify.py autoload jabber.py
$ ls -1
anotify.py
autoload
jabber.py
$
Redirect output and error to different files:
$ ls -ltr /boot/* > /tmp/test-out.txt 2> /tmp/test-err.txt
$
$ cat /tmp/test-out.txt
...
-rw-r--r-- 1 root root 73210069 Nov 28 11:10 /boot/initrd.img-5.9.0-1-amd64
-rw-r--r-- 1 root root 234724 Nov 28 11:10 /boot/config-5.9.0-1-amd64
/boot/grub:
total 2379
...
-rw-r--r-- 1 root root 2394102 Nov 14 18:12 unicode.pf2
-r--r--r-- 1 root root 8362 Nov 28 10:53 grub.cfg
$
$ cat /tmp/test-err.txt
ls: cannot open directory '/boot/efi': Permission denied
ls: cannot open directory '/boot/lost+found': Permission denied
$
Redirect output and error to same file, use “>&“. Other option is “$ program > outfile 2>&1“
$ ls -ltr /boot/* >& /tmp/test-both.txt
$
$ cat /tmp/test-both.txt
...
-rw-r--r-- 1 root root 73210069 Nov 28 11:10 /boot/initrd.img-5.9.0-1-amd64
-rw-r--r-- 1 root root 234724 Nov 28 11:10 /boot/config-5.9.0-1-amd64
ls: cannot open directory '/boot/efi': Permission denied
ls: cannot open directory '/boot/lost+found': Permission denied
/boot/grub:
total 2379
...
-rw-r--r-- 1 root root 2394102 Nov 14 18:12 unicode.pf2
-r--r--r-- 1 root root 8362 Nov 28 10:53 grub.cfg
$
$ ls -ltr /boot/* > /tmp/test3.txt
ls: cannot open directory '/boot/efi': Permission denied
ls: cannot open directory '/boot/lost+found': Permission denied
$
Grouping output from several commands: Use () for grouping them
:/tmp/aaa/bbb$ (ls -ltr; pwd; cd ..; ls -ltr; pwd) > /tmp/all.txt
:/tmp/aaa/bbb$
:/tmp/aaa/bbb$ cat /tmp/all.txt
total 0
-rw-r--r-- 1 tomas tomas 0 Nov 28 16:28 b.txt
/tmp/aaa/bbb
total 4
drwxr-xr-x 2 tomas tomas 4096 Nov 28 16:28 bbb
-rw-r--r-- 1 tomas tomas 0 Nov 28 16:28 aaa.txt
/tmp/aaa
:/tmp/aaa/bbb$
“tee“: read from standard input and write to standard output and files:
:/tmp/bbb$ ls -ltr
total 32
-rw-r--r-- 1 tomas tomas 30 Nov 28 15:29 test.txt
-rw-r--r-- 1 tomas tomas 32 Nov 28 15:30 test2.txt
-rw-r--r-- 1 tomas tomas 58 Nov 28 15:38 error.txt
-rw-r--r-- 1 tomas tomas 935 Nov 28 15:57 test-out.txt
-rw-r--r-- 1 tomas tomas 121 Nov 28 15:57 test-err.txt
-rw-r--r-- 1 tomas tomas 1056 Nov 28 15:59 test-both.txt
-rw-r--r-- 1 tomas tomas 935 Nov 28 16:00 test3.txt
-rw-r--r-- 1 tomas tomas 1 Nov 28 16:47 all.txt
-rw-r--r-- 1 tomas tomas 0 Nov 28 16:52 a.a
-rw-r--r-- 1 tomas tomas 0 Nov 28 16:52 a.aa
-rw-r--r-- 1 tomas tomas 0 Nov 28 16:52 a.aaa
:/tmp/bbb$
:/tmp/bbb$
:/tmp/bbb$ find . -name '*.txt'
./all.txt
./test.txt
./test3.txt
./test2.txt
./test-out.txt
./error.txt
./test-both.txt
./test-err.txt
:/tmp/bbb$
:/tmp/bbb$ find . -name '.txt' | tee /tmp/tee.txt
./all.txt
./test.txt
./test3.txt
./test2.txt
./test-out.txt
./error.txt
./test-both.txt
./test-err.txt
:/tmp/bbb$
:/tmp/bbb$ cat /tmp/tee.txt
./all.txt
./test.txt
./test3.txt
./test2.txt
./test-out.txt
./error.txt
./test-both.txt
./test-err.txt
:/tmp/bbb$
Here-Doc: use \EOF to turn off shell scripting features inside here-doc.
:/tmp/aaa$ bash here.txt bb
bb $2
:/tmp/aaa$ bash here.txt aa
aa $1
:/tmp/aaa$
:/tmp/aaa$ cat here.txt
here-doc example
grep $1 <<\EOF
name note
aa $1
bb $2
cc $3
EOF
:/tmp/aaa$
“$?”return non-zero if the last command fails.
:/tmp$ pwd
/tmp
:/tmp$ echo $?
0
“&&” run next program if the preceding program worked (logic and)
:/tmp$ ./test && date
bash: ./test: No such file or directory
:/tmp$
:/tmp$ pwd && date
/tmp
Sat 28 Nov 17:20:50 GMT 2020
:/tmp$
“||” (logic or)
:/tmp/aaa$ ./test || ( printf "%b" "Failed.\n")
bash: ./test: No such file or directory
Failed.
:/tmp/aaa$
nohup: run job in background and exit shell before finishing job.
$ nohup ./long-script &
for loop:
:/tmp/aaa$ for FILE in bbb/*
do
if [ -f $FILE ]
then
cat $FILE
fi
done
a file
b file
c file
:/tmp/aaa$ ls -ltr bbb/
total 12
-rw-r--r-- 1 tomas tomas 7 Nov 28 17:30 a.txt
-rw-r--r-- 1 tomas tomas 7 Nov 28 17:30 b.txt
-rw-r--r-- 1 tomas tomas 7 Nov 28 17:31 c.txt
Ribs
Ribs is something I tried for first time some years a go in a BBQ restaurant. I wanted to try for some time. So I checked these two videos: american version – spanish version.
I followed the American version mainly. I bought two rack of small pork ribs. Whatever my butcher had left.
First thing, I salt them as I was going to cook them the next day.
Pre-heat oven at 150C
Rib Rub: Salt, pepper, garlic powder, paprika. (for nex time, I need to add coffee)
BBQ Sauce: ketchup, mustard, sugar, soy sauce, apple vinegar, salt, garlic powder, paprika.
Dry the ribs with kitchen paper. Spread your rib rub thoroughly in the rack. Spread a bit of vinegar to give some moist. Wrap the ribs very tightly with aluminium foil.
Put the ribs in the oven at 150C for 2.5h – 3h.
The challenge here is to be sure if the ribs are cooked as you can’t see them. But the result was good:
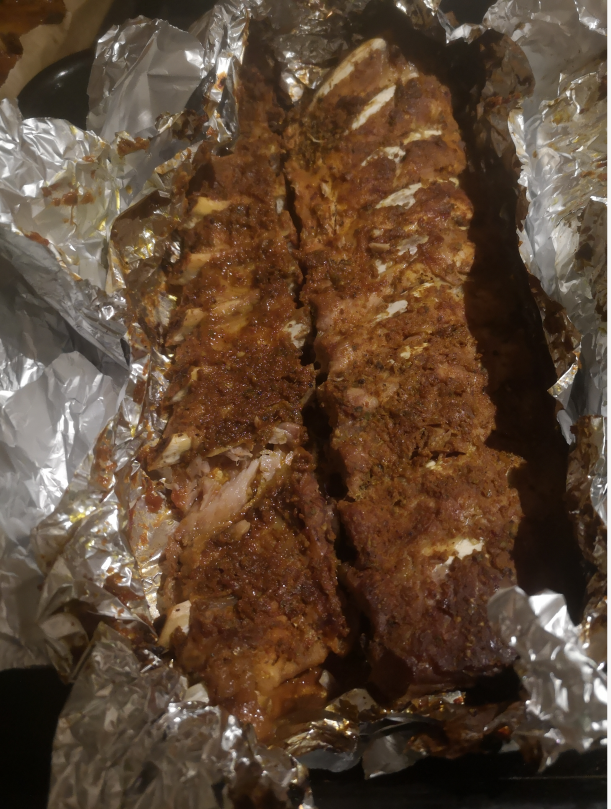
They looked tender! And there was sauce around so I think it is a good sign that they are not dry! And could pull a bone easily!
Now last part. Use a brash to spread your bbq sauce on the top and put then back in the oven at 200C for 10 minutes (or until the sauce is a bit dry)
Then you are ready!

It was really testy for the first time!
A couple of days later, I tried the second rack…. and the result wasnt that good. I put the ribs at 200C for nearly 3h.. they turned up dry 🙁
Well, that’s experience. But I am glad of trying!
Backup-Day
python-golang-p1
This week I had to update several spreadsheets…. again donkey job, again try to work smarter. So there was a pattern, and I knew I could copy/paste to the spreadsheet all changes (192 changes per file…). So decided to create a python script to generate the output I needed. It was just new hostnames for devices. So it wasnt really difficult. Although I had to search for basic stuff like how to make a for loop in python. That’s what happens when yo dont use thing often.
Anyway, I managed to get my basic python script. And I could copy paste the output to the spreadsheet just fine.
$ cat rename.py
for x in range(137,141):
    print("router-p1-r" + str(x) + "01")
    print("router-p1-r" + str(x) + "02")
    print("router-p1-r" + str(x) + "03")
    print()
$
$ python rename.py
router-p1-r13701
router-p1-r13702
router-p1-r13703

router-p1-r13801
router-p1-r13802
router-p1-r13803

router-p1-r13901
router-p1-r13902
router-p1-r13903

router-p1-r14001
router-p1-r14002
router-p1-r14003
But now, I have been trying to learn golang (even though I dont master python neither bash….) and I thought this was a basic stuff to try in golang too. So again, I had to search for basic stuff. How to create a range: link. How to concatenate a string and a integer: link.
So managed to get this and looks like it does the same job:
$ cat rename.go
package main

import "fmt"

func main() {
	for i := 137; i <= 141; i++ {
		fmt.Println(fmt.Sprint("router-p1-r", i, "01"))
		fmt.Println(fmt.Sprint("router-p1-r", i, "02"))
		fmt.Println(fmt.Sprint("router-p1-r", i, "03"))
		fmt.Println()
	}
}
$
$ go run rename.go
router-p1-r13701
router-p1-r13702
router-p1-r13703

router-p1-r13801
router-p1-r13802
router-p1-r13803

router-p1-r13901
router-p1-r13902
router-p1-r13903

router-p1-r14001
router-p1-r14002
router-p1-r14003

router-p1-r14101
router-p1-r14102
router-p1-r14103
So got the same result in both languages. Keep going!
sed
This week I have to update a couple of yaml files and add a line in too many places. This is the chance to work smarter. So I searched how to add a line after a match and I found this link. So let’s use sed:
$ cat test.yaml
bgp:
  bgp_as: 65000
  enable: true
  maximum_routes: 12000
  neighbors:
  - description: R1
    route_map_in: RM-IN
  - description: R2
    route_map_in: RM-IN
$
$ sed '/route_map_in: RM-IN/a route_map_out: RM-OUT' test.yaml
bgp:
  bgp_as: 65000
  enable: true
  maximum_routes: 12000
  neighbors:
  - description: R1
    route_map_in: RM-IN
route_map_out: RM-OUT
  - description: R2
    route_map_in: RM-IN
route_map_out: RM-OUT
But the I needed to add some spaces to be aligned properly… So I searched again and found this. Now try again adding the spaces we need using “\ ” for each one.
go:1.14.6|py:3.7.3|tomas@athens:~$ sed '/route_map_in: RM-IN/a \ \ \ \ route_map_out: RM-OUT' test.yaml
bgp:
  bgp_as: 65000
  enable: true
  maximum_routes: 12000
  neighbors:
  - description: R1
    route_map_in: RM-IN
    route_map_out: RM-OUT
  - description: R2
    route_map_in: RM-IN
    route_map_out: RM-OUT
So now redirect to a new file to fully check and then you can rename:
$ sed '/route_map_in: RM-IN/a \ \ \ \ route_map_out: RM-OUT' test.yaml > test.yaml.new
$ cat test.yaml.new
$ mv test.yaml.new test.yaml
Now it is perfect aligned. It is kernel hack, but I am happy enough and saved a lot of time copy/paste and errors for sure.
IronFit
I finished this book this week. I was interested how you can prepare for an IronMan or a normal triathlon. I like to have a training plan for different levels of commitment. And the planning for the race itself. I have learned some tips to improve in the three sports. At some point I would like to try a triathlon (I need to join a swim gym and get a heart meter). My only concern for a bigger challenge is the left knee. But, step by step.