History: URL and more

I had in my backlog a long post from Cloudflare about the history of URL. It actually contains much more info. So it is a really nice reading:

https://blog.cloudflare.com/the-history-of-the-url

There are many things that I didnt know but these two caught my attention:

The root DNS zone of the internet is composed of thirteen DNS server clusters. There are only 13 server clusters, because that’s all we can fit in a single UDP packet. Historically, DNS has operated through UDP packets, meaning the response to a request can never be more than 512 bytes.

I knew there were 13 root DNS cluster but I didnt think the reason why was the UDP packet size!

And from Punycode, interesting you can create emoji urls!

http://www.xn--vi8hiv.ws/

Linux network monitoring

I use gkrellm as my linux monitoring app. I have used it since I started but something I miss is I would like to know what app and destination IPs are causing a traffic spike in my laptop.

Searching a bit a come up with this page with several tools:

Based on my requirement, it seems I need two apps.

  • nethogs: For finding out the process triggering the traffic spike
  • pktstat: For finding out the IPs involved.

Now it is case of remembering the commands 🙂 But as far as I have tested. It seems they can do the job.

To cloud or not to cloud

This is nothing new. But I was reading an article about it and was a good refresh:

https://lwn.net/Articles/748106/

The article is a couple of years old but I think it is still relevant. Most people I know they have their infrastructure in the cloud. In my current job we are still based on bare metal due to the nature of our business but some years ago we were in that point when deciding what to do with our CI/CD environment. I wasnt involved in that decision (only in the deployment/implementation). Our capex was higher but long term (3y), it was cheaper to build in premise than in the cloud. I agree with the article that when you dont know how things are going to grow, scale requirements, etc cloud is the best choice. Once you ran pass the start-up phase, you should reconsider the position.

25519

Today I’ve received a copy of Serious Cryptography and jumped straight ahead to Chapter 12 talking about Elliptic Curves. I’m more or less aware of how RSA works, but was intruigued for a few years now about how criptography was able to achieve same security capabilities with more efficiency while dealing with less information.

Basically that is a different kind of beast based on the hard it is to retrieve the exponent from a discrete logarithm, instead of rely on the factorization of a number composed from two large primes as it is with RSA. As the size of the numbers are much lower with the same hardness to attack, the keys involved are also way smaller.

Elliptic Curve comes after the properties of the equation that the field of work is based, an equation of the curve of the type y^2=x^3 + ax + b where a and b are pre-cooked parameters that must be carefully chosen to avoid security risks.

In fact, there are two main curves used nowadays. One are a family of curves that the NIST approved, the most famous known as P-256, being the most commonly used in the industry, but also had some critisism because those a and b params in the equation were defined by the NSA and the generation is not completely publicly known. Therefore it could have potentially unknown pre-cooked attacks, althought based on the book, the general consensus by the experts is that there is no problem.

The second one is the curve generated by Daniel J. Bernstein that have pretty much the security of the NIST one and arguabilly a bit more of performance speed. It is called Curve25519 because the (discrete) field it works on is based on the prime number 2^255-19, having a=486662 and b=x .

ZFS Basic

A couple of weeks ago, at work, sysadmin guys were working on some ZFS issues. They were talking about ZIL and ARC, and I had no idea what was that.

I always wanted to run ZFS, so I think early 2019 I configured my laptop to use ZFS, not in the root partition but in a different partition. I had to configure my Debian Testing to support ZFS (I dont remember if it was very difficult) and then backup some data to make room for my new ZFS partition.

For ZFS basics, you can follow the link below but there are many good tutorial searching in your favourite engine:

In my case, it is a laptop, so I just have one pool that is based on my LV “storage”. I think this was the command I used:

#zpool create -o mountpoint=/home/username storage /dev/mapper/laptop--vg-storage

That would give me the following:

# zpool status
  pool: storage
 state: ONLINE
status: Some supported features are not enabled on the pool. The pool can
	still be used, but some features are unavailable.
action: Enable all features using 'zpool upgrade'. Once this is done,
	the pool may no longer be accessible by software that does not support
	the features. See zpool-features(5) for details.
  scan: scrub repaired 0B in 0 days 00:10:39 with 0 errors on Sun Jan 12 00:34:40 2020
config:

	NAME                  STATE     READ WRITE CKSUM
	storage               ONLINE       0     0     0
	  laptop--vg-storage  ONLINE       0     0     0

errors: No known data errors
# 

And that would be mounted where I requested

$ df -hT | grep zfs
storage        zfs       176G   73G  103G  42% /home/username/storage

This is too basic, in most cases your will want to have a kinf of RAID. But again, this is a simple laptop. As well, you can configure snapshots (useful if you want to have rollback a server upgrade that involves a huge amount of data) and other performance parameters (as per document below):

https://www.percona.com/live/17/sites/default/files/slides/pl17_ZFS_MySQL_Salesforce_0.pdf

So once you have your ZFS configured and mounted you can work with it as usual.

So back to the ZIL and ARC. Based on the links below:

https://www.zfsbuild.com/2010/04/15/explanation-of-arc-and-l2arc/
  • ZFS Intent Log, or ZIL, to buffer WRITE operations.
  • ARC and L2ARC which are meant for READ operations.

In my laptop, I dont have any space left to play with this, so I can only check in my employer systems.

TCP Thin-Stream Modifications

I have read the below article and I am going to give it a go in my laptop

https://www.simula.no/file/lj-219-jul-2012pdf/download

First, check the status of tcp thin:

# sysctl net.ipv4.tcp_thin_linear_timeouts
net.ipv4.tcp_thin_linear_timeouts = 0

I have realised that I dont have “/proc/sys/net/ipv4/tcp_thin_dupack” as the article mentions…

Ok, let update the value and be sure is still active after reboot.

Enable the value:

# echo "1" > /proc/sys/net/ipv4/tcp_thin_linear_timeouts
# sysctl net.ipv4.tcp_thin_linear_timeouts
net.ipv4.tcp_thin_linear_timeouts = 1

Make it permanent, edit /etc/sysctl.conf like this

# Based on https://www.simula.no/file/lj-219-jul-2012pdf/download
# enabling tcp thin-steam modifications for reducing latency in interactive apps
net.ipv4.tcp_thin_linear_timeouts = 1

Now it is time to test and see if you see any improvement or degradation!

Microarchitecture

This week attended a webinar from Alex Blewitt about CPU microarchiteture to increase application performance. The link was sent by a work colleague but you can get pdf and see the presentation from the below source:

https://www.infoq.com/presentations/microarchitecture-modern-cpu

The presentation is obviously very interesting. You need to know your CPU to get the most of it.

How can I see my CPU architecture? “lstopo” (graphic) or “lstopo-no-graphics” is your friend. This is from my laptop.

# lstopo-no-graphics
Machine (7934MB total)
Package L#0
NUMANode L#0 (P#0 7934MB)
L3 L#0 (4096KB)
L2 L#0 (256KB) + L1d L#0 (32KB) + L1i L#0 (32KB) + Core L#0
PU L#0 (P#0)
PU L#1 (P#2)
L2 L#1 (256KB) + L1d L#1 (32KB) + L1i L#1 (32KB) + Core L#1
PU L#2 (P#1)
PU L#3 (P#3)
HostBridge
PCI 00:02.0 (VGA)
PCIBridge
PCI 02:00.0 (Network)
Net "wlp2s0"
PCI 00:1f.2 (SATA)
Block(Disk) "sda"
Misc(MemoryModule)
Misc(MemoryModule)
#

As you can see, my humble laptop just have one NUMA node, with two cores/processors, and two hyperthreads per core.

But in a server, very likely you will have more NUMA nodes, more cores and more processors so you want to be sure that is used properly.

I am not expert in CPU performance at all but there many important points like memory allocation, huge pages, pinning memory/threads (isolcpu, taskset, etc), compiler strategies and tools to test the performance. Some of them ring the bell and it is nice to know that exist. You never know when you will have to dive in this type of water.

LVM 101 + Linux disk encryption

Once more post from Cloudflare. I think most Linux distributions already offer by default transparent disk encryption. As far as I can see in my Debian, I have encryption with LVM. I need to write a post about LVM as I have always to google most basic command. “Logic Volume Manager” (LVM) is an abstraction layer for managing storage (maybe too basic explanation but that is how I understand it). When I built my laptop, I had the option (I think it was by default) to choose LVM + encryption (dm_crypt module). So I took that.

So first, how I check my LVM? Well, df -h, will give the first clues

# df -hT
Filesystem Type Size Used Avail Use% Mounted on
udev devtmpfs 3.9G 0 3.9G 0% /dev
tmpfs tmpfs 794M 2.7M 791M 1% /run
/dev/mapper/laptop--vg-root ext4 24G 17G 6.3G 73% /
tmpfs tmpfs 3.9G 414M 3.5G 11% /dev/shm
tmpfs tmpfs 5.0M 8.0K 5.0M 1% /run/lock
tmpfs tmpfs 3.9G 0 3.9G 0% /sys/fs/cgroup
/dev/sda2 ext2 237M 155M 70M 69% /boot
/dev/sda1 vfat 496M 60M 437M 13% /boot/efi
/dev/mapper/laptop--vg-home ext4 20G 9.9G 8.7G 54% /home
tmpfs tmpfs 794M 24K 794M 1% /run/user/1000

You see thing with “/dev/mapper” and “vg” (volume group). So you have LVM running.

Some basic LVM notes:

# pvs –> it will show the physical disks, partitions, etc used in your LVM setup and the “vgs” they belong to. PVS stands for “physical volume system”. In my case only the partition sda3 from my physical disk is part of LVM. Physical volumes are used to create Volume groups.

# pvs
PV VG Fmt Attr PSize PFree
/dev/mapper/sda3_crypt laptop-vg lvm2 a-- 237.73g <2.62g

# vgs –> it will show you the volumes in your system, the number of PV they are using and the number of LV they are providing. VGS stands for “volume group system”. In my case, I have just one VG, that is use 1 PV and is providing 4 LV.

# vgs
VG #PV #LV #SN Attr VSize VFree
laptop-vg 1 4 0 wz--n- 237.73g <2.62g

#lvs –> it will show the “logical volumes” you have created from a VG. In my case, I have four LV.

# lvs
LV VG Attr LSize Pool Origin Data% Meta% Move Log Cpy%Sync Convert
home laptop-vg -wi-ao---- 22.00g
root laptop-vg -wi-ao---- 24.31g
storage laptop-vg -wi-ao---- 182.00g
swap_1 laptop-vg -wi-ao---- 6.80g

BTW, how I can see all the partitions in my machine, “fdisk -l”

root@athens:/boot# fdisk -l
Disk /dev/sda: 238.49 GaiB, 256060514304 bytes, 500118192 sectors
Disk model: NISU SSD ALLI
Units: sectors of 1 * 512 = 512 bytes
Sector size (logical/physical): 512 bytes / 512 bytes
I/O size (minimum/optimal): 512 bytes / 512 bytes
Disklabel type: gpt
Disk identifier: TRALARI-TRALARI-TRALARI-TRALARI
Device Start End Sectors Size Type
/dev/sda1 2048 1050623 1048576 512M EFI System
/dev/sda2 1050624 1550335 499712 244M Linux filesystem
/dev/sda3 1550336 500117503 498567168 237.8G Linux filesystem

So based on our “pvs” we know “dev/sda3” is part of LVM. How the encryption is happening? The type of partition will tell us

# blkid /dev/sda3
/dev/sda3: UUID="f6263aee-3966-4c23-a4ef-b4d9916f1a07" TYPE="crypto_LUKS" PARTUUID="b224eb49-1e71-4570-8b62-fb38df801170"
#

So, “crypto_LUKS” is key. Our LVM is running over a partition that is encrypted.

So after this detour, lets go back to Cloudflare post about Linux disk encryption.

I really enjoyed the kind of forensic work trying to discover when and why the changes in the Linux kernel code (!) were happening and how affected the speed. BTW, I crashed my laptop when trying to run their tests!

https://blog.cloudflare.com/speeding-up-linux-disk-encryption

Iptables Conntrack

I am subscribed to Cloudflare blog as they are in general really good. And definitely, you always learn something new (and want to cry because you have so much to learn from these guys).

This time was a dissection of conntrack in iptables to improve their firewall performance.

https://blog.cloudflare.com/conntrack-tales-one-thousand-and-one-flows

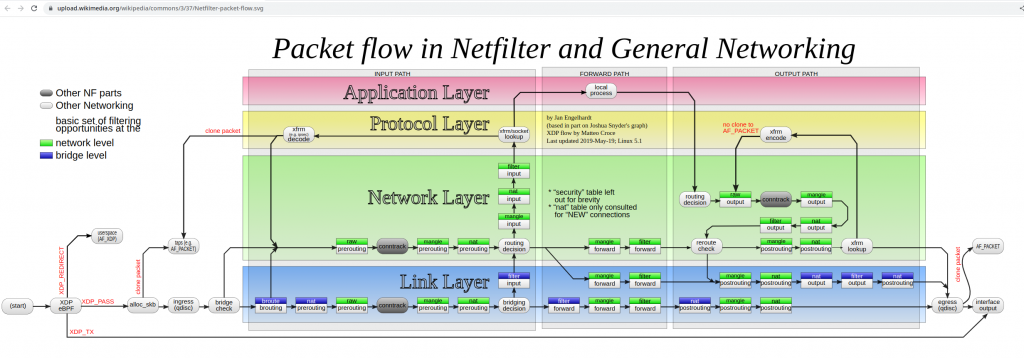
I never thought about the limits of the conntrack table and how important is to have in mind (or make a tattoo of) the iptables diagram:

Ensaladilla Rusa (Russian Salad)

This blog is mainly for “Today I learned…” (TIL). And that can be anything…. so don’t get surprised. It could be worse ™

“Ensaladilla Rusa” (Russian Salad) is a typical Spanish dish. I remember we had it nearly every week in summer time. With the hot weather, having something fresh, it was a bless. Like “gazpacho” 🙂

But I have never tried it on my own until last weekend. I love cooking (I dont consider myself a good cook though), it is relaxing and I regard it as a very important part of my upbringing and culture. I want to keep it and enjoy it! It has to be simple, humble, tasty, etc. Dont like fancy or over the top things.

So back to the track… You can find many recipes in google/youtube, it is like “Tortilla Española”, each home has its own. This is the one I tried and I liked the result:

Ingredients for the salad

  • 1kg potatoes
  • 500g of frozen vegetables mix (peas, carrots, corn, beans)
  • 1 can of tuna (or 2)
  • 4 boiled eggs (salt and vinegar in the water so the shell doesn’t break)
  • olives
  • grilled pepper

Ingredient for the mayonesse

  • 1 egg
  • salt
  • juice of 1/2 lemon (you will have to taste and maybe you dont need to use all of it)
  • 500ml oil (I mixed 250ml sunflower oil + 250ml virgin olive oil)

Process:

  • Boil the potatoes with enough water and salt (skin included). Be sure the potatoes are similar size so the go tender around the same time. Cut them if needed. They are ready when you can cross a knife through the potato without effort. This is not mash potatoes though 🙂 Let them cool down
  • I put the frozen salad in boiling water for 1-2 minutes so they became eatable again.
  • Boil the eggs with enough water (salt and vinegar). Around 10 minutes. Let cool down a bit under a bit of cold water. Then remove the shell (it shouldn’t be too difficult) and cut them in small cubes.
  • Peel the potatoes with your hand and cut them in little cubes (like the eggs)
  • In a glass try, mix the potatoes, vegetables, eggs and tuna. Let them cool in the fridge.
  • Once you get your mayonnaise, add it to the mix.
  • Optionally you can add some olives and decorate the top of the salad with slices of grilled peppers
  • Cool a bit in the fridge and ready to eat!

Mayonnaise Process:

  • Put in your hand mixer glass, the egg, salt, some lemon juice and a bit of oil to cover the mixer head.
  • Start mixing and it will become white. Then start adding the rest of oil bit a bit.
  • The mix shouldn’t be liquid neither solid. Something like heavier egg whites.
  • Taste it, very important. Add more salt? More lemon? Mine had a strong lemony flavour but remember you will add it to the salad.
  • Ready to use with the salad.