25519

Today I’ve received a copy of Serious Cryptography and jumped straight ahead to Chapter 12 talking about Elliptic Curves. I’m more or less aware of how RSA works, but was intruigued for a few years now about how criptography was able to achieve same security capabilities with more efficiency while dealing with less information.

Basically that is a different kind of beast based on the hard it is to retrieve the exponent from a discrete logarithm, instead of rely on the factorization of a number composed from two large primes as it is with RSA. As the size of the numbers are much lower with the same hardness to attack, the keys involved are also way smaller.

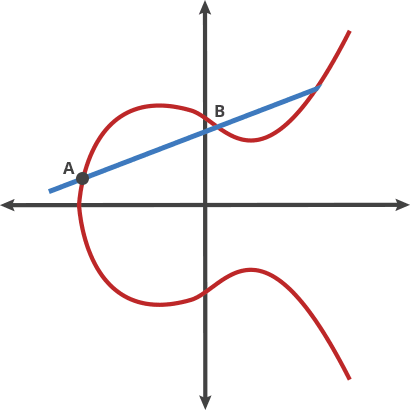
Elliptic Curve comes after the properties of the equation that the field of work is based, an equation of the curve of the type y^2=x^3 + ax + b where a and b are pre-cooked parameters that must be carefully chosen to avoid security risks.

In fact, there are two main curves used nowadays. One are a family of curves that the NIST approved, the most famous known as P-256, being the most commonly used in the industry, but also had some critisism because those a and b params in the equation were defined by the NSA and the generation is not completely publicly known. Therefore it could have potentially unknown pre-cooked attacks, althought based on the book, the general consensus by the experts is that there is no problem.

The second one is the curve generated by Daniel J. Bernstein that have pretty much the security of the NIST one and arguabilly a bit more of performance speed. It is called Curve25519 because the (discrete) field it works on is based on the prime number 2^255-19, having a=486662 and b=x .

ZFS Basic

A couple of weeks ago, at work, sysadmin guys were working on some ZFS issues. They were talking about ZIL and ARC, and I had no idea what was that.

I always wanted to run ZFS, so I think early 2019 I configured my laptop to use ZFS, not in the root partition but in a different partition. I had to configure my Debian Testing to support ZFS (I dont remember if it was very difficult) and then backup some data to make room for my new ZFS partition.

For ZFS basics, you can follow the link below but there are many good tutorial searching in your favourite engine:

In my case, it is a laptop, so I just have one pool that is based on my LV “storage”. I think this was the command I used:

#zpool create -o mountpoint=/home/username storage /dev/mapper/laptop--vg-storage

That would give me the following:

# zpool status
  pool: storage
 state: ONLINE
status: Some supported features are not enabled on the pool. The pool can
	still be used, but some features are unavailable.
action: Enable all features using 'zpool upgrade'. Once this is done,
	the pool may no longer be accessible by software that does not support
	the features. See zpool-features(5) for details.
  scan: scrub repaired 0B in 0 days 00:10:39 with 0 errors on Sun Jan 12 00:34:40 2020
config:

	NAME                  STATE     READ WRITE CKSUM
	storage               ONLINE       0     0     0
	  laptop--vg-storage  ONLINE       0     0     0

errors: No known data errors
# 

And that would be mounted where I requested

$ df -hT | grep zfs
storage        zfs       176G   73G  103G  42% /home/username/storage

This is too basic, in most cases your will want to have a kinf of RAID. But again, this is a simple laptop. As well, you can configure snapshots (useful if you want to have rollback a server upgrade that involves a huge amount of data) and other performance parameters (as per document below):

https://www.percona.com/live/17/sites/default/files/slides/pl17_ZFS_MySQL_Salesforce_0.pdf

So once you have your ZFS configured and mounted you can work with it as usual.

So back to the ZIL and ARC. Based on the links below:

https://www.zfsbuild.com/2010/04/15/explanation-of-arc-and-l2arc/
  • ZFS Intent Log, or ZIL, to buffer WRITE operations.
  • ARC and L2ARC which are meant for READ operations.

In my laptop, I dont have any space left to play with this, so I can only check in my employer systems.

TCP Thin-Stream Modifications

I have read the below article and I am going to give it a go in my laptop

https://www.simula.no/file/lj-219-jul-2012pdf/download

First, check the status of tcp thin:

# sysctl net.ipv4.tcp_thin_linear_timeouts
net.ipv4.tcp_thin_linear_timeouts = 0

I have realised that I dont have “/proc/sys/net/ipv4/tcp_thin_dupack” as the article mentions…

Ok, let update the value and be sure is still active after reboot.

Enable the value:

# echo "1" > /proc/sys/net/ipv4/tcp_thin_linear_timeouts
# sysctl net.ipv4.tcp_thin_linear_timeouts
net.ipv4.tcp_thin_linear_timeouts = 1

Make it permanent, edit /etc/sysctl.conf like this

# Based on https://www.simula.no/file/lj-219-jul-2012pdf/download
# enabling tcp thin-steam modifications for reducing latency in interactive apps
net.ipv4.tcp_thin_linear_timeouts = 1

Now it is time to test and see if you see any improvement or degradation!