Again, I am following the author post but adapting it to my environment using libvirt instead of VirtualBox and Debian10 as VM. All my data is here.
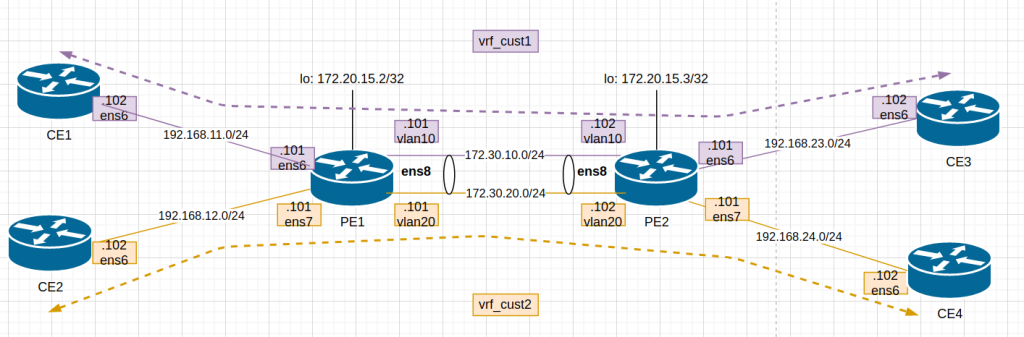
This is the diagram adapted to my lab:
After updating Vagrantfile and provisioning script, I “vagrant up”. The 6 VMs dont take long to boot up so it is a good thing.
The provisioning script is mainly for configuration of PE1 and PE2 . This is a bit more detail:
    # enabling ipv4 forwarding (routing)
    sudo sysctl net.ipv4.ip_forward=1

    # add loopback (not used in lab3)
    sudo ip addr add 172.20.5.$self/32 dev lo

    # removing ip in link between pe1-pe2 as we will setup a trunk with two vlans.
    sudo ip addr del 192.168.66.10$self/24 dev ens8

    # creating two vlans 10 (ce1,ce3) and 20 (ce2, ce4)
    sudo ip link add link ens8 name vlan10 type vlan id 10
    sudo ip link add link ens8 name vlan20 type vlan id 20

    # assign IP to each vlan
    sudo ip addr add 172.30.10.10$self/24 dev vlan10
    sudo ip addr add 172.30.20.10$self/24 dev vlan20

    # turn up each vlan as by default are down
    sudo ip link set vlan10 up
    sudo ip link set vlan20 up

    # create two routing tables with a null route
    sudo ip route add blackhole 0.0.0.0/0 table 10
    sudo ip route add blackhole 0.0.0.0/0 table 20

    # create two VRFs and assign one table (created above) to each one
    sudo ip link add name vrf_cust1 type vrf table 10
    sudo ip link add name vrf_cust2 type vrf table 20

    # assign interfaces to the VRFs            // ie. PE1:
    sudo ip link set ens6 master vrf_cust1     // interface to CE1
    sudo ip link set vlan10 master vrf_cust1   // interface to PE2-vlan10

    sudo ip link set ens7 master vrf_cust2     // interface to CE2
    sudo ip link set vlan20 master vrf_cust2   // interface to PE2-vlan20

    # turn up VRFs
    sudo ip link set vrf_cust1 up
    sudo ip link set vrf_cust2 up

    # add static route in each VRF routing table to reach the opposite CE
    sudo ip route add 192.168.$route1.0/24 via 172.30.10.10$neighbor table 10
    sudo ip route add 192.168.$route2.0/24 via 172.30.20.10$neighbor table 20
Check the status of the VRFs in PE1:
vagrant@PE1:/vagrant$ ip link show type vrf
 8: vrf_cust1:  mtu 65536 qdisc noqueue state UP mode DEFAULT group default qlen 1000
     link/ether c6:b8:f2:3b:53:ed brd ff:ff:ff:ff:ff:ff
 9: vrf_cust2:  mtu 65536 qdisc noqueue state UP mode DEFAULT group default qlen 1000
     link/ether 62:1c:1d:0a:68:3d brd ff:ff:ff:ff:ff:ff
 vagrant@PE1:/vagrant$
 vagrant@PE1:/vagrant$ ip link show vrf vrf_cust1
 3: ens6:  mtu 1500 qdisc pfifo_fast master vrf_cust1 state UP mode DEFAULT group default qlen 1000
     link/ether 52:54:00:6f:16:1e brd ff:ff:ff:ff:ff:ff
 6: vlan10@ens8:  mtu 1500 qdisc noqueue master vrf_cust1 state UP mode DEFAULT group default qlen 1000
     link/ether 52:54:00:33:ab:0b brd ff:ff:ff:ff:ff:ff
 vagrant@PE1:/vagrant$
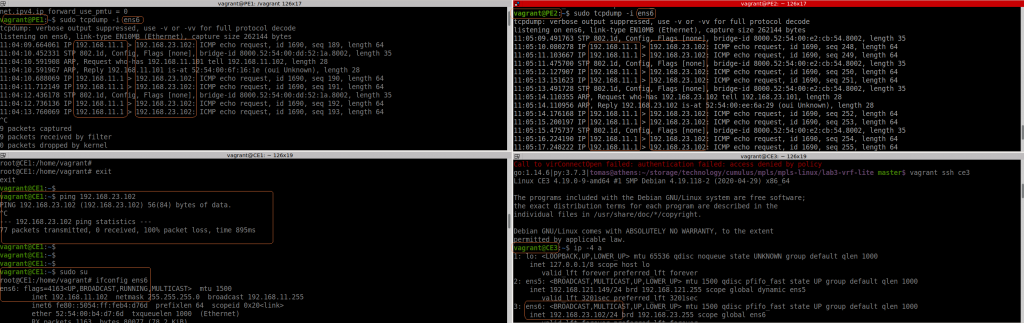
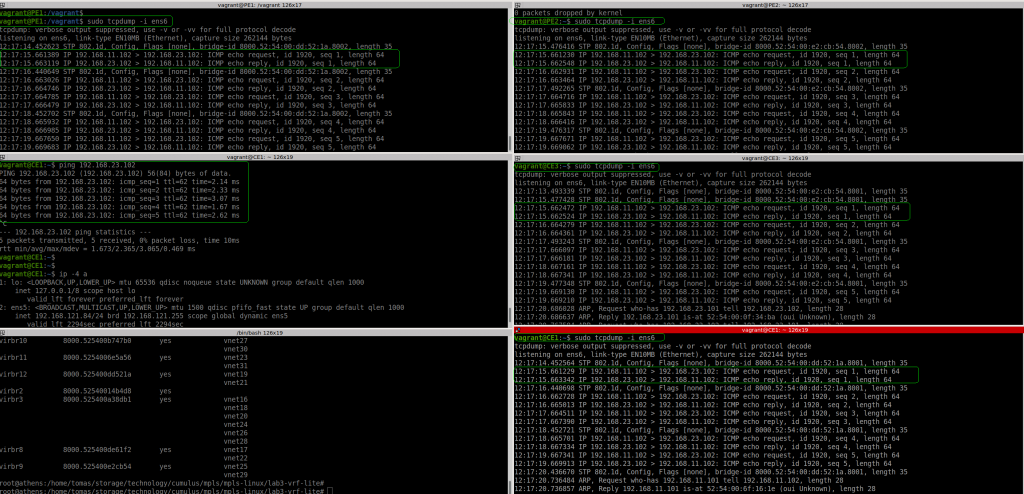
So let’s test if we can ping from CE1 to CE3:
Ok, if fails. I noticed that PE1 sees the packet from CE1… but the source IP is not the expected one (11.1 is the host/my laptop). And the packet reaches to PE2 with the same wrong source IP and then to CE3. In CE3 the ICMP reply is sent to 11.1, to it never reaches CE1.
The positive thing is that VRF lite seems to work.
I double checked all IPs, routing, etc. duplicated MAC in CE1 and my laptop maybe??? I installed “net-tools” to get “arp” command and check the arp table contents in CE1. Checking the ARP request in wireshark, all was good.
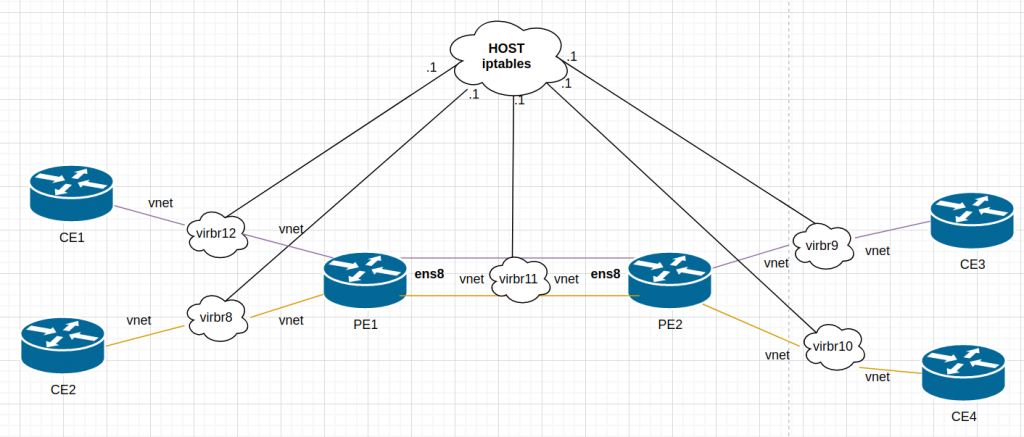
Somehow, the host was getting involved…. Keeping in mind that this is a simulated network, the host has access to all “links” in the lab. Libvirt creates a bridge (switch) for each link and it adds a vnet (port) for each VM that uses it:
“.1” is always the host but It was clear my routing was correct in all devices. I remembered that I had some issues during the summer when I was playing with containers/docker and doing some routing…. so I checked iptables….
I didnt have iptables in the VMs… but as stated earlier, the host is connected to all “links” used between the VMs. There is no real point-to-point link.
# iptables -t nat -vnL --line-numbers
...
Chain LIBVIRT_PRT (1 references)
num   pkts bytes target     prot opt in     out     source               destination
1       11   580 RETURN     all  --  *      *       192.168.11.0/24      224.0.0.0/24
2        0     0 RETURN     all  --  *      *       192.168.11.0/24      255.255.255.255
3        0     0 MASQUERADE  tcp  --  *      *       192.168.11.0/24     !192.168.11.0/24      masq ports: 1024-65535
4       40  7876 MASQUERADE  udp  --  *      *       192.168.11.0/24     !192.168.11.0/24      masq ports: 1024-65535
5       16  1344 MASQUERADE  all  --  *      *       192.168.11.0/24     !192.168.11.0/24
6       15   796 RETURN     all  --  *      *       192.168.24.0/24      224.0.0.0/24
7        0     0 RETURN     all  --  *      *       192.168.24.0/24      255.255.255.255
8        0     0 MASQUERADE  tcp  --  *      *       192.168.24.0/24     !192.168.24.0/24      masq ports: 1024-65535
9       49  9552 MASQUERADE  udp  --  *      *       192.168.24.0/24     !192.168.24.0/24      masq ports: 1024-65535
10       0     0 MASQUERADE  all  --  *      *       192.168.24.0/24     !192.168.24.0/24


# iptables-save -t nat
# Generated by iptables-save v1.8.7 on Sun Feb  7 12:06:09 2021
*nat
:PREROUTING ACCEPT [365:28580]
:INPUT ACCEPT [143:14556]
:OUTPUT ACCEPT [1617:160046]
:POSTROUTING ACCEPT [1390:101803]
:DOCKER - [0:0]
:LIBVIRT_PRT - [0:0]
-A PREROUTING -m addrtype --dst-type LOCAL -j DOCKER
-A OUTPUT ! -d 127.0.0.0/8 -m addrtype --dst-type LOCAL -j DOCKER
-A POSTROUTING -s 172.17.0.0/16 ! -o docker0 -j MASQUERADE
-A POSTROUTING -s 172.18.0.0/16 ! -o br-4bd17cfa19a8 -j MASQUERADE
-A POSTROUTING -s 172.19.0.0/16 ! -o br-43481af25965 -j MASQUERADE
-A POSTROUTING -j LIBVIRT_PRT
-A POSTROUTING -s 192.168.122.0/24 -d 224.0.0.0/24 -j RETURN
-A POSTROUTING -s 192.168.122.0/24 -d 255.255.255.255/32 -j RETURN
-A POSTROUTING -s 192.168.122.0/24 ! -d 192.168.122.0/24 -p tcp -j MASQUERADE --to-ports 1024-65535
-A POSTROUTING -s 192.168.122.0/24 ! -d 192.168.122.0/24 -p udp -j MASQUERADE --to-ports 1024-65535
-A POSTROUTING -s 192.168.122.0/24 ! -d 192.168.122.0/24 -j MASQUERADE
-A DOCKER -i docker0 -j RETURN
-A DOCKER -i br-4bd17cfa19a8 -j RETURN
-A DOCKER -i br-43481af25965 -j RETURN
-A LIBVIRT_PRT -s 192.168.11.0/24 -d 224.0.0.0/24 -j RETURN
-A LIBVIRT_PRT -s 192.168.11.0/24 -d 255.255.255.255/32 -j RETURN
-A LIBVIRT_PRT -s 192.168.11.0/24 ! -d 192.168.11.0/24 -p tcp -j MASQUERADE --to-ports 1024-65535
-A LIBVIRT_PRT -s 192.168.11.0/24 ! -d 192.168.11.0/24 -p udp -j MASQUERADE --to-ports 1024-65535
-A LIBVIRT_PRT -s 192.168.11.0/24 ! -d 192.168.11.0/24 -j MASQUERADE
-A LIBVIRT_PRT -s 192.168.24.0/24 -d 224.0.0.0/24 -j RETURN
-A LIBVIRT_PRT -s 192.168.24.0/24 -d 255.255.255.255/32 -j RETURN
-A LIBVIRT_PRT -s 192.168.24.0/24 ! -d 192.168.24.0/24 -p tcp -j MASQUERADE --to-ports 1024-65535
-A LIBVIRT_PRT -s 192.168.24.0/24 ! -d 192.168.24.0/24 -p udp -j MASQUERADE --to-ports 1024-65535
-A LIBVIRT_PRT -s 192.168.24.0/24 ! -d 192.168.24.0/24 -j MASQUERADE
Ok, it seems the traffic form 192.168.11.0 to 192.168.23.0 is NAT-ed (masquerade in iptables). So makes sense that I see the traffic as 11.1 in PE1. Let’s remove that:
Pasta bolognesa was my favourite dish as a kid. We had it I think once every week. Canelones was another big one but my mum didnt cook it that often as it was more time consuming assembling the canelones and preparing the white sauce.
Anyway, I wanted to try the spinach version so I found this recipe that looked nice. I used lasagna sheets cut in two for the canelones and worked nicely.
Ingredients for filling
12 lasagna sheets
250g frozen spinach (put in boiling water to unfreeze)
1 chopped onion
1 piece of garlic
1 boiled egg
20g of pine nuts
a bit of grated parmesan cheese (or similar hard cheese)
Ingredients for bechamel sauce:
2-3 big tsp of plain flour
25g of butter
nutmeg
salt and pepper
200ml milk
grated parmesan cheese
Process
Boil 1l water in a pan, with salt and a bit of olive oil. Once boiling, put lasagna sheet in 2-3 at each time. They should be ready in a couple of minutes (they should float). Remove and leave it rest.
In a sauce pan, heat some oil, add the onion and garlic. Until soft
Add the unfrozen spinach, keep stirring.
Add the pine nuts and the boiled egg (cut in small pieces). Salt and pepper.
Add a bit of cheese.
Retire from the heat.
In a saucepan, melt the butter, add the flour little by little until forming a paste.
Start adding the milk, again little by little stirring without stopping. This is at low-medium heat. Add nutmet, salt and pepper. Taste from time to time. Add the cheese at the end.
Once you have a sauce that is not very liquid neither thick, we are ready to assemble everything.
Pre-heat oven at 200C
Put some of the bechamel in the spinach mix and stir.
Prepare an oven dish. Put some butter or bechamel sauce in the dish to avoid stickiness.
Take the cold lasagne sheets, cut in two squares. In each square put a spoon of the spinach mix and roll like a canelone. Put in the oven dish in lines.
Once you the oven dish covered with canelones, pour the bechamel soauce on top of them. Add some grated cheese. I had some tomato sauce left over and I add it too.
Put the oven dish in the oven. 30m or until the top is grilled.
I read this book in 2019 about fermentation as I was already doing sourdough and wanted to learn more things. It is a great about anything related to fermentation. From there I started doing sauerkraut (still haven’t achieved the required results though). Another thing I wanted to try was kombucha, a fermented fizzy drink. I thought it was difficult to develop the scoby until I watched this video and learned that I can buy it! So I got my scobby and started the process:
2- Add two bags of black tea for 10 minutes, then remove the bags.
3- Let it cool down to room temperature
4- Add the mixture to a 1 litre jar, add the scoby with its liquid.
5- Cover the jar with a cloth and leave it somewhere warm for 5 days without direct sunlight (I put it under the sink)
6- Remove the scoby and 100ml of the mix into a small jar, keep it in the fridge for the next batch.
7- Put the rest of the mix into a airtight glass 1l bottle at room temperature for 3-7 days until fizzy. I put it under the sink again. You may release a bit of gas after a couple of days if you dont want to see the bottle explode when opening…
8- Put the bottle in the fridge, and afterwards you can enjoy a refreshing fizzy homemade drink!!!
It is a slow process but it is easy. In my first bottle, I was surprised because it was actually quite fizzy!!! The taste was a kind of cider, redbull , etc without the after taste of dead by sugar.
I am doing my second bottle and at some point I would like to add flavours, like ginger… I need to check if this is consider ginger beer. Although no idea if it generates any alcohol… (there is a fermentation process involved and breakdown of sugars….)
Happy with it, and hopefully adding to my routine.
I finished “Greenlights” and really enjoyed. I am not very keen of famous people as I think they are overrated but I had watched some motivational videos from Matthew McConaughey in youtube and decided to give it a go.
BTW, this is the best definition (minute 2) for trading you can find anywhere. After this you will not need to apply for a MBA.
It has been a very engaging read, the typical book that you wish it had more pages. It is about “livin” as they author writes. You see the experiences, problems, adventures of a human being. With all the lessons. It is like spending a whole night with a person you just met or a good friend, enjoying dinner, and a drink (or two) and a smoke (or two) and you open up totally, mutually: good, bad, worse, best things. Until sunrise. Intense but soothing .
When you dont have much social interactions, sometimes, you only source of “experience” apart from yours, it is a book. And I feel I learned from it.
I finished this book and to be honest it has been a bit of a “tostón”. I read it because was referenced from another book (I dont remember which right now) and I thought it should be interested.
The book starts in the Greece of Socrates/Plato times. Socrates didnt write anything and all his lessons/learning were oral. All we know come from Plato. So all teaching from Socrates was based on Memory. And obviously you had to memorize a lot and techniques to do that should exist (and of course were not written). The idea was to find a building and create a history from its features. Kind of mnemotechnics. As well, we have Aristotle.
I have been always more keen to understand things than memorize but there are cases where you have to memorize and the rules has been always repetition and brute force. But in some few cases, I have learned to use mnemotechnics and I dont know why this technique is not taught more often. I will always remember EIGRP parameters (bad dog loves red meat – b d l r m – bandwidth delay load reliability mtu) and BGP best path decision process (NWILLA OMNI – I have in my mind the spanish footballer David Villa playing in Africa)
So until that point the books was good as a history refresh.
Then we moved to the Middle Ages with St Thomas Aquinas, St Albert Magnus as next figures in the art of memory using the old Greek master. I always remember St Thomas Aquinas as the person who converted Aristotle writings to Catholic views. And St Augustine, who converted Socrates/Plato to Catholic. So the Church in those times could cope with the new threat of people using their brains. Here things get messy in the book and start losing track. Things looks a bit esoteric, magical, the ocult.
And when we reach Ramon Llull, I feel quite lost. The book start talking about Cabala and some other things. I had some reference from RL before (it is the main university in Majorca and wrote in catalan) but nor much more.
Moving forwards to the Renaissance, I hit two figures totally unknown to me: Giulio Camillo and Giordano Bruno. The first one, built a theater for the King of France as an example of memorizing the universe. And Giordano write several books about the art of memory that look quite complex due to esotericism, occultism, magic and references to Egyptian religions, etct.
In the last part we reach the Shakespeare times and the architecture of the Globe theatre as example of art of memory. Big debate if it is a circle or hexagon originally.
And finally, Leibniz, that refers to Ramon Llull as one of his references to create a common language that turned up to be Calculus.
It is like all this occultism, turned up as just Mathematics. In other references to Newton, he tried to convert lead into gold, and tried a lot of crazy stuff. So it looks like it makes sense that the begining of the science we know today was pretty much connected to esotericism, hermetic, occultism, etc.
I checked the author, Frances Yates and it seem she focused on esotericism.
Anyway, I tried to take positive things, mainly historic. And I learned from “new historical figures”.
Continuation of the first part, this time we want to establish dynamic LSP, so we will use LDP for label exchange and ISIS as IGP.
Again, I am following the author post but adapting it to my environment. The latest stable FRR is 7.5. All my data is here.
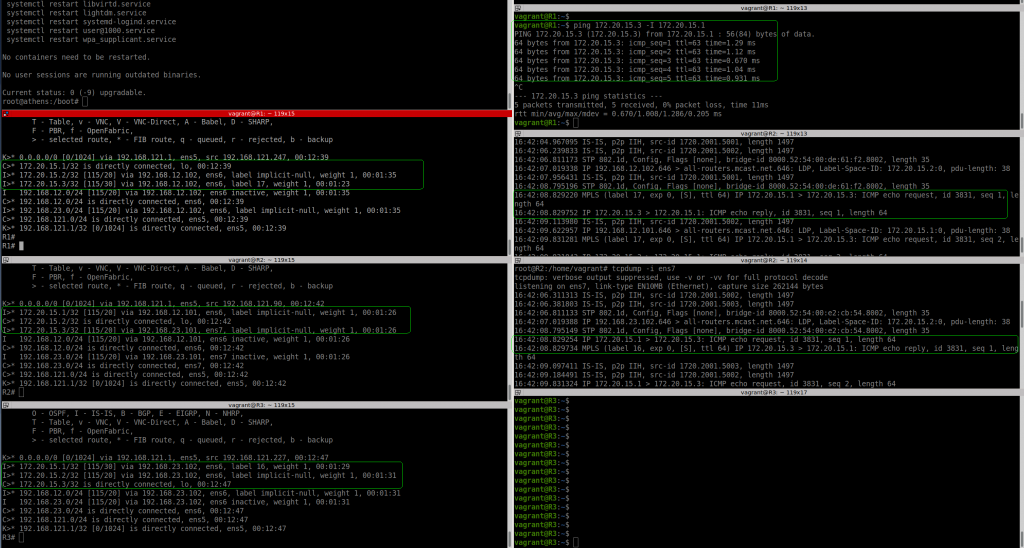
So once the routers R1, R2 and R3 are configured and FRR is reload (very important, restart doesnt do the trick). ISIS and LDP will come up, you need just need to be a bit patience.
Checking on R2, we can see ISIS and LDP established to R1 and R3 respectively. So this is a very good sign.
R2# show isis neighbor
 Area ISIS:
   System Id           Interface   L  State        Holdtime SNPA
   R1                  ens6        2  Up            30       2020.2020.2020
   R3                  ens7        2  Up            28       2020.2020.2020
 R2#
 R2# show mpls ldp neighbor
 AF   ID              State       Remote Address    Uptime
 ipv4 172.20.15.1     OPERATIONAL 172.20.15.1     00:27:44
 ipv4 172.20.15.3     OPERATIONAL 172.20.15.3     00:27:47
 R2#
Let’s check the routing table is programmed as expected. R2 is learning R1 and R3 loopbacks via ISIS and it reachable via MPLS (using implicit-null because R2 is doing Penultimate Hop Popping – PHP) based on the LDP bindings.
R2# show ip route
 Codes: K - kernel route, C - connected, S - static, R - RIP,
        O - OSPF, I - IS-IS, B - BGP, E - EIGRP, N - NHRP,
        T - Table, v - VNC, V - VNC-Direct, A - Babel, D - SHARP,
        F - PBR, f - OpenFabric,
        > - selected route, * - FIB route, q - queued, r - rejected, b - backup
 K>* 0.0.0.0/0 [0/1024] via 192.168.121.1, ens5, src 192.168.121.90, 00:12:42
 I>* 172.20.15.1/32 [115/20] via 192.168.12.101, ens6, label implicit-null, weight 1, 00:01:26
 C>* 172.20.15.2/32 is directly connected, lo, 00:12:42
 I>* 172.20.15.3/32 [115/20] via 192.168.23.101, ens7, label implicit-null, weight 1, 00:01:26
 I   192.168.12.0/24 [115/20] via 192.168.12.101, ens6 inactive, weight 1, 00:01:26
 C>* 192.168.12.0/24 is directly connected, ens6, 00:12:42
 I   192.168.23.0/24 [115/20] via 192.168.23.101, ens7 inactive, weight 1, 00:01:26
 C>* 192.168.23.0/24 is directly connected, ens7, 00:12:42
 C>* 192.168.121.0/24 is directly connected, ens5, 00:12:42
 K>* 192.168.121.1/32 [0/1024] is directly connected, ens5, 00:12:42
 R2#
R2# show mpls ldp binding
 AF   Destination          Nexthop         Local Label Remote Label  In Use
 ipv4 172.20.15.1/32       172.20.15.1     16          imp-null         yes
 ipv4 172.20.15.1/32       172.20.15.3     16          18                no
 ipv4 172.20.15.2/32       172.20.15.1     imp-null    16                no
 ipv4 172.20.15.2/32       172.20.15.3     imp-null    16                no
 ipv4 172.20.15.3/32       172.20.15.1     17          18                no
 ipv4 172.20.15.3/32       172.20.15.3     17          imp-null         yes
 ipv4 192.168.12.0/24      172.20.15.1     imp-null    imp-null          no
 ipv4 192.168.12.0/24      172.20.15.3     imp-null    17                no
 ipv4 192.168.23.0/24      172.20.15.1     imp-null    17                no
 ipv4 192.168.23.0/24      172.20.15.3     imp-null    imp-null          no
 ipv4 192.168.121.0/24     172.20.15.1     imp-null    imp-null          no
 ipv4 192.168.121.0/24     172.20.15.3     imp-null    imp-null          no
 R2#
Now, let’s do the ping test and see if MPLS is actually used.
I can see clearly on the left hand side, that R2-ens6 (link to R1) is receiving the ICMP request as MPLS packet (label 17) and the ICMP reply is sent back to R1 without label (as expected by PHP). In R2-ens7 (link to R3) we see R2 sending the ICMP request without label (again expected due to PHP) and the ICMP reply from R3 is arriving with label 16 to R2.
I have to say that I had to try twice until things got working as expected. In my first attempt, somehow, R1 was not sending ICMP request to R2 encapsulated as MPLS packet, somehow the routing table was still programmed for only ISIS. Although ISIS, LDP and LDP bindings were correc.t
NOTES:
1- vagrant-nfs: I was thinking how to connect the VMs with my laptop for sharing files easily. It seems that by default the folder which is holding your Vagrant file is automatically exported in NFS in /vagrant in the VMs. Super handy. Just in case, a bit of documentation. My vagrant version is 2.2.14.
2- For loading the FRR config, I had to “lowercase” the VM hostname to match the FRR config file. Based on this link, it is quite easy. “${X,,}”
In November 2020, I got an email from the FRR email list about using MPLS with FRR. And the answer that you could do already natively (and easily) MPLS in Linux dumbfound me. So I add in my to-do list, try MPLS in Linux as per the blog. So all credits to the author, that’s a great job.
So reading the blog, I learned that the kernel supported MPLS since 4.3 (I am using 5.10) and creating VRF support was challenging until Cumulus did it. Thanks! So since April 2017 there is full support for L3VPNs in Linux… I’m getting a bit late in the wagon.
Anyway, I want to test myself and see if I can make it work. I downloaded the repo from the author to start working on it.
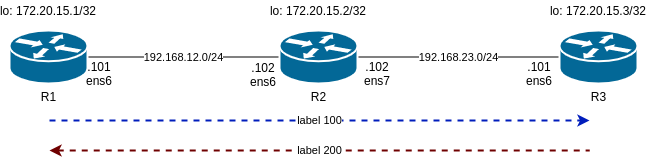
So I am following the same steps as him and will start with a lab consisting of static LSP. This is the diagram:
Main differences in my lab are:
1- I use libvirt instead of VirtualBox
2- I am using debian10 buster64 as VM
This affect the Vagrant file and the script to configure the static LSP. The libvirt_ commands I am using in Vagrantfile are ignored as I am not able to name the interfaces as I want. As well, I had to change the IP addressing as I had collisions with .1. And debian/buster64 has specific interfaces names that I have to use.
So, now we can turn up the lab.
/mpls-linux/lab1-static-lsps$ vagrant up
 Bringing machine 'r1' up with 'libvirt' provider…
 Bringing machine 'r2' up with 'libvirt' provider…
 Bringing machine 'r3' up with 'libvirt' provider…
 ==> r2: Checking if box 'debian/buster64' version '10.4.0' is up to date…
 ==> r3: Checking if box 'debian/buster64' version '10.4.0' is up to date…
 ==> r1: Checking if box 'debian/buster64' version '10.4.0' is up to date…
 ==> r1: Creating image (snapshot of base box volume).
 ==> r2: Creating image (snapshot of base box volume).
 ==> r3: Creating image (snapshot of base box volume).
 ==> r2: Creating domain with the following settings…
 ==> r1: Creating domain with the following settings…
...
/mpls-linux/lab1-static-lsps master$ vagrant status
 Current machine states:
 r1                        running (libvirt)
 r2                        running (libvirt)
 r3                        running (libvirt)
So we can check R1. One important detail here, is how we can defined a static route to reach R3 loopback and it is encapsulated in MPLS with label 100.
/mpls-linux/lab1-static-lsps$ vagrant ssh r1
...
vagrant@R1:~$ lsmod | grep mpls
 mpls_iptunnel          16384  1
 mpls_router            36864  1 mpls_iptunnel
 ip_tunnel              24576  1 mpls_router
 vagrant@R1:~$
 vagrant@R1:~$ ip route
 default via 192.168.121.1 dev ens5 proto dhcp src 192.168.121.124 metric 1024
 172.20.15.3  encap mpls  100 via 192.168.12.102 dev ens6
 192.168.12.0/24 dev ens6 proto kernel scope link src 192.168.12.101
 192.168.121.0/24 dev ens5 proto kernel scope link src 192.168.121.124
 192.168.121.1 dev ens5 proto dhcp scope link src 192.168.121.124 metric 1024
 vagrant@R1:~$
 vagrant@R1:~$ ip -4 a
 1: lo:  mtu 65536 qdisc noqueue state UNKNOWN group default qlen 1000
     inet 127.0.0.1/8 scope host lo
        valid_lft forever preferred_lft forever
     inet 172.20.15.1/32 scope global lo
        valid_lft forever preferred_lft forever
 2: ens5:  mtu 1500 qdisc pfifo_fast state UP group default qlen 1000
     inet 192.168.121.124/24 brd 192.168.121.255 scope global dynamic ens5
        valid_lft 3204sec preferred_lft 3204sec
 3: ens6:  mtu 1500 qdisc pfifo_fast state UP group default qlen 1000
     inet 192.168.12.101/24 brd 192.168.12.255 scope global ens6
        valid_lft forever preferred_lft forever
 vagrant@R1:~$
Now check R2 as it is our P router between R1 and R3 as per diagram. Important bit here is “ip -M route show”. This shows the MPLS routing label that is based in labels. In the standard “ip route” you dont seen any reference to MPLS.
vagrant@R2:~$ ip -4 a
 1: lo:  mtu 65536 qdisc noqueue state UNKNOWN group default qlen 1000
     inet 127.0.0.1/8 scope host lo
        valid_lft forever preferred_lft forever
     inet 172.20.15.2/32 scope global lo
        valid_lft forever preferred_lft forever
 2: ens5:  mtu 1500 qdisc pfifo_fast state UP group default qlen 1000
     inet 192.168.121.103/24 brd 192.168.121.255 scope global dynamic ens5
        valid_lft 2413sec preferred_lft 2413sec
 3: ens6:  mtu 1500 qdisc pfifo_fast state UP group default qlen 1000
     inet 192.168.12.102/24 brd 192.168.12.255 scope global ens6
        valid_lft forever preferred_lft forever
 4: ens7:  mtu 1500 qdisc pfifo_fast state UP group default qlen 1000
     inet 192.168.23.102/24 brd 192.168.23.255 scope global ens7
        valid_lft forever preferred_lft forever
 vagrant@R2:~$ ip route
 default via 192.168.121.1 dev ens5 proto dhcp src 192.168.121.103 metric 1024
 192.168.12.0/24 dev ens6 proto kernel scope link src 192.168.12.102
 192.168.23.0/24 dev ens7 proto kernel scope link src 192.168.23.102
 192.168.121.0/24 dev ens5 proto kernel scope link src 192.168.121.103
 192.168.121.1 dev ens5 proto dhcp scope link src 192.168.121.103 metric 1024
 vagrant@R2:~$
 vagrant@R2:~$ lsmod | grep mpls
 mpls_router            36864  0
 ip_tunnel              24576  1 mpls_router
 vagrant@R2:~$
 vagrant@R2:~$ ip -M route show
 100 via inet 192.168.23.101 dev ens7
 200 via inet 192.168.12.101 dev ens6
 vagrant@R2:~$
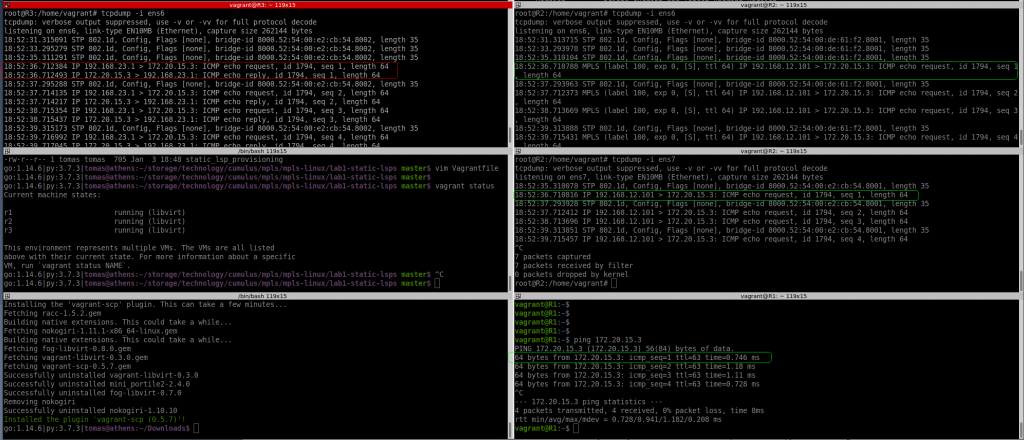
So let’s see if pinging the loopback in R1 and R3 gets labelled traffic:
I can see the labelled packet from R1 to R2 with label 100 as expected, but I dont see any “echo reply”…..
But ping is successful based on R1:
vagrant@R1:~$ ping 172.20.15.3
 PING 172.20.15.3 (172.20.15.3) 56(84) bytes of data.
 64 bytes from 172.20.15.3: icmp_seq=1 ttl=63 time=0.746 ms
 64 bytes from 172.20.15.3: icmp_seq=2 ttl=63 time=1.18 ms
 64 bytes from 172.20.15.3: icmp_seq=3 ttl=63 time=1.11 ms
 64 bytes from 172.20.15.3: icmp_seq=4 ttl=63 time=0.728 ms
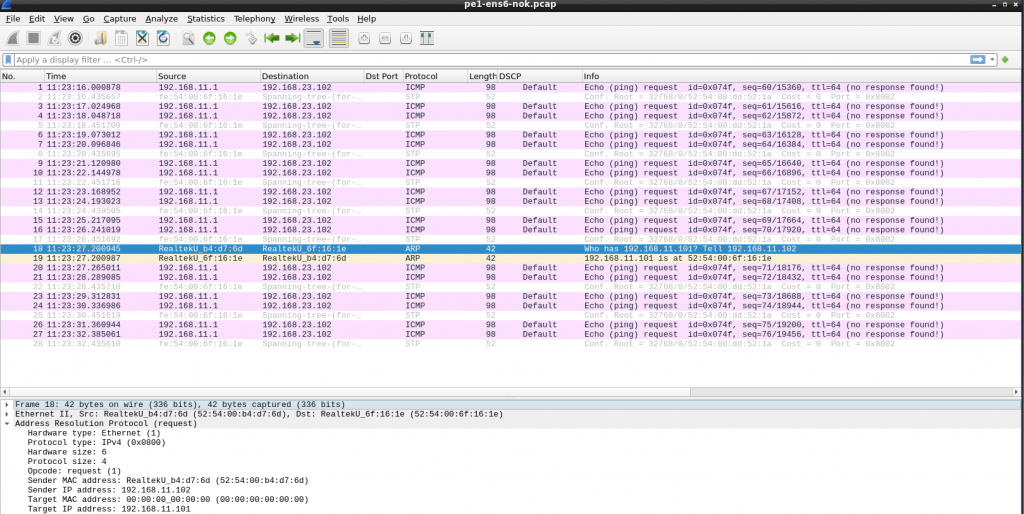
Something is wrong. As per pic below, with tcpdump in all interfaces, R3 is seeing the echo request from a different source (not R1).
And if I ping using R1 loopback, I can’t see anything leaving R1 ens6 interface.
vagrant@R1:~$ ping 172.20.15.3 -I lo
 PING 172.20.15.3 (172.20.15.3) from 172.20.15.1 lo: 56(84) bytes of data.
 ^C
 --- 172.20.15.3 ping statistics ---
 25 packets transmitted, 0 received, 100% packet loss, time 576ms
Based on the original blog post, this should work. The main difference here is I am using libvirt. Need to carry on investigating
This is my IP config, 23.1 is my laptop:
9: virbr3:  mtu 1500 qdisc noqueue state UP group default qlen 1000
     inet 192.168.121.1/24 brd 192.168.121.255 scope global virbr3
        valid_lft forever preferred_lft forever
 10: virbr8:  mtu 1500 qdisc noqueue state UP group default qlen 1000
     inet 192.168.12.1/24 brd 192.168.12.255 scope global virbr8
        valid_lft forever preferred_lft forever
 11: virbr9:  mtu 1500 qdisc noqueue state UP group default qlen 1000
     inet 192.168.23.1/24 brd 192.168.23.255 scope global virbr9
        valid_lft forever preferred_lft forever
How to ssh to a vagrant box without using “vagran ssh”: link
# save the config to a file
vagrant ssh-config > vagrant-ssh

# run ssh with the file
ssh -F vagrant-ssh default

# update your .gitignore for not tracking this file!!!!
Ok, I have tried again. I rebooted my laptop, rebuilt the VMs, etc. And now it works
9: virbr3:  mtu 1500 qdisc noqueue state UP group default qlen 1000
     inet 192.168.121.1/24 brd 192.168.121.255 scope global virbr3
        valid_lft forever preferred_lft forever
 10: virbr8:  mtu 1500 qdisc noqueue state UP group default qlen 1000
     inet 192.168.12.1/24 brd 192.168.12.255 scope global virbr8
        valid_lft forever preferred_lft forever
 11: virbr9:  mtu 1500 qdisc noqueue state UP group default qlen 1000
     inet 192.168.23.1/24 brd 192.168.23.255 scope global virbr9
        valid_lft forever preferred_lft forever
 root@athens:/boot# uname -a
 Linux athens 5.9.0-5-amd64 #1 SMP Debian 5.9.15-1 (2020-12-17) x86_64 GNU/Linux
 root@athens:/boot#
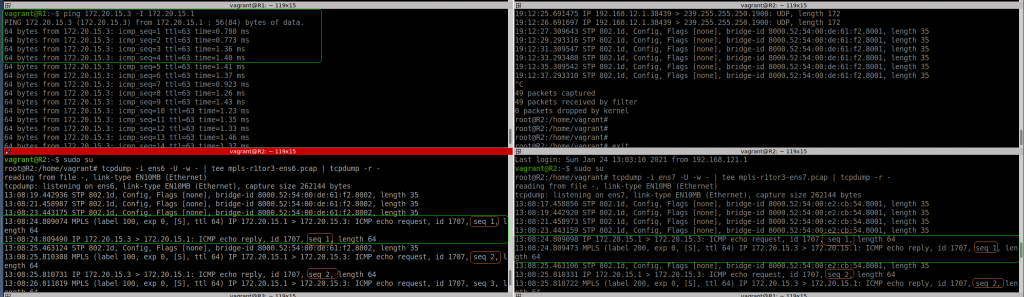
I can see now clearly, how the ICMP request packet is encapsulated with MPLS tag 100 from R1 to R2 (ens6 interface), then the label is popped in R2, and you can see the same ICMP request leaving R2 via ens7 to R3.
Then the ICMP reply is encapsulated with MPLS tag 200 in R3 to R2 (ens7) and again, the labels is popped in R2, and you see the packet again from R2 (ens6) to R1.
So this test is successful at the end although not sure what I have been doing wrong before.
It is never too late. I have never tried “Roscon de Reyes” before. But this year (although over a week later) I wanted to make it as it is the only thing I miss from (my child time) Christmas (Sorry Santa, you dont belong to my culture)
580g Strong white flour (I guess you can use plain too)
180 ml milk (I use semi-skim)
100g sugar
2 egg
7g instant yeast (1 sacket – I can’t get fresh yeast)
80g butter (room temperature)
zest of 1 orange
zest of 1 lemon
pinch of salt
1 tsp of vanilla paste (I dont have “agua de azahar”)
Decoration:
Cherry glacier
Italian mixed peel (orange and lemon glacier peel)
almond flakes
Egg wash
Ingredients for the filling / cream:
500ml of double cream (cold from the fridge)
50g sugar
20ml milk
Process:
In a bowl, put the flour, sugar, yest, zest of lemon, zest of orange, pinch of salt, vanilla paste. Mix everything.
Make a whole in the middle, add the milk, eggs. Mix everything until nearly combine. Finally the butter. Mix again, you will reach a point it is not possible in the bowl.
Put the dough in a work surface. Start knelling a bit. Once your hands are quite sticky with the dough. Stop for a couple of minutes while you scrap the dough from your hands into the main ball. Start knelling again, it should be much easier now and you should get a soft dough after 5-7 minutes.
Put a couple of oil drops in the bowl and spread it so we are going to put the dough in it. Cover with plastic film and let it rest until double in size. It can be over a couple of hours as it is winter.
Once the dough is double in size, remove it from the bowl. Remove the air bubbles knelling a bit, let it rest of a couple of minutes in the bowl.
Take the dough and make a whole in the middle. Spin the dough so you create a “wheel”. Put it in a try with baking paper. Let it rest until double in size again (this time will be quicker)
Now, start preparing the filling. Put in a bowl the double cream, sugar and milk. I used a hand blender and it was perfectly fine. The cream became solid quite quickly to be honest. Give it a taste, you can add more sugar if you want. Let it rest in the fridge.
Once the ring-dough has double up. Pre-heat the oven at 180C. Egg wash the dough very well, this will make it golden. Then add as much Italian mixed peel, glacier cherries and almond flakes as you can. The egg should help to stick it.
Once the oven is hot. Put the “roscon” in until golden. My case was nearly 30 minutes.
Once it is golden, remove from the oven. Check with a tooth stick that is cook inside. Let it cool down properly. With a bread knife, cut it in two slices. Be careful dont break the top, put it aside. Now spread all your cream / “nata” in the base. Put back the top over the cream. And that’s it.
It brought me very good memories (and it is tasty!!!)
After learning about kubernetes from kodekloud. I want to take a look at Terraform.
These are my notes that I am taking along the course.
1- Intro:
A- config mgmt: ansible, puppet, saltstack
Design to install and manage sw
B- Server Templating: docker, packer, vagrant.
Pre install sw and dependencies
vm or docker images
immutable infra
C- Provision tools: terraform, cloudformation
deploy immutable infra resources
servers, dbs, net components
multiple providers.
Terraform is available in AWS, GCP, Azure and physical machines. Multiple providers like cloudflare, paloalto, dns, infoblox, grafana, influxdb, mongodb, etc
It uses a declarative code HCL = HashiCorp Config Language: *.tf
Phases: Init, plan and apply.
2- Install and Basics
I am going to use my laptop initially, so I will follow the official instructions using a precompiled binary. So download the zip file (terraform_0.14.3_linux_amd64.zip), unzip and move the binary somewhere active in your path. I decided to use /usr/bin and install autocompletion.
/terraform/test1$ which terraform
 /usr/bin/terraform

/terraform/test1$ terraform version
 Terraform v0.14.3
 provider registry.terraform.io/hashicorp/local v2.0.0

/terraform/test1$ terraform -install-autocomplete
// This one use the resource "local_file". We call it "hello". It creates a file with specific content
$ vim local.tf
 resource "local_file" "hello" {
  filename = "/tmp/hello-terra.txt"
  content = "hello world1"
 }

Based on the above:
 block_name -> resource
 provider type -> local
 resource type -> file
 resource_name: hello
   arguments: filename and content


// The next ones use AWS provider types

$ vim aws-ec2.tf
 resource "aws_instance" "webserver" {
  ami = "ami-asdfasdf"
  instance_type = "t2.micro"
 }

$ vim aws-s3.tf
 resource "aws_s3_bucket" "data" {
   bucket = "webserver-bucket-org-2207"
   acl = "private"
 }
Deployment process:
 0- create *.tf file
 1- terraform init --> prepare env / install pluggins, etc
 2- terraform plan --> steps to be done // review
 3- terraform apply -> execute steps from plan
 4- terraform show
Example using “local_file” resource:
/terraform/test1$ terraform init
 Initializing the backend…
 Initializing provider plugins…
 Reusing previous version of hashicorp/local from the dependency lock file
 Installing hashicorp/local v2.0.0…
 Installed hashicorp/local v2.0.0 (signed by HashiCorp)
 Terraform has been successfully initialized!
 You may now begin working with Terraform. Try running "terraform plan" to see
 any changes that are required for your infrastructure. All Terraform commands
 should now work.
 If you ever set or change modules or backend configuration for Terraform,
 rerun this command to reinitialize your working directory. If you forget, other
 commands will detect it and remind you to do so if necessary.
/terraform/test1$
/terraform/test1$ terraform plan
 local_file.hello: Refreshing state… [id=c25325615b8492da77c2280a425a3aa82efda6d3]
 An execution plan has been generated and is shown below.
 Resource actions are indicated with the following symbols:
 create
 Terraform will perform the following actions:
 # local_file.hello will be created
 resource "local_file" "hello" { content              = "hello world1"
 directory_permission = "0777"
 file_permission      = "0700"
 filename             = "/tmp/hello-terra.txt"
 id                   = (known after apply)
 }
 Plan: 1 to add, 0 to change, 0 to destroy.

 Note: You didn't specify an "-out" parameter to save this plan, so Terraform
 can't guarantee that exactly these actions will be performed if
 "terraform apply" is subsequently run.
/terraform/test1$
/terraform/test1$ terraform apply
 local_file.hello: Refreshing state… [id=c25325615b8492da77c2280a425a3aa82efda6d3]
 An execution plan has been generated and is shown below.
 Resource actions are indicated with the following symbols:
 create
 Terraform will perform the following actions:
 # local_file.hello will be created
 resource "local_file" "hello" { content              = "hello world1"
 directory_permission = "0777"
 file_permission      = "0700"
 filename             = "/tmp/hello-terra.txt"
 id                   = (known after apply)
 }
 Plan: 1 to add, 0 to change, 0 to destroy.
 Do you want to perform these actions?
   Terraform will perform the actions described above.
   Only 'yes' will be accepted to approve.
 Enter a value: yes
 local_file.hello: Creating…
 local_file.hello: Creation complete after 0s [id=c25325615b8492da77c2280a425a3aa82efda6d3]
 Apply complete! Resources: 1 added, 0 changed, 0 destroyed.
/terraform/test1$
/terraform/test1$ cat /tmp/hello-terra.txt
 hello world1
Update/Destroy:
 $ update tf file
 $ terraform apply   -> apply the changes
or
 $ terraform destroy -> shows the destroy plan and then you need to confirm
Providers:
https://registry.terraform.io/
  oficial: aws, gcp, local, etc
  verified (3rdparty): bigip, heroku, digitalocena
  community: activedirectory, ucloud, netapp-gcps

$ terraform init -> show the providers installed

 plugin name format:
  * registry.terraform.io/hashicorp/local
           ^                ^         ^
       hostname      org namespace   type

plugins installed in .terraform/plugins

https://registry.terraform.io/providers/hashicorp/local/latest/docs/resources/file#sensitive_content
 main.tf: resource definition
 variables.tf: variable declarations
 outputs.tf: outouts from resources
 provider.tf: providers definition
Variables:
filename
content
prefix
separator
length
* type is optional
type: string "tst"
number 1
bool true/false
any whatever
list ["cat","dog"]
map pet1=cat
object mix of the above
tuple like a list of types
set (it is like a list but can't have duplicate values!)
Examples:
vim varibles.ttf
// List
variable "prefix" {
default = ["Mr", "Mrs", "Sir"] **default is optional!!!
type = list(string)
}
// Map
variable file-content {
type = map(string)
default = {
"state1" = "test1"
"state2" = "test2"
}
}
// Set
variable "prefix" {
default = ["10","11","12"]
type = set(number)
}
// Object
variable "bella" {
type = object({
name = string
age = number
food = list(string)
alive = bool
})
default = {
name = "bella"
age = 21
food = ["pasta", "tuna"]
alive = true
}
}
// Tuple
variable kitty {
type = tuple([string, number, bool)]
default = ["cat", 7, true]
}
Using variablesvim main.tf
resource "random_pet" "my-pet" {
prefix = var.prefix[0]
}
resource local_file my-file {
filename = "/tmp/test1.txt"
content = var.file-content["state1"]
}
Example using vars:
/terraform/vars$ cat variables.tf
variable "filename" {
  default = "/tmp/test-var.txt"
  type = string
  description = "xx"
 }
 variable "content" {
  default = "hello test var"
 }
/terraform/vars$ cat main.tf
resource "local_file" "test1" {
  filename = var.filename
  content = var.content
 }
/terraform/vars$
/terraform/vars$ terraform init
 Initializing the backend…
 Initializing provider plugins…
 Finding latest version of hashicorp/local…
 Installing hashicorp/local v2.0.0…
 Installed hashicorp/local v2.0.0 (signed by HashiCorp)
 Terraform has created a lock file .terraform.lock.hcl to record the provider
 selections it made above. Include this file in your version control repository
 so that Terraform can guarantee to make the same selections by default when
 you run "terraform init" in the future.
 Terraform has been successfully initialized!
 You may now begin working with Terraform. Try running "terraform plan" to see
 any changes that are required for your infrastructure. All Terraform commands
 should now work.
 If you ever set or change modules or backend configuration for Terraform,
 rerun this command to reinitialize your working directory. If you forget, other
 commands will detect it and remind you to do so if necessary.
/terraform/vars$
/terraform/vars$ terraform plan
 An execution plan has been generated and is shown below.
 Resource actions are indicated with the following symbols:
 create
 Terraform will perform the following actions:
 # local_file.test1 will be created
 resource "local_file" "test1" { content              = "hello test var"
 directory_permission = "0777"
 file_permission      = "0777"
 filename             = "/tmp/test-var.txt"
 id                   = (known after apply)
 }
 Plan: 1 to add, 0 to change, 0 to destroy.

 Note: You didn't specify an "-out" parameter to save this plan, so Terraform
 can't guarantee that exactly these actions will be performed if
 "terraform apply" is subsequently run.
/terraform/vars$
/terraform/vars$ terraform apply
 An execution plan has been generated and is shown below.
 Resource actions are indicated with the following symbols:
 create
 Terraform will perform the following actions:
 # local_file.test1 will be created
 resource "local_file" "test1" { content              = "hello test var"
 directory_permission = "0777"
 file_permission      = "0777"
 filename             = "/tmp/test-var.txt"
 id                   = (known after apply)
 }
 Plan: 1 to add, 0 to change, 0 to destroy.
 Do you want to perform these actions?
   Terraform will perform the actions described above.
   Only 'yes' will be accepted to approve.
 Enter a value: yes
 local_file.test1: Creating…
 local_file.test1: Creation complete after 0s [id=9f5d7ee95aa30648a2fb6f8e523e0547b7ecb78e]
 Apply complete! Resources: 1 added, 0 changed, 0 destroyed.
/terraform/vars$
/terraform/vars$
/terraform/vars$ cat /tmp/test-var.txt
 hello test var
Pass var values:
 1- if there is no values for var, when running "terrafom apply" it will ask for the values interactivily!
 2- cli params
    $ terraform apply -var "filename=/root/test.tst" -var "content=My Test"
 3- env vars  TF_VAR_xxx=xxx
    $ export TF_VAR_filename="/root/test.tst"
    $ terraform apply
 4- var files:
    autoloaded: terraform.tfvars, terraform.tfvars.json, *.auto.tfvars, *.auto.tvars.json
    explicit NAME.tfvars
    $ cat terraform.tfvars
      filename="/root/test.tst"
    $ terraform apply
    $ terraform -var-file NAME.tfvars

VAR PRECEDENCE: less -> more
 1 env vars
 2 terraform.tfvars
 3 *.auto.tfvars (alphabetic order)
 4 -var -r -var-file (cli flags)     --> highest priority!!!! it overrides all above options