Nice Jinja2 parser online! Great job for the author!!!
From this link:
https://ttl255.com/jinja2-tutorial-part-3-whitespace-control/
Today I Learned
Nice Jinja2 parser online! Great job for the author!!!
From this link:
https://ttl255.com/jinja2-tutorial-part-3-whitespace-control/
A good refresh about traceroute. It is a very common tool for network troubleshooting so it is important to use it wisely
Important points
And if you are more interested in the paths than latency, this can be a good too:
I finished this book. It is quite good, I have read about Wim Hof through another book that mentioned the benefits of cold for physical recovery in sports. And after a bit of more searching I was interested in reading more.
The book shows the benefits of breathing and how disconnected we are from our environment. And we have the tools to change that.
In other books about depression and trauma, mentioned the disconnection from our environment as one main cause, and getting back to it (nature) gets improvements.
I have never been a strong swimmer neither have a big lung capacity but I remember that when I was swimming as a teenager in my hometown, after doing the breathing exercises I could hold much longer. And the second day I tried the breathing exercise from the book, I managed 4 minutes. I was quite surprised. So I am adding this to my meditation practice too.
Regarding the cold, the days I am going for a run, I finish my shower with cold water (based on the fittest book) so I can give better recovery to my legs (and knees). And to be honest, It feels very good afterwards. If you don’t fight the cold (don’t shiver) it is interesting how your body relaxes and heartbeat slows down.
So I will carry on with the cold and breath exercises.
This is the thing I have to do from time to time and I never remember how to do:
https://stackoverflow.com/questions/235839/indent-multiple-lines-quickly-in-vi
And this what works for me:
Key presses for more visual people:
1- Enter Command Mode:
Escape

2- Move around to the start of the area to indent:
hjkl↑↓←→

3- Start a block:
v

4- Move around to the end of the area to indent:
hjkl↑↓←→

5- Type the number of indentation levels you want
0..9

6- Execute the indentation on the block:
>
Let’s see if I can remember it…
I have struggled to get something working for learning a bit of openconfig.
At the end, all info my info comes from Anton’s Karneliuk blog series about Openconfig. So all credit to him. It is the best source about real testing of openconfig in different platforms.
I am not going to create the wheel and explain what openconfig is. In my head, it is attempt from several big vendors to standardise the network management (config) and monitoring (telemetry) via YANG (vendor-neutral) models. So OC uses YANG. And we interact with OC using a transport protocol like netconf, restcong and gNMI. So the network devices need to implement one of these protocols. Based on the blog Cisco, Nokia and Arista have netconf implementations and Ansible has a module for that!!! So the key words are openconfig, yang and netcong.
So in my case, based on my ceos lab, I have added a new playbook based on Anton’s to test openconfig/netcong with Arista cEOS:
https://github.com/thomarite/ceos-testing/blob/master/README.md#openconfig
This is quite basic as it only gets the interface config.
Following Anton’s Part3 Blog:
I tried to push config via openconfig to my ceos devices (all files are in github as per link above).
The blog is dense but it is good because there is a lot of info. In this case, you have to use an Ansible role so it is a new thing to learn. As well, I wanted to adapt that role to my env and found some ansible issues but managed to fix after reading ansible documentation and paying attention to the -vvv info.
From “oc-push-config.yaml” the first task “collect” it is fine. It just takes some 10 minutes or more to get all YANG modules from each device.
The issue is with task “configure”. It fails when trying to push the interface config. I have tried Anton’s config and the actual config generated from oc-get-interface-info.yaml but no joy.
Based on the blog, it seems Arista doesnt have much interest in Openconfig.
Anyway, there have been a couple of intense days looking at all this openconfig/netcong/yang thing. I have just touched the surface but I have learned some Ansible in the way too. So could be worse.
Will move on to something else.
Some time ago I watched this video from Paul Hollywood in Madrid. I was amazed! And there was something I had in my to-cook list: Empanada
As a kid I have eaten different types of empanadas, mainly vegetable and meat ones. Although you have find versions with fish (cod) and seafood/octupus. Depends on the region in Spain.
And you can find them in many Latin countries too!
Finally this weekend I gave it a go.
Based on this recipe, I made mine with grilled vegetables.
1. Oven should be hot from the grilled vegs at 200C
2. Mix the flour and salt. Add water bit a bit until getting a dough. Shouldnt be too sticky. You can knead it a bit.
3. Roll the dough out into a rectangle on a lightly floured work surface. Add half of the butter/lard over the pastry. Fold the dough on top of the butter/lard. Turn, use the roll to mix and repeat again with the rest of the butter/lard. In the video is much easier to see/understand. Repeat the roll and folding two more times so we create the layers in the pastry.
4. Wrap the dough in cling film and leave to rest in the fridge for 30 minutes before using.
5. Take the chilled pastry from the fridge and roll out onto a lightly floured surface. Roll into a rectangle. Just be sure the dough doesn’t break. Brush the edges with beaten egg as this will be the sticking point for the pastry.
6. Add the grilled vegs in half of the dough. Fold the other half to cover the filling. Press the edges to seal. Brush the top with beaten egg
7. Put in the oven at 200C for 25 minutes or so until the pastry is crispy and a golden brown colour.

For being the first time, I was really surprised how crunchy it was! I had a good lunch.
I think you prepare the dough the day before, and as soon the vegs are ready, take it out of the fridge and carry on.
Grating the butter/lard was a bit messy even being frozen. Next time I will slice it very finely. When making croissants, you just flatten the butter.
Anyway, new recipe in my arsenal!
I like bread, a lot. And I have been baking at home once a week for a couple of years already. And Mainly sourdough. Still far from the courses and videos you can find in the internet but I am happy with it. I really enjoy eating it 🙂
Once day watching some videos about sourdough, I found this focaccia sourdough recipe. I had seen another videos in the past from the author so I decided to give it a go. I have tried once focaccia a couple of years ago using yeast sackets but never with sourdough starter.
All credits to the author.
My topping was different. I did tomate sauce, thin slices of potatoes, onions, a bit of courguette and frozen rosemary.
Not sure why, my dough didnt come up like in the video/blog. I think it needs a bit more oil?

Anyway, the taste is good. Will try another time.
Other things I want to try with sourdough are croissants and ciabattas!
A couple of years a go I wrote a playbook with ansible to use napalm for configuring some switches.
I wanted to test again ansible as I am quite rusty and there is always demand for that.
I started with just something basic with my ceos lab.
All my code is here:
https://github.com/thomarite/ceos-testing/tree/master/ansible
Initially I was following the official documentation for Arista EOS Ansible modules:
https://ansible-arista-howto.readthedocs.io/en/latest/COLLECTING_STATUS.html
https://github.com/titom73/ansible-arista-module-howto
Installing ansible was fine with pip in my venv.
But I hit the wall with just the first example using “eos_facts”. Initially I wasnt adding debugging flags so was even worse. Fortunately I remembered “-vvv”. I was seeing this:
The full traceback is:
Traceback (most recent call last):
File "/home/tomas/.ansible/tmp/ansible-tmp-1594296522.1539829-295453-189146847007138/AnsiballZ_eos_facts.py", line 102, in
_ansiballz_main()
File "/home/tomas/.ansible/tmp/ansible-tmp-1594296522.1539829-295453-189146847007138/AnsiballZ_eos_facts.py", line 94, in _ansiballz_main
invoke_module(zipped_mod, temp_path, ANSIBALLZ_PARAMS)
File "/home/tomas/.ansible/tmp/ansible-tmp-1594296522.1539829-295453-189146847007138/AnsiballZ_eos_facts.py", line 40, in invoke_module
runpy.run_module(mod_name='ansible.modules.network.eos.eos_facts', init_globals=None, run_name='main', alter_sys=True)
File "/home/tomas/.pyenv/versions/3.7.3/lib/python3.7/runpy.py", line 205, in run_module
return _run_module_code(code, init_globals, run_name, mod_spec)
File "/home/tomas/.pyenv/versions/3.7.3/lib/python3.7/runpy.py", line 96, in _run_module_code
mod_name, mod_spec, pkg_name, script_name)
File "/home/tomas/.pyenv/versions/3.7.3/lib/python3.7/runpy.py", line 85, in _run_code
exec(code, run_globals)
File "/tmp/ansible_eos_facts_payload_r5gz8rov/ansible_eos_facts_payload.zip/ansible/modules/network/eos/eos_facts.py", line 206, in
File "/tmp/ansible_eos_facts_payload_r5gz8rov/ansible_eos_facts_payload.zip/ansible/modules/network/eos/eos_facts.py", line 197, in main
File "/tmp/ansible_eos_facts_payload_r5gz8rov/ansible_eos_facts_payload.zip/ansible/module_utils/network/common/facts/facts.py", line 23, in init
File "/tmp/ansible_eos_facts_payload_r5gz8rov/ansible_eos_facts_payload.zip/ansible/module_utils/network/common/network.py", line 213, in get_resource_connection
File "/tmp/ansible_eos_facts_payload_r5gz8rov/ansible_eos_facts_payload.zip/ansible/module_utils/network/common/network.py", line 229, in get_capabilities
File "/tmp/ansible_eos_facts_payload_r5gz8rov/ansible_eos_facts_payload.zip/ansible/module_utils/connection.py", line 121, in init
AssertionError: socket_path must be a value
fatal: [r3]: FAILED! => {
"changed": false,
"module_stderr": "Traceback (most recent call last):\n File \"/home/tomas/.ansible/tmp/ansible-tmp-1594296522.1539829-295453-189146847007138/AnsiballZ_eos_facts.py\", line 102, in \n _ansiballz_main()\n File \"/home/tomas/.ansible/tmp/ansible-tmp-1594296522.1539829-295453-189146847007138/AnsiballZ_eos_facts.py\", line 94, in _ansiballz_main\n invoke_module(zipped_mod, temp_path, ANSIBALLZ_PARAMS)\n File \"/home/tomas/.ansible/tmp/ansible-tmp-1594296522.1539829-295453-189146847007138/AnsiballZ_eos_facts.py\", line 40, in invoke_module\n runpy.run_module(mod_name='ansible.modules.network.eos.eos_facts', init_globals=None, run_name='main', alter_sys=True)\n File \"/home/tomas/.pyenv/versions/3.7.3/lib/python3.7/runpy.py\", line 205, in run_module\n return _run_module_code(code, init_globals, run_name, mod_spec)\n File \"/home/tomas/.pyenv/versions/3.7.3/lib/python3.7/runpy.py\", line 96, in _run_module_code\n mod_name, mod_spec, pkg_name, script_name)\n File \"/home/tomas/.pyenv/versions/3.7.3/lib/python3.7/runpy.py\", line 85, in _run_code\n exec(code, run_globals)\n File \"/tmp/ansible_eos_facts_payload_r5gz8rov/ansible_eos_facts_payload.zip/ansible/modules/network/eos/eos_facts.py\", line 206, in \n File \"/tmp/ansible_eos_facts_payload_r5gz8rov/ansible_eos_facts_payload.zip/ansible/modules/network/eos/eos_facts.py\", line 197, in main\n File \"/tmp/ansible_eos_facts_payload_r5gz8rov/ansible_eos_facts_payload.zip/ansible/module_utils/network/common/facts/facts.py\", line 23, in init\n File \"/tmp/ansible_eos_facts_payload_r5gz8rov/ansible_eos_facts_payload.zip/ansible/module_utils/network/common/network.py\", line 213, in get_resource_connection\n File \"/tmp/ansible_eos_facts_payload_r5gz8rov/ansible_eos_facts_payload.zip/ansible/module_utils/network/common/network.py\", line 229, in get_capabilities\n File \"/tmp/ansible_eos_facts_payload_r5gz8rov/ansible_eos_facts_payload.zip/ansible/module_utils/connection.py\", line 121, in init\nAssertionError: socket_path must be a value\n",
"module_stdout": "",
"msg": "MODULE FAILURE\nSee stdout/stderr for the exact error",
"rc": 1
}
So, “socket_path” was defined. I checked all the python files mentioned in the stack but couldnt find anything.
It was clear that I wasn’t providing enough info to ansible to establish the socket for connection to the devices (ip:port)
And the example from the documentation didnt work neither:
https://docs.ansible.com/ansible/latest/network/user_guide/platform_eos.html#using-eapi-in-ansible
I knew my old ansible script was working before I left my job. But I knew as well that I was using the latest version of ansible so very likely things have changed since then.
$ ansible --version
ansible 2.9.10
So I had to read about the “eos_fact” and “eos_config” module searching here:
https://docs.ansible.com/ansible/latest/modules/list_of_network_modules.html
https://docs.ansible.com/ansible/latest/modules/eos_facts_module.html#eos-facts-module
https://docs.ansible.com/ansible/latest/modules/eos_config_module.html
After some time, I managed to fix the playbook and my environment and I could run the playbook using the ssh connector (but I was ignoring a warning about “provider” not needed…)
(testdir2)/ansible master$ cat ansible-hosts
[all:vars]
ansible_python_interpreter=/home/tomas/storage/technology/arista/testdir2/bin/python
ansible_user='tomas'
ansible_password='tomas123'
[ceoslab]
r1 ansible_host=127.0.0.1 ansible_port=2000
r2 ansible_host=127.0.0.1 ansible_port=2001
r3 ansible_host=127.0.0.1 ansible_port=2002

(testdir2)/ansible master$ cat group_vars/ceoslab.yaml
ansible_network_os: eos
The output:
/ansible master$ ansible-playbook playbooks/collect-facts-cli.yaml PLAY [Run commands on ceos lab] TASK [Collect all facts from device] *** [WARNING]: provider is unnecessary when using network_cli and will be ignored [WARNING]: default value forgather_subsetwill be changed tominfrom!configv2.11 onwards ok: [r1] ok: [r3] ok: [r2] TASK [Display result] **** ok: [r2] => { "msg": "Model is cEOSLab and it is running 4.23.3M" } ok: [r1] => { "msg": "Model is cEOSLab and it is running 4.23.3M" } ok: [r3] => { "msg": "Model is cEOSLab and it is running 4.23.3M" } PLAY RECAP * r1 : ok=2 changed=0 unreachable=0 failed=0 skipped=0 rescued=0 ignored=0 r2 : ok=2 changed=0 unreachable=0 failed=0 skipped=0 rescued=0 ignored=0 r3 : ok=2 changed=0 unreachable=0 failed=0 skipped=0 rescued=0 ignored=0
Ok, so getting the playbook using the API shouldnt be that difficult? It was.
The full traceback is:
File "/tmp/ansible_eos_facts_payload_vz7c7ipu/ansible_eos_facts_payload.zip/ansible/module_utils/network/common/network.py", line 229, in get_capabilities
capabilities = Connection(module._socket_path).get_capabilities()
File "/tmp/ansible_eos_facts_payload_vz7c7ipu/ansible_eos_facts_payload.zip/ansible/module_utils/connection.py", line 185, in rpc
raise ConnectionError(to_text(msg, errors='surrogate_then_replace'), code=code)
fatal: [r1]: FAILED! => {
"changed": false,
"invocation": {
"module_args": {
"auth_pass": null,
"authorize": null,
"gather_network_resources": null,
"gather_subset": [
"all"
],
"host": null,
"password": null,
"port": null,
"provider": null,
"ssh_keyfile": null,
"timeout": null,
"transport": null,
"use_ssl": null,
"username": null,
"validate_certs": null
}
},
"msg": "Could not connect to http://127.0.0.1:80/command-api: [SSL: CERTIFICATE_VERIFY_FAILED] certificate verify failed: self signed certificate (_ssl.c:1056)"
}
I was surprised that it was using port 80. I was pretty sure I was providing the correct port (900x) so somehow my data wasnt being processed.
I wasn’t clearly paying attention to the documentation:
https://docs.ansible.com/ansible/latest/modules/eos_facts_module.html#eos-facts-module
It says clearly that “provider” is deprecated since 2.5! I am using 2.9
As well, I have a very poor knowledge of ansible and I didnt understand the concept of “connection”. The SSH was using “network_cli” and API was using “httpapi”.
I was very close to give up the API connection when somehow I searched for “ansible network_cli” and I found documentation for that plugging. Then I searched for “httpapi” and it was gold!
https://docs.ansible.com/ansible/latest/plugins/connection/network_cli.html
https://docs.ansible.com/ansible/latest/plugins/connection/httpapi.html
I realised that I need to pass specific vars for getting the HTTPS connection. So at the end, managed to get the config right for both SSH and HTTPS:
/ansible master$ cat ansible-hosts
[all:vars]
ansible_python_interpreter=/home/tomas/storage/technology/arista/testdir2/bin/python
ansible_user='tomas'
ansible_password='tomas123'
[ceoslab]
r1 ansible_host=127.0.0.1 ansible_port=2000 ansible_httpapi_port=9000
r2 ansible_host=127.0.0.1 ansible_port=2001 ansible_httpapi_port=9001
r3 ansible_host=127.0.0.1 ansible_port=2002 ansible_httpapi_port=9002

/ansible master$ cat group_vars/ceoslab.yaml
ansible_network_os: eos
#start - eapi config
ansible_httpapi_use_ssl: 'yes'
ansible_httpapi_validate_certs: 'no'
ansible_httpapi_password: "{{ ansible_password }}"
#end - eapi config
The output:
ansible master$ ansible-playbook playbooks/collect-facts-eapi.yaml PLAY [Run commands on remote ceos lab] * TASK [Collect all facts from device] *** [WARNING]: default value forgather_subsetwill be changed tominfrom!configv2.11 onwards ok: [r3] ok: [r1] ok: [r2] TASK [Display result] **** ok: [r2] => { "msg": "Model is cEOSLab and it is running 4.23.3M" } ok: [r1] => { "msg": "Model is cEOSLab and it is running 4.23.3M" } ok: [r3] => { "msg": "Model is cEOSLab and it is running 4.23.3M" } PLAY RECAP * r1 : ok=2 changed=0 unreachable=0 failed=0 skipped=0 rescued=0 ignored=0 r2 : ok=2 changed=0 unreachable=0 failed=0 skipped=0 rescued=0 ignored=0 r3 : ok=2 changed=0 unreachable=0 failed=0 skipped=0 rescued=0 ignored=0
At the end of the day, the scripts are identical apart from the “connection” var:
/ansible/playbooks master$ diff collect-facts-cli.yaml collect-facts-eapi.yaml
4c4
< connection: network_cli
---
> connection: httpapi
I think you can pass a var to the playbook via the CLI so I will try later.
My recommendation is always to use “-vvv”.
BTW, A good ansible summary I found:
https://gist.github.com/andreicristianpetcu/b892338de279af9dac067891579cad7d
In summary, I found ansible more difficult to troubleshoot that nornir. In nornir, is pure python, I can run ipdb wherever a I want.
But anyway, I learned things. I will add try to write a bit more complex playbooks.
Yesterday managed to get netbox and my lab connected. So today followed up with the original article, and found a new issue that took me several hours.
Initially I was seeing an error that I couldn’t undestand “
netbox.exceptions.CreateException: This field is required
From
(venv) /netbox-example/nornir-napalm-netbox-demo master$ python scripts/create_interfaces.py
nb_url = http://0.0.0.0:8080
Creating Netbox Interface for device r1, interface Loopback1
Traceback (most recent call last):
File "scripts/create_interfaces.py", line 42, in
task=create_netbox_interface,
File "/home/tomas/storage/technology/netbox-example/venv/lib/python3.7/site-packages/nornir/core/init.py", line 146, in run
result = self._run_serial(task, run_on, **kwargs)
File "/home/tomas/storage/technology/netbox-example/venv/lib/python3.7/site-packages/nornir/core/init.py", line 72, in _run_serial
result[host.name] = task.copy().start(host, self)
File "/home/tomas/storage/technology/netbox-example/venv/lib/python3.7/site-packages/nornir/core/task.py", line 85, in start
r = self.task(self, **self.params)
File "scripts/create_interfaces.py", line 34, in create_netbox_interface
device_id=device_id,
File "/home/tomas/storage/technology/netbox-example/venv/lib/python3.7/site-packages/netbox/dcim.py", line 431, in create_interface
return self.netbox_con.post('/dcim/interfaces/', required_fields, **kwargs)
File "/home/tomas/storage/technology/netbox-example/venv/lib/python3.7/site-packages/netbox/connection.py", line 124, in post
raise exceptions.CreateException(resp_data)
netbox.exceptions.CreateException: This field is required.
So I started to follow the trace, adding “print” and using “ipdb” to see what was going on:
....
/home/tomas/storage/technology/netbox-example/venv/lib/python3.7/site-packages/netbox/connection.py(71)__request()
70 finally:
---> 71 self.close()
72
ipdb> dir(response)
['attrs', 'bool', 'class', 'delattr', 'dict', 'dir', 'doc', 'enter', 'eq', 'exit', 'format', 'ge', 'getattribute', 'getstate', 'gt', 'hash', 'init', 'init_subclass', 'iter', 'le', 'lt', 'module', 'ne', 'new', 'nonzero', 'reduce', 'reduce_ex', 'repr', 'setattr', 'setstate', 'sizeof', 'str', 'subclasshook', 'weakref', '_content', '_content_consumed', '_next', 'apparent_encoding', 'close', 'connection', 'content', 'cookies', 'elapsed', 'encoding', 'headers', 'history', 'is_permanent_redirect', 'is_redirect', 'iter_content', 'iter_lines', 'json', 'links', 'next', 'ok', 'raise_for_status', 'raw', 'reason', 'request', 'status_code', 'text', 'url']
ipdb> response.url
'http://0.0.0.0:8080/api/dcim/interfaces/'
ipdb> response.text
'{"type":["This field is required."]}'
ipdb> response.status_code
400
ipdb> response.content
b'{"type":["This field is required."]}'
ipdb> response.reason
'Bad Request'
ipdb> response.request

ipdb> prepared_request

ipdb> prepared_request.url
'http://0.0.0.0:8080/api/dcim/interfaces/'
ipdb> dir(prepared_request)
['class', 'delattr', 'dict', 'dir', 'doc', 'eq', 'format', 'ge', 'getattribute', 'gt', 'hash', 'init', 'init_subclass', 'le', 'lt', 'module', 'ne', 'new', 'reduce', 'reduce_ex', 'repr', 'setattr', 'sizeof', 'str', 'subclasshook', 'weakref', '_body_position', '_cookies', '_encode_files', '_encode_params', '_get_idna_encoded_host', 'body', 'copy', 'deregister_hook', 'headers', 'hooks', 'method', 'path_url', 'prepare', 'prepare_auth', 'prepare_body', 'prepare_content_length', 'prepare_cookies', 'prepare_headers', 'prepare_hooks', 'prepare_method', 'prepare_url', 'register_hook', 'url']
ipdb> prepared_request.path_url
'/api/dcim/interfaces/'
ipdb> response.__content
*** AttributeError: 'Response' object has no attribute '__content'
ipdb> response._content
b'{"type":["This field is required."]}'
ipdb> response.content
b'{"type":["This field is required."]}'
ipdb> response.headers
{'Server': 'nginx', 'Date': 'Wed, 08 Jul 2020 12:36:35 GMT', 'Content-Type': 'application/json', 'Content-Length': '36', 'Connection': 'keep-alive', 'Vary': 'Accept, Cookie, Origin', 'Allow': 'GET, POST, HEAD, OPTIONS, TRACE', 'API-Version': '2.8', 'X-Content-Type-Options': 'nosniff', 'X-Frame-Options': 'SAMEORIGIN'}
ipdb> response.reason
'Bad Request'
ipdb> response.request

ipdb> response.test
*** AttributeError: 'Response' object has no attribute 'test'
ipdb> response.text
'{"type":["This field is required."]}'
ipdb> response.url
'http://0.0.0.0:8080/api/dcim/interfaces/'
ipdb> quit
Create Netbox Interfaces
r1 ** changed : False
vvvv Create Netbox Interfaces ** changed : False vvvvvvvvvvvvvvvvvvvvvvvvvvvvvvv ERROR
---- napalm_get ** changed : False --------------------------------------------- INFO
(venv) go:1.12.5|py:3.7.3|tomas@athens:~/storage/technology/netbox-example/nornir-napalm-netbox-demo master$ python scripts/create_interfaces.py
nb_url = http://0.0.0.0:8080
url3=http://0.0.0.0:8080/api/dcim/interfaces?limit=0
Creating Netbox Interface for device r1, interface Loopback1
url3=http://0.0.0.0:8080/api/dcim/devices/?name=r1&limit=0
device_id = 1
url3=http://0.0.0.0:8080/api/dcim/interfaces/
resp_ok=False resp_status=400
body_data= {'name': 'Loopback1', 'form_factor': 1200, 'device': 1}
params= /dcim/interfaces/
resp_data= {'type': ['This field is required.']}
Traceback (most recent call last):
File "scripts/create_interfaces.py", line 43, in
task=create_netbox_interface,
File "/home/tomas/storage/technology/netbox-example/venv/lib/python3.7/site-packages/nornir/core/init.py", line 146, in run
result = self._run_serial(task, run_on, **kwargs)
File "/home/tomas/storage/technology/netbox-example/venv/lib/python3.7/site-packages/nornir/core/init.py", line 72, in _run_serial
result[host.name] = task.copy().start(host, self)
File "/home/tomas/storage/technology/netbox-example/venv/lib/python3.7/site-packages/nornir/core/task.py", line 85, in start
r = self.task(self, **self.params)
File "scripts/create_interfaces.py", line 35, in create_netbox_interface
device_id=device_id,
File "/home/tomas/storage/technology/netbox-example/venv/lib/python3.7/site-packages/netbox/dcim.py", line 431, in create_interface
return self.netbox_con.post('/dcim/interfaces/', required_fields, **kwargs)
File "/home/tomas/storage/technology/netbox-example/venv/lib/python3.7/site-packages/netbox/connection.py", line 130, in post
raise exceptions.CreateException(resp_data)
netbox.exceptions.CreateException: This field is required.
So it seems that at the end I realised that I was missing the parameter “type” !!!
I was checking the documentation from netbox in github but I couldnt see clearly what kind of config I had to provide…
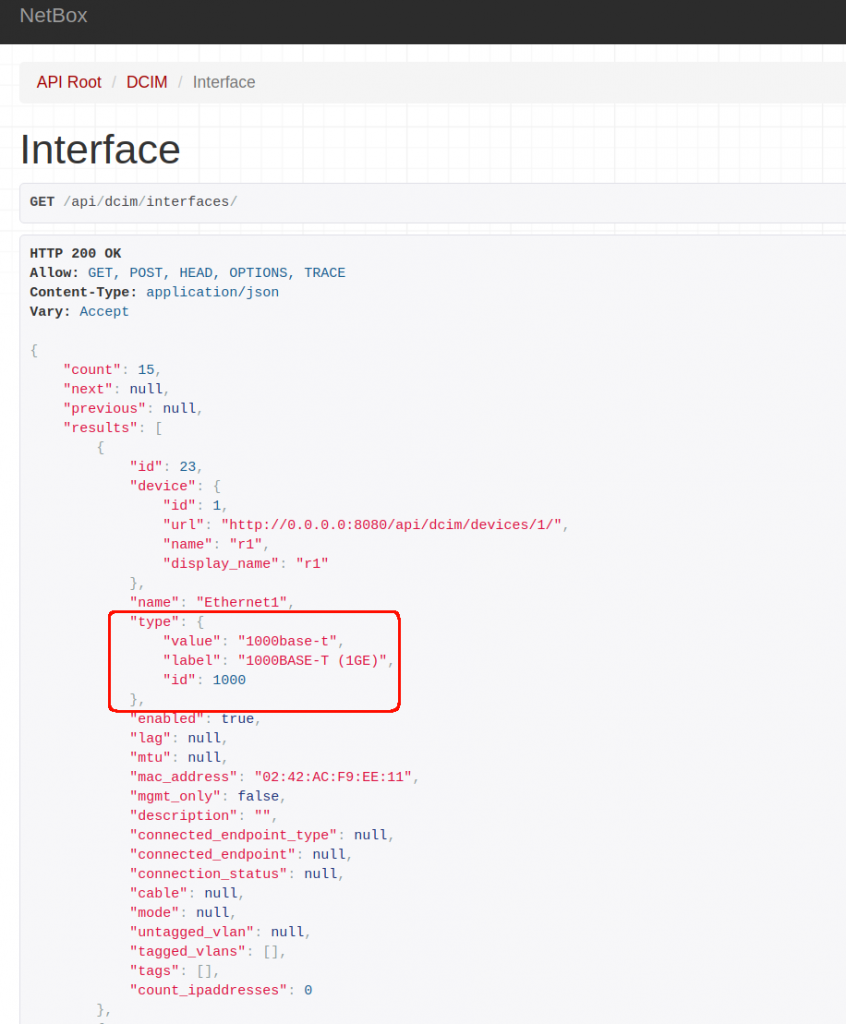
I checked the “type” value for the only interfaces I already had in netbox: “http://0.0.0.0:8080/api/dcim/interfaces/“

So I tried to pass exactly that but it was still failing…
(venv) go:1.12.5|py:3.7.3|tomas@athens:~/storage/technology/netbox-example/nornir-napalm-netbox-demo master$ python scripts/create_interfaces.py
nb_url = http://0.0.0.0:8080
url3=http://0.0.0.0:8080/api/dcim/interfaces?limit=0
Creating Netbox Interface for device r1, interface Loopback1
url3=http://0.0.0.0:8080/api/dcim/devices/?name=r1&limit=0
device_id = 1
url3=http://0.0.0.0:8080/api/dcim/interfaces/
resp_ok=False resp_status=400
body_data= {'name': 'Loopback1', 'form_factor': 1200, 'device': 1, 'type': {'value': '1000base-t', 'label': '1000BASE-T (1GE)', 'id': 1000}}
params= /dcim/interfaces/
resp_data= {'type': ['Value must be passed directly (e.g. "foo": 123); do not use a dictionary or list.']}
Traceback (most recent call last):
File "scripts/create_interfaces.py", line 50, in
task=create_netbox_interface,
File "/home/tomas/storage/technology/netbox-example/venv/lib/python3.7/site-packages/nornir/core/init.py", line 146, in run
result = self._run_serial(task, run_on, **kwargs)
File "/home/tomas/storage/technology/netbox-example/venv/lib/python3.7/site-packages/nornir/core/init.py", line 72, in _run_serial
result[host.name] = task.copy().start(host, self)
File "/home/tomas/storage/technology/netbox-example/venv/lib/python3.7/site-packages/nornir/core/task.py", line 85, in start
r = self.task(self, **self.params)
File "scripts/create_interfaces.py", line 42, in create_netbox_interface
**interface_type,
File "/home/tomas/storage/technology/netbox-example/venv/lib/python3.7/site-packages/netbox/dcim.py", line 431, in create_interface
return self.netbox_con.post('/dcim/interfaces/', required_fields, **kwargs)
File "/home/tomas/storage/technology/netbox-example/venv/lib/python3.7/site-packages/netbox/connection.py", line 130, in post
raise exceptions.CreateException(resp_data)
netbox.exceptions.CreateException: Value must be passed directly (e.g. "foo": 123); do not use a dictionary or list.
(venv) go:1.12.5|py:3.7.3|tomas@athens:~/storage/technology/netbox-example/nornir-napalm-netbox-demo master$
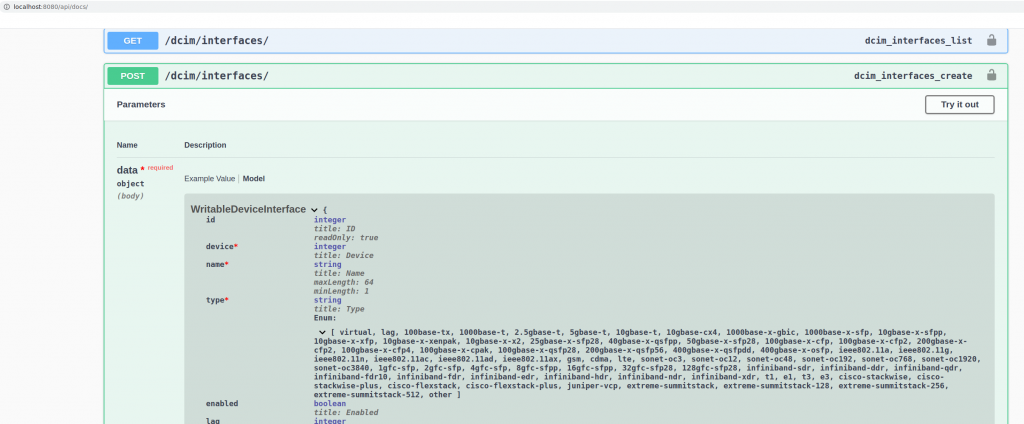
Somehow the API had to be documented… by chance, looking at the bottom of the netbox page, there was an”API” link….

So, now I needed to look up the correct API call. Based on the script and logs, it was a “POST” for “/dcim/interfaces/”. Here we go!

So finally, I had the info. I confirmed what fields were mandatory and the value they needed!
interface_type = {}
interface_type["type"] = "1000base-t"
for interface_name in interfaces.keys():
    if not is_interface_present(nb_interfaces, f"{task.host}", interface_name):
        print(
            f"* Creating Netbox Interface for device {task.host}, interface {interface_name}"
        )
        device_id = get_device_id(f"{task.host}", netbox)
        print("device_id = %s" % device_id)
        netbox.dcim.create_interface(
           name=f"{interface_name}",
           form_factor=1200,  # default
           device_id=device_id,
           **interface_type,
        )
So the script ran fine for all my devices:
netbox-example/nornir-napalm-netbox-demo master$ python scripts/create_interfaces.py
nb_url = http://0.0.0.0:8080
url3=http://0.0.0.0:8080/api/dcim/interfaces?limit=0
Create Netbox Interfaces
r1 ** changed : False
vvvv Create Netbox Interfaces ** changed : False vvvvvvvvvvvvvvvvvvvvvvvvvvvvvvv INFO
---- napalm_get ** changed : False --------------------------------------------- INFO
^^^^ END Create Netbox Interfaces ^^^^^^^^^^^^^^^^^^^^^^^^^^^^^^^^^^^^^^^^^^^^^^
r2 ** changed : False
vvvv Create Netbox Interfaces ** changed : False vvvvvvvvvvvvvvvvvvvvvvvvvvvvvvv INFO
---- napalm_get ** changed : False --------------------------------------------- INFO
^^^^ END Create Netbox Interfaces ^^^^^^^^^^^^^^^^^^^^^^^^^^^^^^^^^^^^^^^^^^^^^^
r3 ** changed : False
vvvv Create Netbox Interfaces ** changed : False vvvvvvvvvvvvvvvvvvvvvvvvvvvvvvv INFO
---- napalm_get ** changed : False --------------------------------------------- INFO
^^^^ END Create Netbox Interfaces ^^^^^^^^^^^^^^^^^^^^^^^^^^^^^^^^^^^^^^^^^^^^^^
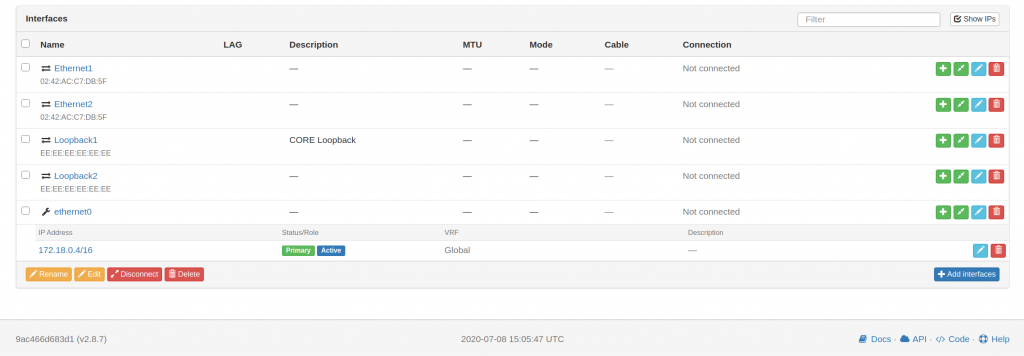
And it is updated in GUI:

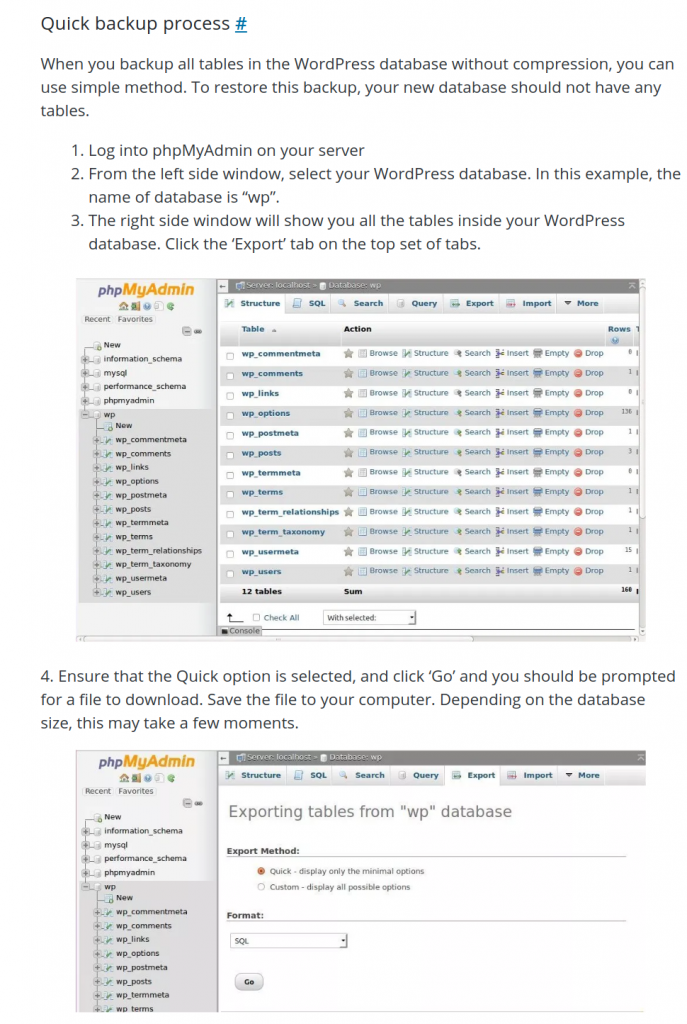
I have decided to backup this blog. First time. So following instructions from wordpress.
https://your_domain_or_IP/phpmyadmin
root@vps:/var/www# ls
html wordpress
root@vps:/var/www# cd ..
root@vps:/var# tar zcvf web-backup.tgz www
/blog-backup$ tree
.
├── apache-files
│   └── web-backup-20200707.tgz
└── mysql
    └── blog-backup-20200707.sql