TCPLS: I know about QUIC (just the big picture) but this TCP+TLS implementation looks interesting. Although I am not sure if their test is that meaningful. A more “real” life example would be ideal (packet loss, jitter, etc)
ByPass CDN: I am not well versed in Cloud services but this looks like a interesting article CDN and WAF from a security perspective. It is the typical example of thinking out of the box, why the attacker can’t be a “customer” of the CDN too???
Packet Generator – BNG Blaster: I knew about TReX but never had the chance to use it and I know how expensive are the commercial solutions (shocking!) so this looks like a nice tool.
Reading a bit of old news about One-Time-Passwords attacks (link1 and link2) I realized that there is no much awareness in companies about this danger. Most people assume that having 2FA means the perfect security system. But it seems it is not and we have to be still even more vigilant. Trust is earned not deserved. So we need a bit of common sense practices spread around this topci. I liked the explanation about the link used for attacking coinbase and how slick was the method of using a subdomain that in a mobile screen only shows the small part and tricks you.
I read this entry and I didn’t remember you could download all our Google data. So I did. The same way I backup my laptop’s hard drive, I should do the same with gmail.
I finished this book yesterday. This was my first book from Cory Doctorow, I have heard about him for some time about his support for digital freedom and his blogging (never read it though). Somehow I decided to read something from I chose this book as it seemed the latest. And to be honest, I am glad I did it because I liked it. I didnt know what to expect the four novellas really hit the nail on the head in the main issues of our society:
1- Immigration – Digital freedom – Social connection – Social classes – Youth against injustice
2- Racism – even superpowers can “fix” it – America blind eye (and the whole world to be honest)
4- Clean water, Global instability, Violence, Social disconnection
I have the feeling that you can see the current work in each history. In one part you think we are doomed but there is always a spot of hope. And it is just “having hope”, it is taking action.
And I learned that the DMCA was signed by a Democrat…. good b-job Clinton…
And I want to use more often Tor more often. Just for browsing it is really easy.
I was reading through my backlog and noticed too close by incidents. A BGP hijack on 30th September from Telstra and Tokyo Stock Exchange outage on 2nd Oct. At the end of the day, small mistakes/errors (on purpose or not) can cause massive impact (depending on your point of view). For BGP, RPKI is the security framework to make sure the advertised routes belong to the real owners. Yeah, quick summary. But at the end of the day, not all Internet providers are using RPKI, and even if you use it, you can make mistakes. This is better than nothing. For the exchanges, thinking that a piece of hardware can cause a stop to a 6 trillion $ market is crazy. And it seems is just a 350 servers system. That tells me that you dont need the biggest system to hold the biggest value and you will always hit a problem no matter how safe/resilience is your design/implementation/etc. Likely I am making this up and I need to review the book, but one of the conclusions I took from it, via Godel, it doesn’t matter how many statements you use to declare your (software) system, you can always find a weakness (false statement).
I have read a bit about ID theft in the internet but today I could read an article about a big figure in this type of crimes.
I didnt realised that ID theft was more profitable that just stealing credit cards, etc. And as well, much more damaging for the victim. It is really interesting the economic damage realised from these actions at a nation level like USA.
At least it seems the cyber criminal wants to get clean and help with a guide in his LinkedIn profile. The info maybe is not super up to date but the focus in strong passwords, password managers and Dual-Factor-Authentication for me is key (a part from having antivirus, up to date software, etc etc)
I am subscribed to this site to get news about SSL/TLS. I am not great at security so want to try to read things like this.
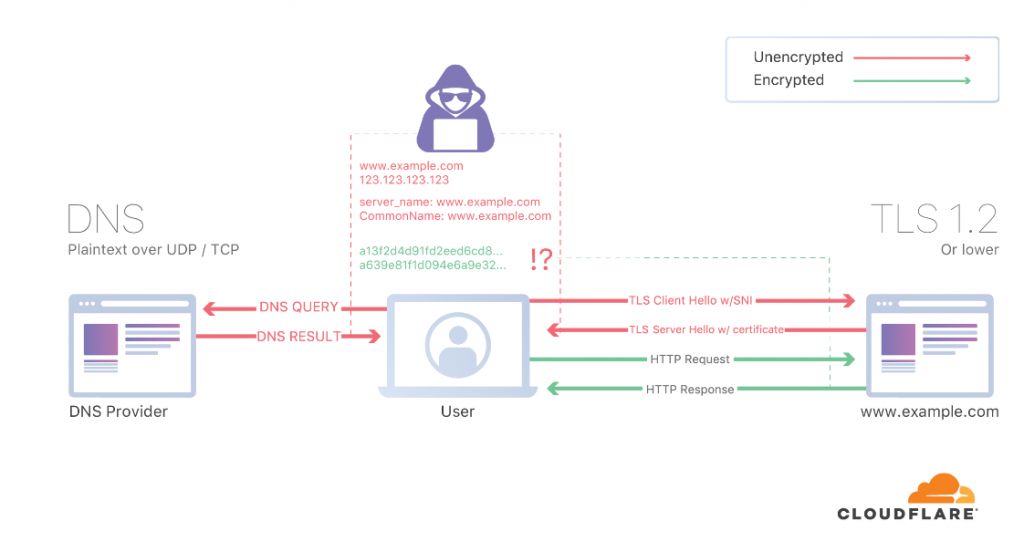
This week there was an article about GFC blocking encrypted SNI. Obviously I had to read about what was ESNI via the Cloudflare link.
From that article, I recognized the SANs from certificates (if you have to renew a certificate with SANs is more expensive, that’s how I learned it). They consider it a hack, not 100% sure why. I thought having encrypted DNS should be enough but I forgot that when you negotiate TLS, that is not encrypted so the SNI you are sending is seen. The picture below, clarified it to me:
So for more details about ESNI, I had to read another entry. So you need TLS 1.3, DNSSEC and DoT/DoH to get the whole thing working. And not everybody support eSNI (rfc3546). As far as I can see, my GC browser doesnt support it and only FF does.
So if I want to get this working in my end I need to encrypt my DNS and use FF. Somehow, I have to be playing with this before because I noticed I had already installed stubby for configuring DNS over TLS. But it wasn’t in use as my resolv.conf is updated every time my laptop wakes up. So I have to change it manually:
cat /etc/resolv.conf
# Generated by NetworkManager
# Check stubby is running
# $ sudo netstat -lnptu | grep stubby
# you can test having wireshark and check tcp 853 to 1.1.1.1 and not seeing # any udp 53.
# dig @127.0.0.0 www.google.com
search mynet
nameserver 127.0.0.1

# netstat -lnptu | grep stubby
tcp 0 0 127.0.0.1:53 0.0.0.0:* LISTEN 478658/stubby
tcp6 0 0 ::1:53 :::* LISTEN 478658/stubby
udp 0 0 127.0.0.1:53 0.0.0.0:* 478658/stubby
udp6 0 0 ::1:53 :::* 478658/stubby
After that change, I tried to test it but I couldnt see any traffic on tcp 853. The stubby service was running but something wasn’t ok.
Aug 31 17:34:44 athens stubby[11294]: Could not schedule query: None of the configured upstreams could be used to send queries on the spe>
Aug 31 17:34:44 athens stubby[11294]: Could not schedule query: None of the configured upstreams could be used to send queries on the spe>
Aug 31 17:34:44 athens stubby[11294]: Could not schedule query: None of the configured upstreams could be used to send queries on the spe>
Aug 31 17:34:44 athens stubby[11294]: Could not schedule query: None of the configured upstreams could be used to send queries on the spe>
So I decided to check the config. My config is the default one so it is using some specific servers. I enabled Google and Cloudflare resolvers and restart stubby. After that, we have tcp 853!
What it looks very clear, it is very verbose. I have “suspender” enabled in GC so there are not may tabs in the background doing things… In my former employer. The firewalls stats showed that DNS was the protocol most used in our corporate network…
So once I have DNSSEC enabled, let’s run the eSNI test.
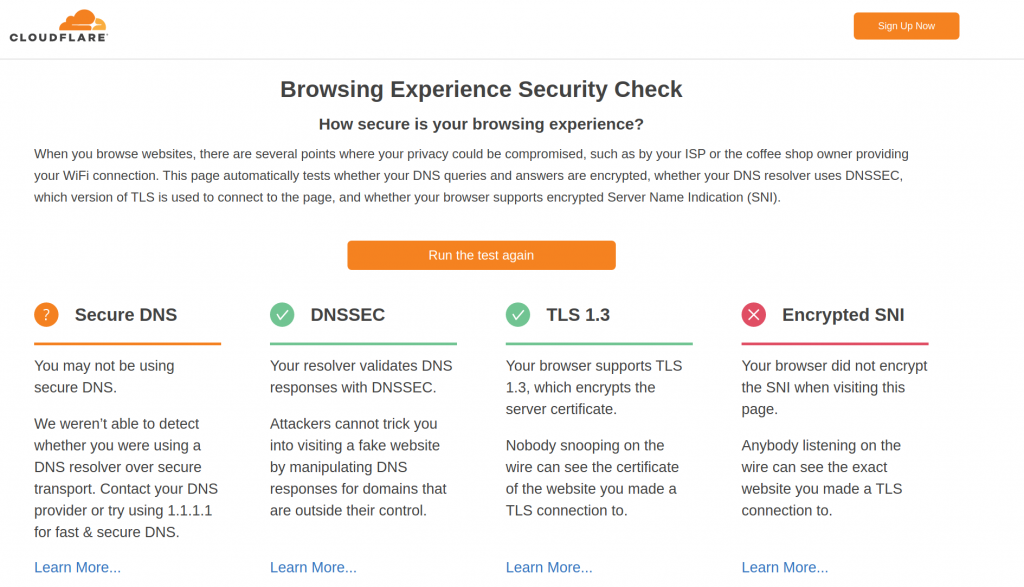
This is from GC:
So good thing DNSSEC and TLS1.3 are fine. Expected that eSNI is failing.
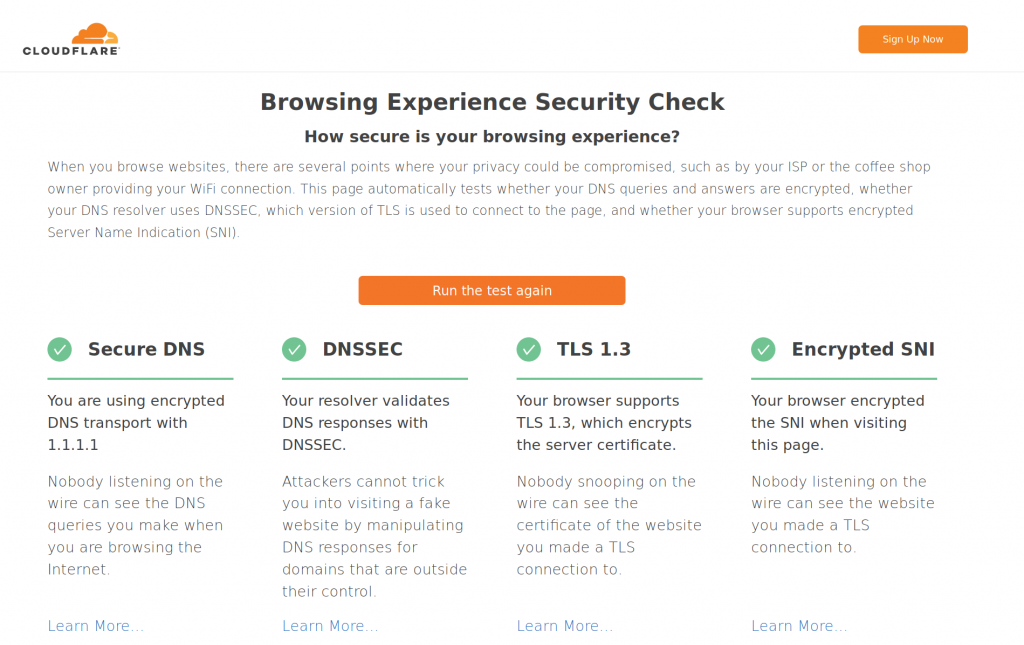
For FF, eSNI is not enabled by default, and took me a bit to find a blog that showed the correct steps to configure it. This is the winner. I need two changes in my about.config and restart FF. And this is the result for the same test page:
So it is nice to have the whole setup working with FF. It would be great if GC had eSNI support. But still this has to be supported by the destination web server.
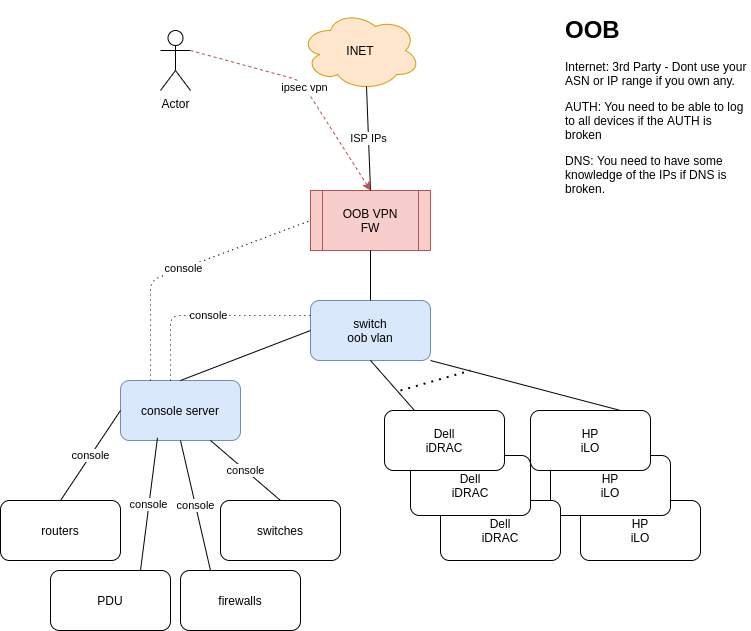
I was reading this blog and realised that OOB is something is not talked about very often. Based on what I have seen in my career:
Design
You need to sell the idea that this is a must. Then you need to secure some budget. You dont need much:
1x switch
1x firewall
1x Internet access (if you have your ASN and IP range, dont use it)
Keep it simple..
Most network kit (firewalls, routers, switches, pdus, console servers, etc) have 1xmgmt port and 1xconsole port. So all those need to go to the console server. I guess most server vendors offer some OOB access (I just know Dell and HP). So all those go to the oob switch.
If you have a massive network with hundreds of devices/servers, then you will need more oob switches and console servers. You still need just one firewall and 1 internet connection. The blog comments about the spine-leaf oob network. I guess this is the way for a massive network/DC.
Access to OOB
You need to be able to access it via your corporate network and from anywhere in the internet.
You need to be sure linux/windows/macs can VPN.
Use very strong passwords and keys.
You need to be sure the oob firewall is quite tight in access. At the end of the day you only want to allow ssh to the console server and https to the ILO/iDRACS. Nothing initiated internally can go to the internet.
Dependencies
Think in the worse scenario. Your DNS server is down. Your authentication is down.
You need to be sure you have local auth enabled in all devices for emergency
You need to work out some DNS service. Write the key IPs in the documentation?
You IP transit has to be reliable. You dont need a massive pipe but you need to be sure it is up.
Monitoring
You dont want to be in the middle of the outage and realise that your OOB is not functional. You need to be sure the ISP for the OOB is up and the devices (oob switch and oob firewall) are functional all the time.
Another point frequently lost. You need to be sure people can find info about the OOB: how is built and how to access it.
Training
At the end of the day, if you have a super OOB network but then nobody knows how to connect and use it, then it is useful. Schedule routine checkups with the team to be sure everybody can OOB. This is useful when you get a call at 3am.
Diagram
Update
Funny enough, I was watching today NLNOG live and there was a presentation about OOB with too different approaches: in-band out-of-band and pure out-of-band.
From the NTT side, I liked the comment about conserver.com to manage your serial connections. I will try to use it once I have access to a new network.
1- You need to increase the logging of your sshd (destination – server)
server# vim /etc/ssh/sshd_config
LogLevel VERBOSE
server# service sshd restart
server# tail -f /var/log/auth.log
2- From client, just ssh as usual to the server and check auth.log as per above
Jul 3 14:17:55 server sshd[8600]: Connection from IPV6 port 57628 on IPV6::453 port 64022
Jul 3 14:17:55 server sshd[8600]: Postponed publickey for client from IPv6 port 57628 ssh2 [preauth]
Jul 3 14:17:55 server sshd[8600]: Accepted publickey for client from IPv6 port 57628 ssh2: ED25519 SHA256:BtOAX9eVpFJJgJ5HzjKU8E973m+MX+3gDxsm7eT/iEQ
Jul 3 14:17:55 server sshd[8600]: pam_unix(sshd:session): session opened for user client by (uid=0)
Jul 3 14:17:55 server sshd[8600]: User child is on pid 8606
Jul 3 14:17:55 server sshd[8606]: Starting session: shell on pts/7 for client from IPv6 port 57628 id 0
3- So we have the fingertip of the key used by client. Now we need to get the fingertips of our clients keys to find the match:
Today I have had “fun” troubleshooting an issue that looked easy at first sight. A colleague was trying to PXE boot some server from a network that we haven’t used for a while.
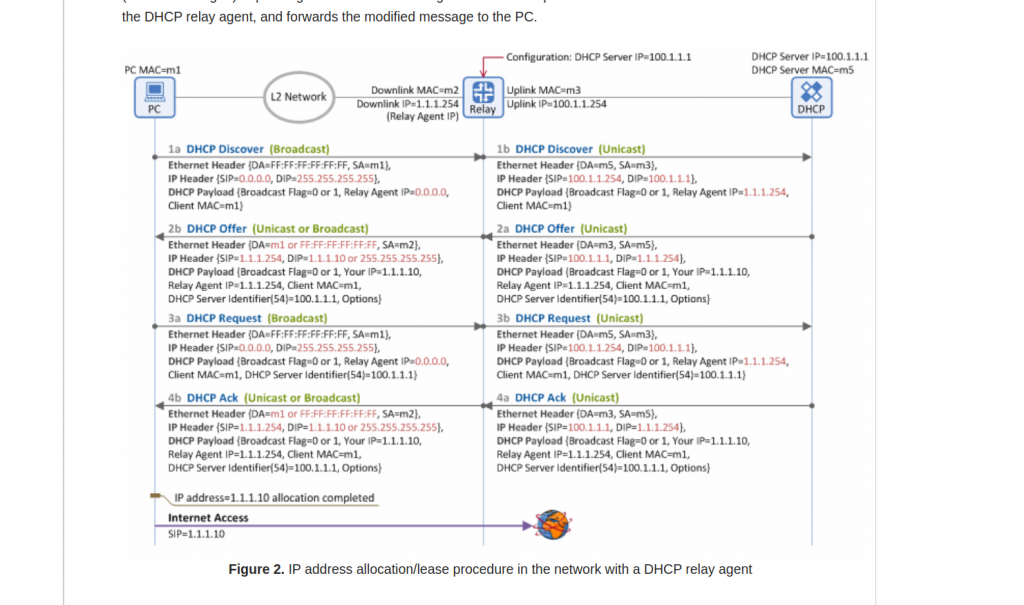
When the server boots up, asks for an IP via DHCP. As we have a centralized DHCP server infrastructure, we have configured DHCP relay in the firewall facing that server to send that request to the DHCP server.
First, let’s take a look at how DHCP relay works. This is a very good link. And this diagram from the mentioned link it is really useful:
One think I learned is the reply (DCHP Offer) doesnt have to use as destination IP the same IP it received as source in DHCP Discover. In the picture, it is packet 2a.
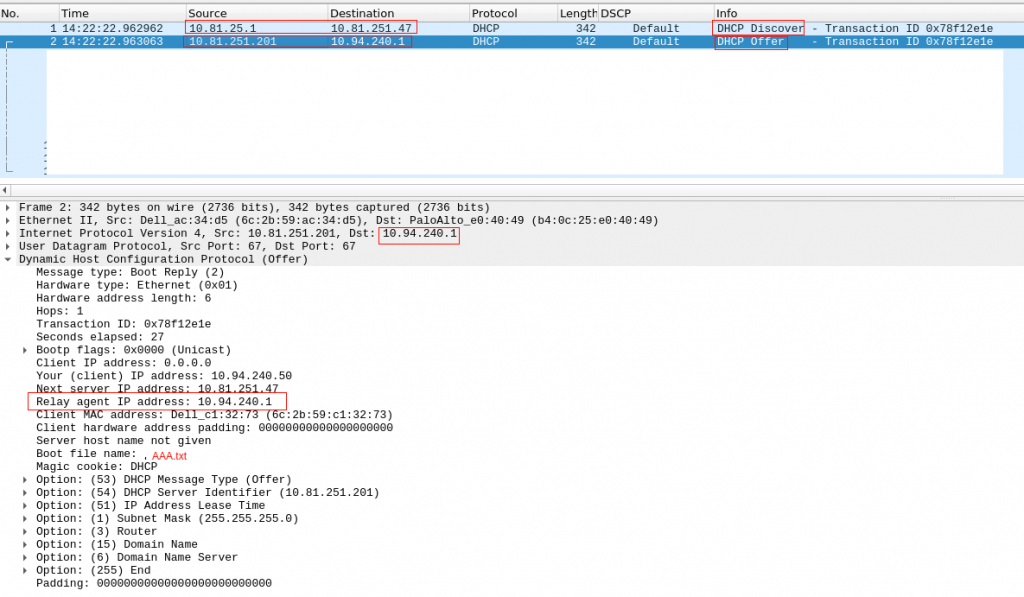
Checking in our environment, we confirm that:
Our server is in 10.94.240.x network. Our firewall is acting as DHCP relay, and send the DHCP Discovery (unicast) to our VIP DHCP Server IP.
The DHCP offer, uses as source the physical IP of the DHCP server and destination is the DHCP relay IP (so it is 10.94.240.1 – the firewall IP in 10.94.240.x network)
Ok, so everything looks fine? No really. The server receives the query, it answers… but we dont see a DCHP Request/ACK.
BTW, keep in mind that DHCP is UDP….
So, we need to see where the packets are lost.
This is a high level path flow between the client and server:
So we need to check this connection is three different firewall vendors….
The initial troubleshooting was just using the GUI tools from Palo/Fortigate. We couldn see anything…. but the server was constantly receiving DHCP Discover and sending DHCP Offer… I dont get it:
# tcpdump -i X udp port 67 or 66 -nn

14:58:06.969462 IP 10.81.25.1.67 > 10.81.251.47.67: BOOTP/DHCP, Request from 6c:2b:59:c1:32:73, length 300
14:58:06.969564 IP 10.81.251.201.67 > 10.94.240.1.67: BOOTP/DHCP, Reply, length 300

14:58:28.329048 IP 10.81.25.1.67 > 10.81.251.47.67: BOOTP/DHCP, Request from 6c:2b:59:c1:32:73, length 300
14:58:28.329157 IP 10.81.251.201.67 > 10.94.240.1.67: BOOTP/DHCP, Reply, length 300
Initially it took me a while to see the request/reply because I was assuming the dhcp request had source 10.94.240.1. So I was seeing only the Reply but not the Request. That was when I went to clarify my head about DHCP Relay and found the link.
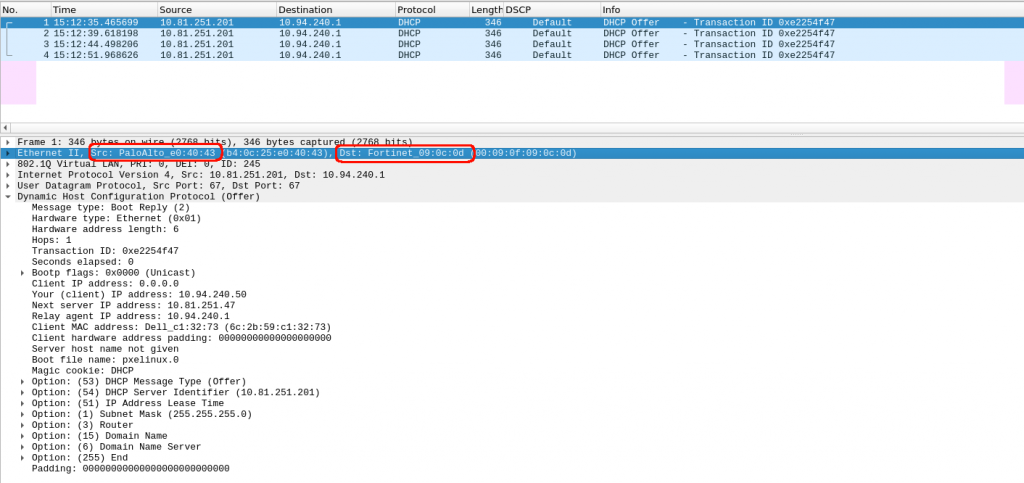
So ok, we have the DHCP Request/Reply, but absolutely nothing in the Palo. Is the palo dropping the packets or is forwarding? No idea. The GUI says nothing, I took a packet capture and couldnt see that traffic neither…
Doesnt makes sense.
Let’s get back to basic.
Did I mention DHCP is UDP? So how a next generation firewall (like paloalto) with all the fancy features enable (we have nearly all of them enable…) treats a UDP connection? UDP is stateless… but the firewall is statefull… the firewall creates a flow with the first packet so it can track, any new packet is considered part of that flow. But why we dont see the flows? We actually have only one flow. The firewall has created that session and offloaded to hardware. So you dont see anything else in the control-plane / GUI. The GUI only shows the end of a connection/flow. And as our flow DHCP Relay hasnt’ terminated (it is UDP) and the firewall keeps receiving packets, it is considered life (the firewall doesnt really know what is going on). So for that reason we dont see the connection in the PaloUI. Ok, I got to that point after a while…. I need to proof that the packet from the server is reaching the firewall and it is leaving it too.
How can I do that? Well, I need to delete that flow so the firewall considers a new connection and the tcpdump can see the packets.
This is the a good link from paloalto to take captures. So I found my connection and the cleared it:
palo(active)> show session all filter destination 10.94.240.1

ID Application State Type Flag Src[Sport]/Zone/Proto (translated IP[Port])
Vsys Dst[Dport]/Zone (translated IP[Port])
135493 dhcp ACTIVE FLOW 10.81.251.201[67]/ZONE1/17 (10.81.251.201[67])
vsys1 10.94.240.1[67]/ZONE2 (10.94.240.1[67])
palo(active)>
palo(active)> clear session id 135493
And now, my packet capture in paloalto confirms that it is sending the packet to the next firewall (checking the destination MAC) !!!
Ok, so we confirm the first firewall in the return path was fine…. next one, it is fortigate.
BTW, we were checked and assumed that the routing is fine in all routers, firewalls, etc. Sometimes is not the case… so when things dont follow your thoughts, get back to the very basics….
We have exactly the same issue as in PaloAlto. I can’t see anything in the logs about receiving a dhcp offer from palo and forwarding it to the last firewall Cisco.
And again, we apply the same reasoning. We have an UDP connection, we have a next-generation firewall (with fancy ASIC). And one more thing, in this fortigate firewall, we allow intra-zone traffic, so it is not going to show anyway in the GUI monitor…
Fantastic, we have confirmation that the second firewall receives and forwards the DHCP Reply!!!
Ok, now the last stop, Cisco ASA. This is an old firewall, I think it could be my father or Darth Vader.
I dont have the fancy tools for packet capture like Palo/Fortigate…. so I went to the basic “debug” commands and “packet-tracer”.
First, this was the dhcp config in Cisco:
vader/pri/act# show run | i dhcp
dhcprelay server 10.81.251.47 EGRESS
dhcprelay enable SERVERS-ZONE
dhcprelay timeout 60
And, the ACL allows all IP traffic in those interfaces… and couldnt see any deny in the logs.
So, I enabled all debugging things I could find for dhcp:
vader/pri/act# show debug
debug dhcpc detail enabled at level 1
debug dhcpc error enabled at level 1
debug dhcpc packet enabled at level 1
debug dhcpd packet enabled at level 1
debug dhcpd event enabled at level 1
debug dhcpd ddns enabled at level 1
debug dhcprelay error enabled at level 1
debug dhcprelay packet enabled at level 1
debug dhcprelay event enabled at level 200
vader/pri/act# DHCPD: Relay msg received, fip=ANY, fport=0 on SERVERS-ZONE interface
DHCPRA: relay binding found for client f48e.38c7.1b6e.
DHCPD: setting giaddr to 10.94.240.1.
dhcpd_forward_request: request from f48e.38c7.1b6e forwarded to 10.81.251.47.
DHCPD: Relay msg received, fip=ANY, fport=0 on SERVERS-ZONE interface
DHCPRA: relay binding found for client 6c2b.59c1.3273.
DHCPD: setting giaddr to 10.94.240.1.
dhcpd_forward_request: request from 6c2b.59c1.3273 forwarded to 10.81.251.47.
vader/pri/act#
So, the debugging doesnt says anything regarding the packet coming back from Fortigate… Not looking good I am afraid. I wasnt running out of ideas about debug commands. I coudn’t increase an log level neither….
Let’s give a go to packet tracer… doesnt looks good:
vader/pri/act# packet-tracer input EGRESS udp 10.81.251.201 67 10.94.240.1 67
Phase: 1
Type: ACCESS-LIST
Subtype:
Result: ALLOW
Config:
Implicit Rule
Additional Information:
MAC Access list
Phase: 2
Type: ACCESS-LIST
Subtype:
Result: DROP
Config:
Implicit Rule
Additional Information:
Result:
input-interface: EGRESS
input-status: up
input-line-status: up
Action: drop
Drop-reason: (acl-drop) Flow is denied by configured rule
So, we are sure our ACL is totally open but the firewall is dropping the packet coming from fortigate. Why? How to fix it?
Ok, get back to basics. Focus in Cisco config. It uses as DHCP relay server, 10.81.251.47 (VIP). But the DHCP reply is coming from the physical IP 10.81.251.201….. maybe Cisco doesnt like that…. Let’s try to add the physical IPs as a new DHCP server:
vader/pri/act# sri dhcp
dhcprelay server 10.81.251.47 EGRESS
dhcprelay server 10.81.251.201 EGRESS
dhcprelay server 10.81.251.202 EGRESS
I think I nearly cried after seeing this in the dhcp logs in our server:
May 12 16:16:27 dhcp1 dhcpd[2561]: DHCPDISCOVER from f4:8e:38:c7:1b:6e via 10.94.240.1
May 12 16:16:28 dhcp1 dhcpd[2561]: DHCPOFFER on 10.94.240.50 to f4:8e:38:c7:1b:6e (cmc-111) via 10.94.240.1
May 12 16:16:28 dhcp1 dhcpd[2561]: Wrote 0 class decls to leases file.
May 12 16:16:28 dhcp1 dhcpd[2561]: Wrote 0 deleted host decls to leases file.
May 12 16:16:28 dhcp1 dhcpd[2561]: Wrote 0 new dynamic host decls to leases file.
May 12 16:16:28 dhcp1 dhcpd[2561]: Wrote 1 leases to leases file.
May 12 16:16:28 dhcp1 dhcpd[2561]: DHCPREQUEST for 10.94.240.50 (10.81.251.202) from f4:8e:38:c7:1b:6e (cmc-111) via 10.94.240.1
May 12 16:16:28 dhcp1 dhcpd[2561]: DHCPACK on 10.94.240.50 to f4:8e:38:c7:1b:6e (cmc-111) via 10.94.240.1
So at the end, finally fixed…. it took too many hours.
Notes:
DHCP Realy: It is not that obvious the flow regarding IPs.
UDP and firewalls, debugging it is a bit more challenging.
Cisco ASA dhcprelay server IPs…. VIPs and non-VIPs please.