Nice high level intro to Erlang and ELK stack here.
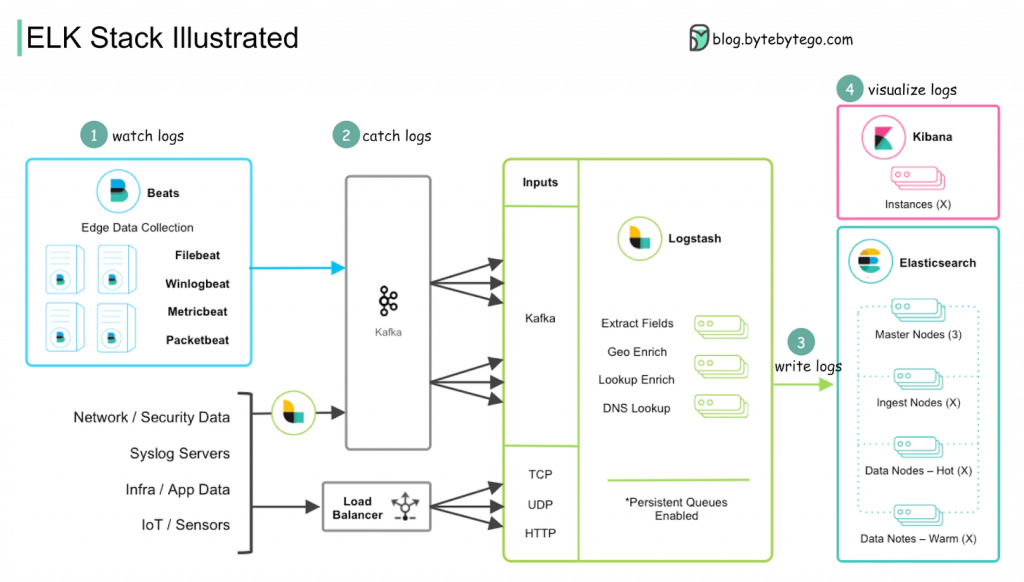
I hope I can remember this ELK stack diagram for the future.
Today I Learned
Nice high level intro to Erlang and ELK stack here.
I hope I can remember this ELK stack diagram for the future.
While updating Debian, I have seen this warning in the last days:
Fetched 11.4 kB in 3s (3,605 B/s)
W: http://www.deb-multimedia.org/dists/testing/InRelease: Key is stored in legacy trusted.gpg keyring (/etc/apt/trusted.gpg), see the DEPRECATION section in apt-key(8) for details.
W: http://deb.torproject.org/torproject.org/dists/testing/InRelease: Key is stored in legacy trusted.gpg keyring (/etc/apt/trusted.gpg), see the DEPRECATION section in apt-key(8) for details.
I did read the apt-key manual but I wasn’t very clear how to proceed. So I searched for a bit and found this article. And it was exactly what I needed.
$ sudo apt-key list
Warning: apt-key is deprecated. Manage keyring files in trusted.gpg.d instead (see apt-key(8)).
/etc/apt/trusted.gpg
--------------------
pub   rsa4096 2014-03-05 [SC]
      A401 FF99 368F A1F9 8152  DE75 5C80 8C2B 6555 8117
uid           [ unknown] Christian Marillat <marillat@debian.org>
uid           [ unknown] Christian Marillat <marillat@free.fr>
uid           [ unknown] Christian Marillat <marillat@deb-multimedia>
uid           [ unknown] Christian Marillat <marillat@deb-multimedia.org>
sub   rsa4096 2014-03-05 [E]

pub   rsa2048 2009-09-04 [SC] [expires: 2024-11-17]
      A3C4 F0F9 79CA A22C DBA8  F512 EE8C BC9E 886D DD89
uid           [ unknown] deb.torproject.org archive signing key
sub   rsa2048 2009-09-04 [S] [expires: 2022-06-11]
...
...
Export the keys:
$ sudo apt-key export 65558117 | sudo gpg --dearmour -o /usr/share/keyrings/repo-debian-multimedia-testing.gpg
Warning: apt-key is deprecated. Manage keyring files in trusted.gpg.d instead (see apt-key(8)).
$


$ sudo apt-key export 886DDD89 | sudo gpg --dearmour -o /usr/share/keyrings/repo-torproject-testing.gpg
Warning: apt-key is deprecated. Manage keyring files in trusted.gpg.d instead (see apt-key(8)).
$
BTW, something I keep forgetting is what part of the pub key I needed. It is the last 8 digits (that you can see in the output of apt-key list). And that was mentioned in the article but I didnt pay attention…
Now update “/etc/apt/sources.list” adding “signed-by=/path to file created above” for each repo:
###Debian Multimedia
deb [arch=amd64 signed-by=/usr/share/keyrings/repo-debian-multimedia-testing.gpg] http://www.deb-multimedia.org testing main non-free

###TOR
deb [arch=amd64 signed-by=/usr/share/keyrings/repo-torproject-testing.gpg] http://deb.torproject.org/torproject.org testing main
Update and see if warning is gone:
# aptitude update
Hit http://security.debian.org/debian-security testing-security InRelease
Hit http://deb.debian.org/debian testing InRelease
Ign https://apt.fury.io/netdevops  InRelease
Ign https://apt.fury.io/netdevops  Release
Hit http://www.deb-multimedia.org testing InRelease
Hit https://dl.google.com/linux/chrome/deb stable InRelease
Hit https://packages.cloud.google.com/apt cloud-sdk InRelease
Hit http://deb.torproject.org/torproject.org testing InRelease
Get: 1 https://apt.fury.io/netdevops  Packages
Ign https://apt.fury.io/netdevops  Translation-en_GB
Ign https://apt.fury.io/netdevops  Translation-en
Ign https://apt.fury.io/netdevops  Contents (deb)
Ign https://apt.fury.io/netdevops  Contents (deb)
Fetched 11.4 kB in 3s (3,650 B/s)

#
All good
And clean-up before finishing:
$ sudo apt-key del 65558117
Warning: apt-key is deprecated. Manage keyring files in trusted.gpg.d instead (see apt-key(8)).
OK
$ sudo apt-key del 886DDD89
Warning: apt-key is deprecated. Manage keyring files in trusted.gpg.d instead (see apt-key(8)).
OK
$
I was watching a concert and I wanted to take just the audio of a song, no video. I knew you could download the full audio from videos pretty easily with youtube-dl but now just wanted an specific portion. Thanks to these links (link1 and link2) I managed to get what I wanted:
$ youtube-dl --youtube-skip-dash-manifest -g "VIDEO_URL"

# copy the second url (audio) from the above command output

$ audio_url="AUDIO_URL_FROM_ABOVE"

$ ffmpeg -i "$audio_url" -ss 00:00:30 -t 00:05:20.0 -q:a 0 -map a sample.mp3

# PLAY IT!

$ vlc sample.mp3Since I had to reinstall my laptop, I have had to tune missing things. One of them was when updating Debian I was constantly having errors with two repositories so I couldn’t get the packages from there. I have been lazy because it wasn’t stopping me for doing anything but I decided to fix that. I have seen this before so it is not totally new but I was surprised as I couldn’t “fix” the key for the Debian Tor repository.
The error for getting the key for “www.deb-multimedia.org” was fixed following this post:
# apt-key adv --keyserver keyring.debian.org --recv-keys 5C808C2B65558117I tried similar approach for “deb.torproject.org” but it failed. I checked the official way to use that repo here. It was a bit different as I do currently as I use the “sources.list” and the post recommends to create a dedicated file. I didn’t pay much attention to it and tried to follow those instructions but using my current config setup. It was still failing. I checked the repo was real. I tried to use a public keyring (based on this) but same result. But at the end I found the solution here:
# wget -q https://deb.torproject.org/torproject.org/A3C4F0F979CAA22CDBA8F512EE8CBC9E886DDD89.asc -O- | sudo apt-key add -After that, my “apt update” didn’t show anymore errors.
And then I noticed why my setup didnt work with the official instructions of Tor Project.
The documentations says to create a new file with this line:
deb [signed-by=/usr/share/keyrings/tor-archive-keyring.gpg] https://deb.torproject.org/torproject.org testing mainAnd then add the key:
# wget -qO- https://deb.torproject.org/torproject.org/A3C4F0F979CAA22CDBA8F512EE8CBC9E886DDD89.asc | gpg --dearmor | tee /usr/share/keyrings/tor-archive-keyring.gpg >/dev/nullBut I have only this in my sources.list:
##### 3rd Party Binary Repos
###Debian Multimedia
deb [arch=amd64] http://www.deb-multimedia.org testing main non-free
#deb [arch=amd64,i386] http://www.deb-multimedia.org buster main non-free

###TOR
deb [arch=amd64] http://deb.torproject.org/torproject.org testing main
#deb-src [arch=amd64] http://deb.torproject.org/torproject.org testing main
So I wasn’t doing the same as I thought.
And somehow I forgot how to scroll using the keyboard with Terminator….and I was sure it worked before. I checked the keysetting and couldnt find anything. I thought something was misconfigured. Then I searched and found this. So as each laptop has a different keyboard setup, I noticed the “shift + PageUp” was actually in my keyboard “shift + Fn + PageUp”.
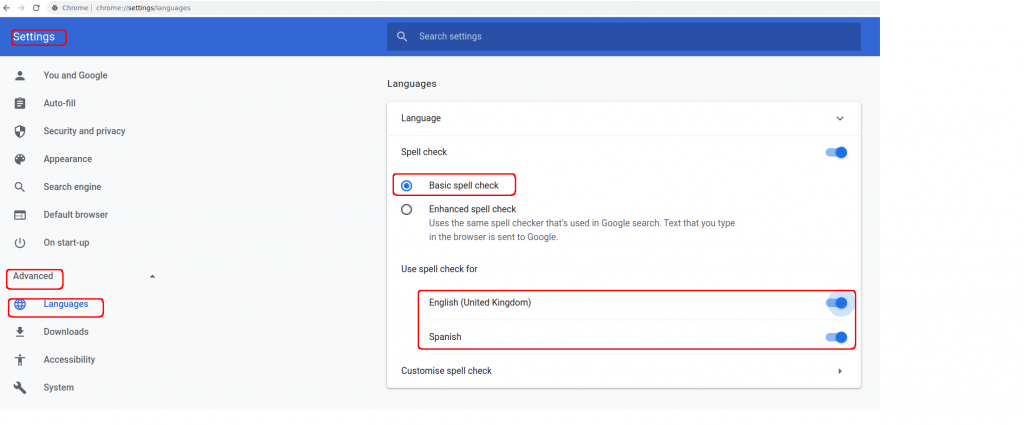
And after sooooo many years, I decided to add spell check for Spanish in GC.
One of the things I had in my to-learn list after rebuilding my laptop was how to scrollback using the tty console (Ctr+F1, etc). I searched and this gave some hope. I tried to see how to do it in Debian as the steps mentioned looked like for Fedora only. This new link looked promising but no joy.
It seems the scrollback support was dropped from kernet 5.9 onwards based on this link. The lack of a maintainer was the main reason (there were security issues that needed attention). I run 5.15.
But as workaround, you can use “tmux” when in the tty and use its scrollback option. tmux is a tool that I would like to learn 🙁 I normally use “terminator”. Although I can use both…
How to scrollback in tmux? Here. So “ctrl+b” then [. Then you can use Fn+PgUp in my case to go up one page. It
A bit of history about Linux console scrollback.
As part of my reinstallation, I had to create a ZFS partition that I used to use for personal storage. Debian Installation process doesnt provide this option, so I have to do it manually. To be honest, it is good to remember/refresh these “basic” things, you never know when you are going to need them (urgently very likely).
As the installation process gave most of the space to the “home” partition, that’s the one I need to take space for creating my ZFS partition. I chose LVM during installation so I dont really have to deal with physical partition, it is mainly logical volumes aka “lv”.
So I rebooted in single-mode as I wanted to be sure that I didnt damage anything and I had to umount the “home” lv. So as root:
Check mounted partitions
# df -hT

Checks LV summary
# lvs

Umount /home
# umount /home/

Check "home" is not munted
# df -hT

Check VolgumeGroup summary
# vgs

Perform filesystem check before making any change
# e2fsck -fy /dev/mapper/athens--vg-home

Resize filesystem to 22G
# resize2fs /dev/mapper/athens--vg-home 22G

Check LV hasnt changed
# lvs

Reduce LV for home to 22G
# lvreduce -L 22G /dev/mapper/athens--vg-home

Check LV home is reduced
# lvs
  LV      VG        Attr       LSize   Pool Origin Data%  Meta%  Move Log Cpy%Sync Convert
  home    athens-vg -wi-ao----  22.00g
  root    athens-vg -wi-ao---- <27.94g
  swap_1  athens-vg -wi-ao---- 976.00m
#

Check you have free space in the VG
# vgs
  VG        #PV #LV #SN Attr   VSize   VFree
  athens-vg   1   3   0 wz--n- 237.48g <186.59g
#

Reboot to be sure everything is fine
# reboot

Check all partitions are mounted and "home" is just 22G
$ df -hT
Filesystem                  Type      Size  Used Avail Use% Mounted on
udev                        devtmpfs  3.9G     0  3.9G   0% /dev
tmpfs                       tmpfs     786M  1.6M  785M   1% /run
/dev/mapper/athens--vg-root ext4       28G  6.7G   20G  26% /
tmpfs                       tmpfs     3.9G   87M  3.8G   3% /dev/shm
tmpfs                       tmpfs     5.0M  8.0K  5.0M   1% /run/lock
/dev/sda2                   ext2      456M   72M  360M  17% /boot
/dev/mapper/athens--vg-home ext4       21G  3.0G   17G  16% /home
/dev/sda1                   vfat      496M   64M  433M  13% /boot/efi
tmpfs                       tmpfs     786M   40K  786M   1% /run/user/1000
$

Create new LV "storage" using the spare space in the VG
# lvcreate -L 186G -n storage athens-vg
  Logical volume "storage" created.
#

Check VG space has reduced
# vgs
  VG        #PV #LV #SN Attr   VSize   VFree
  athens-vg   1   4   0 wz--n- 237.48g 604.00m
#

Check we have a new LV storage of 186G
# lvs
  LV      VG        Attr       LSize   Pool Origin Data%  Meta%  Move Log Cpy%Sync Convert
  home    athens-vg -wi-ao----  22.00g
  root    athens-vg -wi-ao---- <27.94g
  storage athens-vg -wi-a----- 186.00g
  swap_1  athens-vg -wi-ao---- 976.00m
#

Create our Zpool storage using the LV storage.
# zpool create storage /dev/mapper/athens--vg-storage

Check Zpool status
# zpool status
  pool: storage
 state: ONLINE
config:

	NAME                  STATE     READ WRITE CKSUM
	storage               ONLINE       0     0     0
	  athens--vg-storage  ONLINE       0     0     0

errors: No known data errors
#

Check mount point for ZFS pool
# zfs get mountpoint storage
NAME     PROPERTY    VALUE       SOURCE
storage  mountpoint  /storage    default
#

Change Zpool storage mount point to a point in my home dir
# zfs set mountpoint=/home/tomas/storage storage

Check ZFS list
# zfs list
NAME      USED  AVAIL     REFER  MOUNTPOINT
storage   165K   179G       24K  /home/yo/storage
#

Check all partitions
$ df -hT
Filesystem                  Type      Size  Used Avail Use% Mounted on
udev                        devtmpfs  3.9G     0  3.9G   0% /dev
tmpfs                       tmpfs     786M  1.6M  785M   1% /run
/dev/mapper/athens--vg-root ext4       28G  6.7G   20G  26% /
tmpfs                       tmpfs     3.9G   87M  3.8G   3% /dev/shm
tmpfs                       tmpfs     5.0M  8.0K  5.0M   1% /run/lock
/dev/sda2                   ext2      456M   72M  360M  17% /boot
/dev/mapper/athens--vg-home ext4       21G  3.0G   17G  16% /home
/dev/sda1                   vfat      496M   64M  433M  13% /boot/efi
tmpfs                       tmpfs     786M   40K  786M   1% /run/user/1000
storage                     zfs       180G  128K  180G   1% /home/y/storage
$
I have used these links to refresh myself:
To be honest, I thought I was going to struggle much more but it has been quick.
Step by step getting back to my normal environment (and trying to improve it). I said it before, I should be able to reinstall my laptop easily, like a production server….
Using mutt for sending emails via my gmail account has been something I wanted to do for a long time. After my last issue with my laptop, finally I decided to learn how to do it.
Thanks to these blogs I managed to get it working!!!
For the main setup, this link and this. For overcoming the authentication issue, this link. So you define a new password for an app in your google account as I use 2FA.
sudo aptitude install mutt

mkdir ~/.mutt

vim ~/.mutt/muttrc
This is the content of my file:
set from = "youremail@gmail.com"
set realname = "Name Surname"

# IMAP settings
set imap_user = "youremail@gmail.com"
set imap_pass = "your_new_app_password"

# SMTP settings
set smtp_url = "smtps://youremail@smtp.gmail.com"
set smtp_pass = "your_new_app_password"

# Remote Gmail folders
set folder = "imaps://imap.gmail.com/"
set spoolfile = "+INBOX"
set postponed = "+[Gmail]/Drafts"
set trash = "+[Gmail]/Trash"

# Composition
set editor = "vim"
set edit_headers = yes
set charset = UTF-8
This is the error I had before getting the app password:
$ echo "Example mutt+gmail" | mutt -s "Testing mutt+gmail" youremail@gmail.com -a test.txt
SASL authentication failed
Could not send the message.
$
After that. Email sent fine without error and I can see it in my inbox!
$ echo "Example mutt+gmail v2" | mutt -s "Testing mutt+gmail v2" youremail@gmail.com -a books.ods
$
The only thing I dont like is I need to have a password in a text file….
So let’s use chmod so, at least, only me can read the file.
~/.mutt$ chmod og-r muttrc
~/.mutt$ ls -ltr
total 4
-rw------- 1 yy yy 687 Oct 26 23:22 muttrc
~/.mutt$
Although, Ideally, I would prefer to use a certificate that is only valid for gmail, but I haven’t been able to find anything related to this.
Two weeks ago I started having an issue regarding “duplicate file trigger” with some packages related to gtk-2.0 when I was doing my routine “aptitude update/ dist-upgrade”. I use Debian Testing and I have seen in the past weird things with packages but then got fixed. I understand I am in “testing” so these things may happen. Somehow, I tried to take a look If I could understand the problem and fix it. Searching didnt give much info. I found quite old entries about the issue but nothing really clarifying why I ended there. I assume that I am not the only one having these problems in the Debian community so it should be “easier” to find info from more experience people than me. But most of the cases, I rely on old data.
Somehow I “fixed” that issue but I didnt dig enough to understand what it is this thing about “triggers”. So I messed around with “/var/lib/dpkg/triggers/File” but I did a rookie mistake. I didnt do a backup of the file…. (how difficult is to type “cp File File-backup”). I remember that I had to remove several entries and they related to i386 architecture….
Well, then after a couple of days, I had a different issue. Not sure if this was triggered by my “triggers fix”.
Somehow I had some packages failing to install due to missing dependencies. It was mainly related to “python3”. So last Saturday I decided to go deep into it… And I made things worse. When you “aptitude purge” a package, you know the package and dependencies will be removed (if they are not used). While I was trying to solve my “death by dependencies” I deleted many packages that I was sure I needed. Again, I should have stopped or at least take notes of all those packages. At the end, I ended with “just” one issue. I couldnt install python3…. no idea why. In this path of destruction, I removed most of my X11 setup, so no graphic UI for me… But I didnt notice until too late. I tried to reinstall as many packages as possible and still python3 was failing. I have pyenv and I have used python3 so not sure why/how was broken. I reached a point that with so many changes, I had to reboot…. It is not the first time and after spending hours trying to fix something, that you are sure it is fixed, is still not fixed, then your reboot, and it is fixed. So I risked it, I knew that this would be fixed or would blow up big time. The later happened. And again, rookie mistake, I should have refreshed my hard drive backup, just in case you can’t access the laptop. But as my SSD looked healthy, the thought didnt cross my mind…
Reboot, got me stuck in “lightdm can’t start”….. and I couldnt login…. I was impatient. As later I learnt, I should wait a bit (long) for a time out and I would have seen my prompth.
I tried to get into rescue mode / single-user mode, and had to get by root. So I had a bit of access and I tried to run aptitude again…. I didnt have Internet access. Something I give for granted, when you login into your graphic UI, you have your nice network-manager that logs into your wifi. I always thought I was something simple like when you log into wired Internet access… I was totally wrong.
I was lucky that I had Internet in my mobile phone and that helped me a lot to move forwards with each issue. Without that, I would be still writing on paper.
So after a bit of struggling, I learned how to connect to a wifi via CLI. Some I was quite happy with that. I used this link. Thanks to the author!
1) Find out the wireless device name.
# iw dev
phy#0
	Unnamed/non-netdev interface
		wdev 0x5
		addr 60:57:18:00:9d:8a
		type P2P-device
		txpower 0.00 dBm
	Interface wlp2s0
		ifindex 2
.....

2) Check status of wireless interface.
# ip link show wlp2s0
2: wlp2s0: (BROADCAST,MULTICAST) mtu 1500 qdisc noop state DOWN mode DEFAULT qlen 1000
    link/ether aa:aa:aa:aa:aa:aa brd ff:ff:ff:ff:ff:ff

3) Bring up interface if you dont see "UP"
# sudo ip link set wlp2s0 up

# ip link show wlp2s0
2: wlp2s0: (NO-CARRIER,BROADCAST,MULTICAST,UP) mtu 1500 qdisc mq state DOWN mode DEFAULT qlen 1000
    link/ether aa:aa:aa:aa:aa:aa brd ff:ff:ff:ff:ff:ff

4) Check the connection status.
# iw wlp2s0 link
Not connected.

5) Scan to find your local wifi. You need to search for the SSID that you want to connect. This can be a long sentence...
# iw wlp2s0 scan
....
BSS bb:bb:bb:bb:bb:bb(on wlp2s0) -- associated
	last seen: 136826.740s [boottime]
	TSF: 10582137299 usec (0d, 02:56:22)
	freq: 5620
	beacon interval: 100 TUs
	capability: ESS Privacy SpectrumMgmt APSD (0x0911)
	signal: -76.00 dBm
	last seen: 12 ms ago
	Information elements from Probe Response frame:
	SSID: ZZZZZZ PROVIDER SPEED PRODUCT 10Ghz
	Supported rates: 6.0* 9.0 12.0* 18.0 24.0* 36.0 48.0 54.0
	DS Parameter set: channel 124
	HT capabilities:
		Capabilities: 0x0f
			RX LDPC
			HT20/HT40
			SM Power Save disabled
			No RX STBC
			Max AMSDU length: 3839 bytes
			No DSSS/CCK HT40
		Maximum RX AMPDU length 65535 bytes (exponent: 0x003)
		Minimum RX AMPDU time spacing: 4 usec (0x05)
		HT RX MCS rate indexes supported: 0-15, 32
		HT TX MCS rate indexes are undefined
	HT operation:
		 * primary channel: 124
		 * secondary channel offset: above
		 * STA channel width: any
		 * RIFS: 0
		 * HT protection: no
		 * non-GF present: 1
		 * OBSS non-GF present: 0
		 * dual beacon: 0
		 * dual CTS protection: 0
		 * STBC beacon: 0
		 * L-SIG TXOP Prot: 0
		 * PCO active: 0
		 * PCO phase: 0
	RSN:	 * Version: 1
		 * Group cipher: CCMP
		 * Pairwise ciphers: CCMP
		 * Authentication suites: PSK
		 * Capabilities: 1-PTKSA-RC 1-GTKSA-RC (0x0000)
......
	WPS:	 * Version: 1.0
		 * Wi-Fi Protected Setup State: 2 (Configured)
		 * Response Type: 3 (AP)
		 * UUID: bc329e00-1dd8-11b2-8601-38549b39bdd4
		 * Manufacturer: ABCD
		 * Model: ABCD GateWay
		 * Model Number: V1.0
		 * Serial Number: 12345678
		 * Primary Device Type: ABABABAB
		 * Device name: ABCD AP
		 * Config methods: PBC, Keypad
		 * RF Bands: 0x2
		 * Version2: 2.0
.....

As the blog mentions, the two important things here are SSID and RSN/WPS. I dont think it is common these days to find WEP Wifi. Connecting to a WEP it is far much easier.


6) Connect to WPA/WPA2 WiFi network: Generate wpa_supplicant config file
Generate a configuration file for wpa_supplicant that contains the pre-shared key ("passphrase") for the WiFi network.

# wpa_passphrase "ZZZZZZ PROVIDER SPEED PRODUCT 10Ghz" >> /etc/wpa_supplicant.conf
...type in the passphrase and hit enter...

wpa_passphrase takes the SSID as the single argument. You must type in the passphrase for the WiFi network after you run the command. Using that information, wpa_passphrase will output the necessary configuration statements to the standard output. Those statements are appended to the wpa_supplicant configuration file located at /etc/wpa_supplicant.conf.

# cat /etc/wpa_supplicant.conf
# reading passphrase from stdin
network=
	ssid="ZZZZZZ PROVIDER SPEED PRODUCT 10Ghz"
	#psk="mytest123"
	psk=aaaaaasuperlongkeybbbbbbbbbbbbbbbbbbb
}


7) Connect using wpa_supplicant config file.
# sudo wpa_supplicant -B -D wext -i wlp2s0 -c /etc/wpa_supplicant.conf

-B means run wpa_supplicant in the background.
-D specifies the wireless driver. wext is the generic driver.
-c specifies the path for the configuration file.


8) Verify you are attached to your Wifi SSID
# iw wlp2s0 link
Connected to bb:bb:bb:bb:bb:bb (on wlp2s0)
	SSID: ZZZZZZ PROVIDER SPEED PRODUCT 10Ghz
	freq: 2412
	RX: 63825 bytes (471 packets)
	TX: 1344 bytes (12 packets)
	signal: -27 dBm
	tx bitrate: 6.5 MBit/s MCS 0

	bss flags:	short-slot-time
	dtim period:	0
	beacon int:	100

9) Obtain IP address by DHCP and verify IP
# dhclient wlp2s0
#
# ip addr show wlp2s0
2: wlp2s0:  mtu 1500 qdisc mq state UP qlen 1000
    link/ether aa:aa:aa:aa:aa:aa brd ff:ff:ff:ff:ff:ff
    inet 192.168.1.3/24 brd 192.168.1.255 scope global wlp2s0
    inet6 zzz/64 scope link
       valid_lft forever preferred_lft forever

10) Check routing / Add default if needed:
# ip route show
192.168.1.0/24 dev wlp2s0  proto kernel  scope link  src 192.168.1.3

The above routing table contains only 1 rule which redirects all traffic destined for the local subnet (192.168.1.x) to the wlp2s0 interface. You may want to add a default routing rule to pass all other traffic through wlp2s0 as well.

# ip route add default via 192.168.1.254 dev wlp2s0
# ip route show
default via 192.168.1.254 dev wlp2s0
192.168.1.0/24 dev wlp2s0  proto kernel  scope link  src 192.168.1.3

11) Check external connecitivity
# ping 8.8.8.8
After being able to get Internet access I carried on troubleshooting. I was stuck with python3 issue and now ligthdm not starting up… Using this link, I could see lightdm was complaining about an issue with Xorg. So then I checked the logs of Xorg.
[    34.050] (II) LoadModule: "glx"
[    34.050] (II) Loading /usr/lib/xorg/modules/extensions/libglx.so
[    34.050] (EE) Failed to load /usr/lib/xorg/modules/extensions/libglx.so: libGL.so.1: cannot open shared object file: No such file or directory
[    34.050] (EE) Failed to load module "glx" (loader failed, 0)
I searched for info about that error. I followed several pages like this and this, I installed an reinstalled the packages mentioned, but not way could fix that “glx”.
After sometime, I decided to work on the “python3” issue. I tried to follow some advice like this. Again I tried to purge as many packets as I could and reinstall everything python related. Same result, I couldn’t install python3. And weird enough, my wifi used to be disconnected whenever removed python so I had reboot and attach to the wifi a couple of times. And as well, I managed to “lock” my wifi card too, so bizarre!!! I think I followed something from here to unlock.
So I reached a point where I was totally stuck. I couldnt fix the Xorg issue and turn up the graphic desktop environment and python3 was very broken. I decided to reinstall, I was getting nowhere. I made full backup of my homedir and most of the system folders and take some logs about the current config of my system and packages currently installed so I could help me to setup the new environment quicker.
So I downloaded a netinstall iso for Debian testing. Thanks to my mobile, I managed to find the link and I “wget” it via my cli. Then I needed to install that iso in a USB so the Debian documentation was quite easy…
# cp debian-testing-amd64-netinst.iso /dev/sdb1
# sync
Ok, it was time to boot up the usb and resintall…. not that easy…. my laptop was not able to see the usb at boot time….. I checked the BIOS and USB was allowed as boot device…. Back to the shell, I could mount the USB, fdisk showed the partition had the flag enabled for booting.
I decided to find another method. I was pretty sure that in the past when creating a boot USB I had to use “dd”… so following this link:
# dd if=debian-testing-amd64-netinst.iso of=/dev/sdb1 bs=4M conv=fdatasync status=progressThe I tried to boot again, and worked!!!
So started the reinstall process. I chose to use the whole disk and the trigger a process to overwrite my whole disk…. I had to leave the laptop overnight because the process was superslow! I didnt know how to skip it….
Something I still haven’t learned is how to scroll up/down in the tty !!! During the whole troubleshooting time, it was quite frustrating because using “less” didnt work always with all my commands… I tried to find some answers like this but no joy.
Next night I follow up. Obviously the installation process didnt detect my wifi card (non-free drivers my love) and I dont have a RJ45 port… so I had to use my usb-rj45 adaptor and long rj45 cable to get back to the internet and complete the installation…
Once the process finished, you end up with a very basic system… no wifi, no Xorg, just pure CLI environment.
So started trying to install some packages I use more often and get my wifi card detected and working. As I had my backup, I could update my apt/sources.list file and get the repositories I needed.
  104  vim /etc/apt/sources.list
  105  aptitude update
  106  aptitude dist-upgrade
  108  aptitude install firmware-iwlwifi
  109  lsmod | grep iw
  110  iw list
  116  reboot
I installed “lightdm” as my display manager. I finally managed to see it again! I logged in and nothing happend. I forgot to install my lightweith desktop environment… lxde.
So finally, I was back to my graphic environment. But again I forgot to install the network-manager to get my Internet connectivity sorted as I was using the CLI technique before.
One final issue was the sound card, I could see videos online but didnt have sound so I was pretty sure I was missing something again, “alsa-utils” and then with “pavucontrol” I noticed the output devices were muted.
So finally got basic functionality. I haven’t moved all my data yet as I need to create my ZFS partition so I will need a bit more tinkering in the coming days.
This is the list of installed packages so far:
aptitude install lightdm
aptitude install sudo
aptitude install gedit
aptitude install tcpdump
aptitude install nmap
aptitude install terminator
aptitude install gkrellm
aptitude install keepass2
aptitude install firefox-esr
aptitude install vagrant
aptitude install mutt
aptitude install screen
aptitude install tmux
aptitude install wpasupplicant
aptitude install iw
aptitude install minicom
aptitude install lxde
aptitude install pavucontrol
aptitude install libreoffice
aptitude install lstopo
aptitude install apt-file
aptitude install hwloc
aptitude install parted
aptitude install ristretto
aptitude install network-manager-gnome
aptitude install net-tools
aptitude install vim
aptitude install git
aptitude install tig
aptitude install firmware-iwlwifi
aptitude install qemu
aptitude install alsa-tools-gui
aptitude install alsa-utils
aptitude install brightnessctl
aptitude install zfs-dkms
aptitude install gkrellm-volume
Things I want to learn:
Things I need to setup
I want to count the number of interfaces that have some specific configuration in my router. I want to use the most basic tools found in linux (so dont have to assume anything else is installed) and I want to use as less commands as possible.
So this is my config:
frr version 7.5
frr defaults traditional
hostname R2
log syslog informational
no ipv6 forwarding
service integrated-vtysh-config
!
interface ens6
 ip router isis ISIS
 isis circuit-type level-2-only
 isis network point-to-point
!
interface lo1
 ip router isis ISIS
 isis passive
!
interface ens7
 ip router isis ISIS
 isis circuit-type level-2-only
 isis network point-to-point
!
interface lo2
 ip router isis ISIS
 isis passive
!
mpls ldp
 router-id 172.20.15.2
 !
 address-family ipv4
  discovery transport-address 172.20.15.2
  !
  interface ens6
  !
  interface ens7
  !
 exit-address-family
 !
!
router isis ISIS
 net 49.0001.1720.2001.5002.00
!
line vty
!
And I want to count the number of interfaces that have “isis network point-to-point” regardless of any other config.
In this example, we have just two interfaces.
interface ens6
 ip router isis ISIS
 isis circuit-type level-2-only
 isis network point-to-point

interface ens7
 ip router isis ISIS
 isis circuit-type level-2-only
 isis network point-to-point
The pseudo-pattern should be something like:
^interface ens.*point-to-point$So something that starts with “interface ens”, it can have anything after that and then it ends with “point-to-point”
Ideally I want to use just “grep” and it is a standard and common tool
But grep mainly works in one line each time. And my pattern covers multiple lines.
So I searched for some help and found this that uses “perl compatible regular expressions” (PCRE). I have no idea about perl but let’s give it a go:
$ grep -Pz '(?s)interface ens.*point-to-point\n' r5.txt
frr version 7.5
frr defaults traditional
hostname R2
log syslog informational
no ipv6 forwarding
service integrated-vtysh-config
!
interface ens6
 ip router isis ISIS
 isis circuit-type level-2-only
 isis network point-to-point
!
interface lo1
 ip router isis ISIS
 isis passive
!
interface ens7
 ip router isis ISIS
 isis circuit-type level-2-only
 isis network point-to-point
!
interface lo2
 ip router isis ISIS
 isis passive
!
mpls ldp
 router-id 172.20.15.2
 !
 address-family ipv4
  discovery transport-address 172.20.15.2
  !
  interface ens6
  !
  interface ens7
  !
 exit-address-family
 !
!
router isis ISIS
 net 49.0001.1720.2001.5002.00
!
line vty
!
Let’s explain the parameters provided to grep so far:
But if I count, we dont have the expected answer of 2:
$ grep -Pzc '(?s)interface ens.*point-to-point\n' r5.txt
1
The “z” parameter is treating the file as a single line so for grep, there is one match only. The initial command shows in bold just one block.
We notice that the pattern is matching “interface lo1” and that is not what we want, it should be ignored.
So our pattern should match the smallest string. So we want a non-greedy matching regex. So searching again, found this. It seems for Perl regex, we need to use ? after *
$ grep -Pz '(?s)interface ens.*?point-to-point\n' r5.txt
frr version 7.5
frr defaults traditiona
hostname R2
log syslog informational
no ipv6 forwarding
service integrated-vtysh-config
!
interface ens6
 ip router isis ISIS
 isis circuit-type level-2-only
 isis network point-to-point
!
interface lo1
 ip router isis ISIS
 isis passive
!
interface ens7
 ip router isis ISIS
 isis circuit-type level-2-only
 isis network point-to-point
!
interface lo2
 ip router isis ISIS
 isis passive
!
mpls ldp
 router-id 172.20.15.2
 !
 address-family ipv4
  discovery transport-address 172.20.15.2
  !
  interface ens6
  !
  interface ens7
  !
 exit-address-family
 !
!
router isis ISIS
 net 49.0001.1720.2001.5002.00
!
line vty
!
So now, we can see two blocks highlighted. So now let’s print only the matched strings using -o:
$ grep -Pzo '(?s)interface ens.*?point-to-point\n' r5.txt
interface ens6
 ip router isis ISIS
 isis circuit-type level-2-only
 isis network point-to-point
interface ens7
 ip router isis ISIS
 isis circuit-type level-2-only
 isis network point-to-point
So this looks correct but still counting (-c) doesnt work properly because -z is treating the entry as one big line.
I haven’t been able to find the solution with just one command so at the end, I have to pipe another grep. The initial grep matches the pattern, so the second one should just count a specific pattern like “point”. It should be that simple:
$ grep -Pzo '(?s)interface ens.*?point-to-point\n' r5.txt | grep point
grep: (standard input): binary file matches
Weird, I thought this was pure text but seems the ouput of the first grep has some binary data:
$ grep -Pzo '(?s)interface ens.*?point-to-point\n' r5.txt > r55.txt
$ vim r55.txt
interface ens6
 ip router isis ISIS
 isis circuit-type level-2-only
 isis network point-to-point
^@interface ens7
 ip router isis ISIS
 isis circuit-type level-2-only
 isis network point-to-point
^@
But we can tell grep to read binary data too using -a as per this blog and then count.
$ grep -Pzo '(?s)interface ens.*?point-to-point\n' r5.txt | grep -a point
 isis network point-to-point
 isis network point-to-point
$ grep -Pzo '(?s)interface ens.*?point-to-point\n' r5.txt | grep -ac point
2
Funny enough, if I just want to count, I dont need -a:
$ grep -Pzo '(?s)interface ens.*?point-to-point\n' r5.txt | grep -c point
2
So not sure if this is the best solution but it took me a bit to find it. It seems to work:
grep -Pzo ‘(?s)interface ens.*?point-to-point\n’ r5.txt | grep -ac point
Continuation of the second part, this time we want to test VRF-lite.
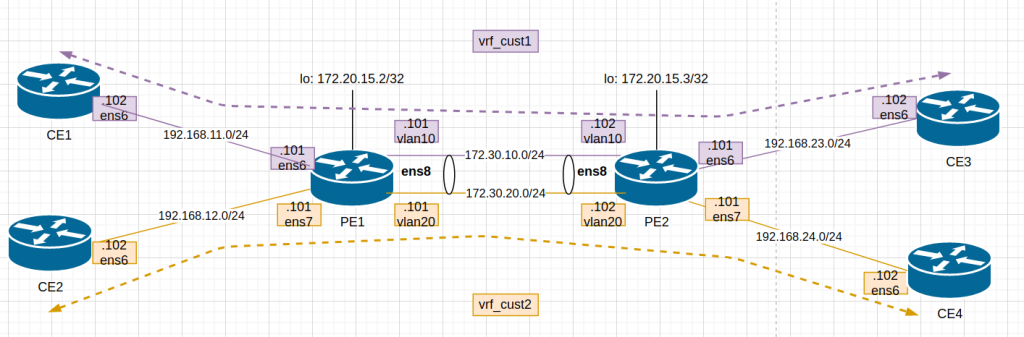
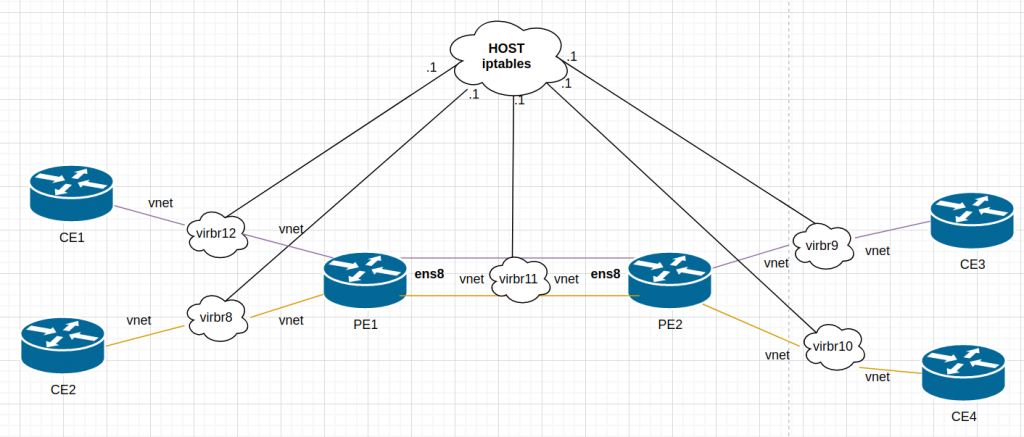
Again, I am following the author post but adapting it to my environment using libvirt instead of VirtualBox and Debian10 as VM. All my data is here.
This is the diagram adapted to my lab:
After updating Vagrantfile and provisioning script, I “vagrant up”. The 6 VMs dont take long to boot up so it is a good thing.
The provisioning script is mainly for configuration of PE1 and PE2 . This is a bit more detail:
    # enabling ipv4 forwarding (routing)
    sudo sysctl net.ipv4.ip_forward=1

    # add loopback (not used in lab3)
    sudo ip addr add 172.20.5.$self/32 dev lo

    # removing ip in link between pe1-pe2 as we will setup a trunk with two vlans.
    sudo ip addr del 192.168.66.10$self/24 dev ens8

    # creating two vlans 10 (ce1,ce3) and 20 (ce2, ce4)
    sudo ip link add link ens8 name vlan10 type vlan id 10
    sudo ip link add link ens8 name vlan20 type vlan id 20

    # assign IP to each vlan
    sudo ip addr add 172.30.10.10$self/24 dev vlan10
    sudo ip addr add 172.30.20.10$self/24 dev vlan20

    # turn up each vlan as by default are down
    sudo ip link set vlan10 up
    sudo ip link set vlan20 up

    # create two routing tables with a null route
    sudo ip route add blackhole 0.0.0.0/0 table 10
    sudo ip route add blackhole 0.0.0.0/0 table 20

    # create two VRFs and assign one table (created above) to each one
    sudo ip link add name vrf_cust1 type vrf table 10
    sudo ip link add name vrf_cust2 type vrf table 20

    # assign interfaces to the VRFs            // ie. PE1:
    sudo ip link set ens6 master vrf_cust1     // interface to CE1
    sudo ip link set vlan10 master vrf_cust1   // interface to PE2-vlan10

    sudo ip link set ens7 master vrf_cust2     // interface to CE2
    sudo ip link set vlan20 master vrf_cust2   // interface to PE2-vlan20

    # turn up VRFs
    sudo ip link set vrf_cust1 up
    sudo ip link set vrf_cust2 up

    # add static route in each VRF routing table to reach the opposite CE
    sudo ip route add 192.168.$route1.0/24 via 172.30.10.10$neighbor table 10
    sudo ip route add 192.168.$route2.0/24 via 172.30.20.10$neighbor table 20
Check the status of the VRFs in PE1:
vagrant@PE1:/vagrant$ ip link show type vrf
 8: vrf_cust1:  mtu 65536 qdisc noqueue state UP mode DEFAULT group default qlen 1000
     link/ether c6:b8:f2:3b:53:ed brd ff:ff:ff:ff:ff:ff
 9: vrf_cust2:  mtu 65536 qdisc noqueue state UP mode DEFAULT group default qlen 1000
     link/ether 62:1c:1d:0a:68:3d brd ff:ff:ff:ff:ff:ff
 vagrant@PE1:/vagrant$
 vagrant@PE1:/vagrant$ ip link show vrf vrf_cust1
 3: ens6:  mtu 1500 qdisc pfifo_fast master vrf_cust1 state UP mode DEFAULT group default qlen 1000
     link/ether 52:54:00:6f:16:1e brd ff:ff:ff:ff:ff:ff
 6: vlan10@ens8:  mtu 1500 qdisc noqueue master vrf_cust1 state UP mode DEFAULT group default qlen 1000
     link/ether 52:54:00:33:ab:0b brd ff:ff:ff:ff:ff:ff
 vagrant@PE1:/vagrant$
So let’s test if we can ping from CE1 to CE3:
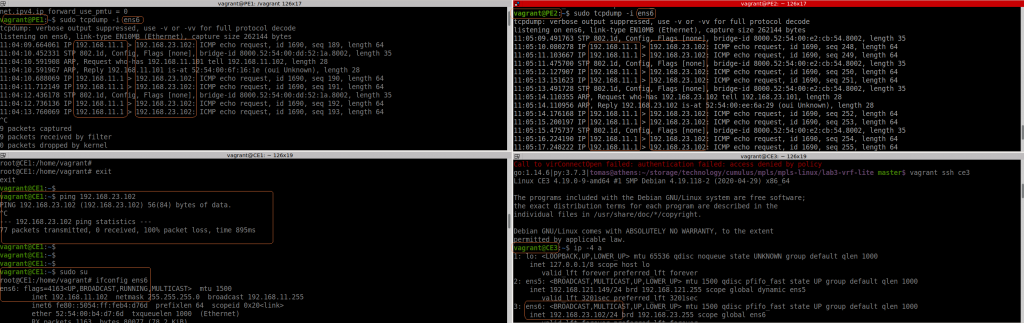
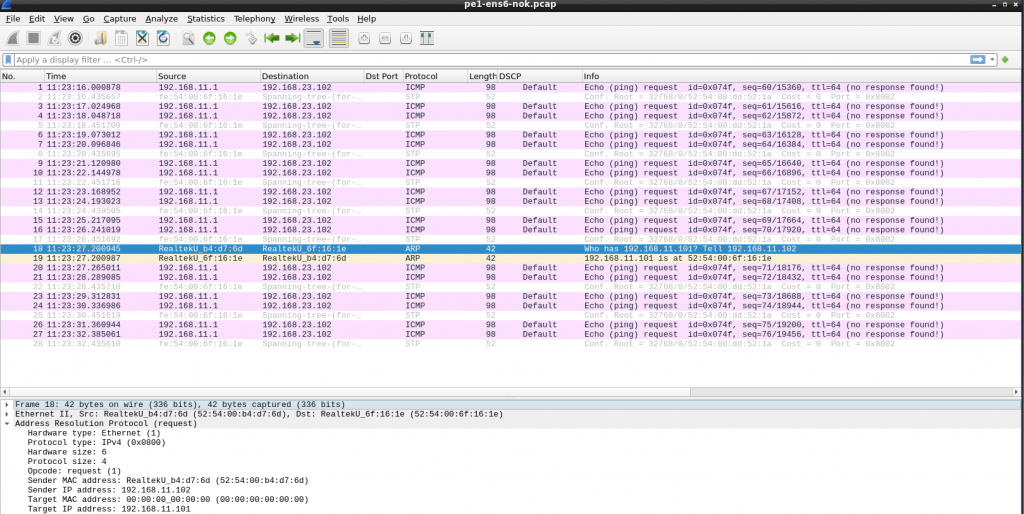
Ok, if fails. I noticed that PE1 sees the packet from CE1… but the source IP is not the expected one (11.1 is the host/my laptop). And the packet reaches to PE2 with the same wrong source IP and then to CE3. In CE3 the ICMP reply is sent to 11.1, to it never reaches CE1.
The positive thing is that VRF lite seems to work.
I double checked all IPs, routing, etc. duplicated MAC in CE1 and my laptop maybe??? I installed “net-tools” to get “arp” command and check the arp table contents in CE1. Checking the ARP request in wireshark, all was good.
Somehow, the host was getting involved…. Keeping in mind that this is a simulated network, the host has access to all “links” in the lab. Libvirt creates a bridge (switch) for each link and it adds a vnet (port) for each VM that uses it:
# brctl show
 bridge name    bridge id       STP enabled interfaces
 virbr10        8000.525400b747b0   yes     vnet27
                                            vnet30
 virbr11        8000.5254006e5a56   yes     vnet23
                                            vnet31
 virbr12        8000.525400dd521a   yes     vnet19
                                            vnet21
 virbr3        8000.525400a38db1   yes     vnet16
                             vnet18
                             vnet20
                             vnet24
                             vnet26
                             vnet28
 virbr8        8000.525400de61f2   yes     vnet17
                                           vnet22
 virbr9        8000.525400e2cb54   yes     vnet25
                                           vnet29
“.1” is always the host but It was clear my routing was correct in all devices. I remembered that I had some issues during the summer when I was playing with containers/docker and doing some routing…. so I checked iptables….
I didnt have iptables in the VMs… but as stated earlier, the host is connected to all “links” used between the VMs. There is no real point-to-point link.
# iptables -t nat -vnL --line-numbers
...
Chain LIBVIRT_PRT (1 references)
num   pkts bytes target     prot opt in     out     source               destination
1       11   580 RETURN     all  --  *      *       192.168.11.0/24      224.0.0.0/24
2        0     0 RETURN     all  --  *      *       192.168.11.0/24      255.255.255.255
3        0     0 MASQUERADE  tcp  --  *      *       192.168.11.0/24     !192.168.11.0/24      masq ports: 1024-65535
4       40  7876 MASQUERADE  udp  --  *      *       192.168.11.0/24     !192.168.11.0/24      masq ports: 1024-65535
5       16  1344 MASQUERADE  all  --  *      *       192.168.11.0/24     !192.168.11.0/24
6       15   796 RETURN     all  --  *      *       192.168.24.0/24      224.0.0.0/24
7        0     0 RETURN     all  --  *      *       192.168.24.0/24      255.255.255.255
8        0     0 MASQUERADE  tcp  --  *      *       192.168.24.0/24     !192.168.24.0/24      masq ports: 1024-65535
9       49  9552 MASQUERADE  udp  --  *      *       192.168.24.0/24     !192.168.24.0/24      masq ports: 1024-65535
10       0     0 MASQUERADE  all  --  *      *       192.168.24.0/24     !192.168.24.0/24


# iptables-save -t nat
# Generated by iptables-save v1.8.7 on Sun Feb  7 12:06:09 2021
*nat
:PREROUTING ACCEPT [365:28580]
:INPUT ACCEPT [143:14556]
:OUTPUT ACCEPT [1617:160046]
:POSTROUTING ACCEPT [1390:101803]
:DOCKER - [0:0]
:LIBVIRT_PRT - [0:0]
-A PREROUTING -m addrtype --dst-type LOCAL -j DOCKER
-A OUTPUT ! -d 127.0.0.0/8 -m addrtype --dst-type LOCAL -j DOCKER
-A POSTROUTING -s 172.17.0.0/16 ! -o docker0 -j MASQUERADE
-A POSTROUTING -s 172.18.0.0/16 ! -o br-4bd17cfa19a8 -j MASQUERADE
-A POSTROUTING -s 172.19.0.0/16 ! -o br-43481af25965 -j MASQUERADE
-A POSTROUTING -j LIBVIRT_PRT
-A POSTROUTING -s 192.168.122.0/24 -d 224.0.0.0/24 -j RETURN
-A POSTROUTING -s 192.168.122.0/24 -d 255.255.255.255/32 -j RETURN
-A POSTROUTING -s 192.168.122.0/24 ! -d 192.168.122.0/24 -p tcp -j MASQUERADE --to-ports 1024-65535
-A POSTROUTING -s 192.168.122.0/24 ! -d 192.168.122.0/24 -p udp -j MASQUERADE --to-ports 1024-65535
-A POSTROUTING -s 192.168.122.0/24 ! -d 192.168.122.0/24 -j MASQUERADE
-A DOCKER -i docker0 -j RETURN
-A DOCKER -i br-4bd17cfa19a8 -j RETURN
-A DOCKER -i br-43481af25965 -j RETURN
-A LIBVIRT_PRT -s 192.168.11.0/24 -d 224.0.0.0/24 -j RETURN
-A LIBVIRT_PRT -s 192.168.11.0/24 -d 255.255.255.255/32 -j RETURN
-A LIBVIRT_PRT -s 192.168.11.0/24 ! -d 192.168.11.0/24 -p tcp -j MASQUERADE --to-ports 1024-65535
-A LIBVIRT_PRT -s 192.168.11.0/24 ! -d 192.168.11.0/24 -p udp -j MASQUERADE --to-ports 1024-65535
-A LIBVIRT_PRT -s 192.168.11.0/24 ! -d 192.168.11.0/24 -j MASQUERADE
-A LIBVIRT_PRT -s 192.168.24.0/24 -d 224.0.0.0/24 -j RETURN
-A LIBVIRT_PRT -s 192.168.24.0/24 -d 255.255.255.255/32 -j RETURN
-A LIBVIRT_PRT -s 192.168.24.0/24 ! -d 192.168.24.0/24 -p tcp -j MASQUERADE --to-ports 1024-65535
-A LIBVIRT_PRT -s 192.168.24.0/24 ! -d 192.168.24.0/24 -p udp -j MASQUERADE --to-ports 1024-65535
-A LIBVIRT_PRT -s 192.168.24.0/24 ! -d 192.168.24.0/24 -j MASQUERADE
Ok, it seems the traffic form 192.168.11.0 to 192.168.23.0 is NAT-ed (masquerade in iptables). So makes sense that I see the traffic as 11.1 in PE1. Let’s remove that:
# iptables -t nat -D LIBVIRT_PRT -s 192.168.11.0/24 ! -d 192.168.11.0/24 -j MASQUERADE
Test again pinging from CE1 to CE3:
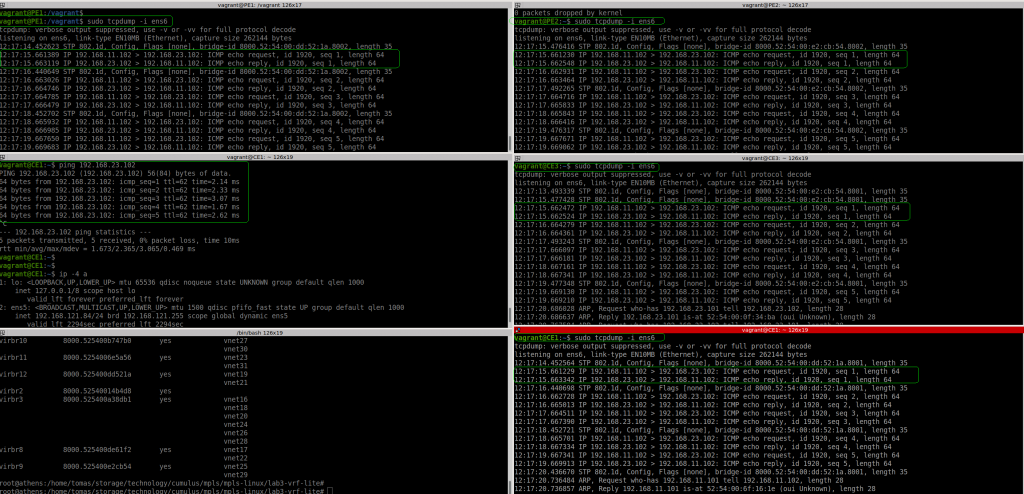
So it works properly, we can see the the correct IPs in every hop: PE1, PE2 and CE3.
So it seems this is a built-in behaviour in libvirt. I need to find out how to “fix” this behaviour whenever I do “vagrant up”.