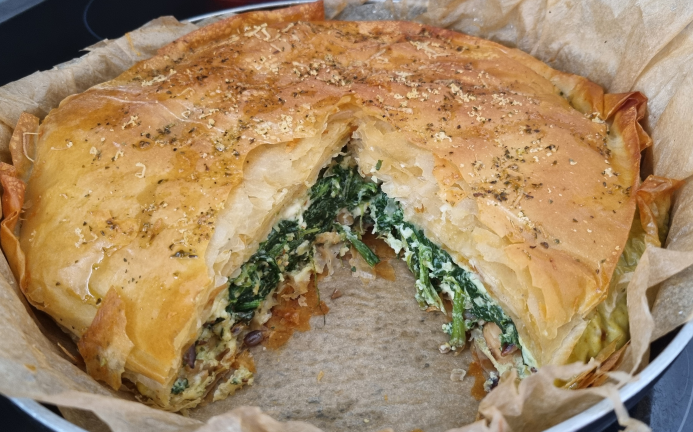
Sable a la poche

Or “sand in the pocket” biscuits or just super tasty biscuits with a glass of cold milk.

Wet Ingredients

  • 340gr butter at room temperature
  • 128gr icing sugar
  • 50gr egg whites
  • 1 tsp vanilla

Dry Ingredients:

  • 380gr strong white flour (bread flour)
  • 1 tsp baking powder
  • 1 tsp salt
  • Glace cherries (for decoration)

Process

  • Pre-heat oven at 180C
  • Sift dry ingredients together and set aside.
  • Cream the butter until pale and creamy. Then add the icing sugar.
  • Add the egg whites and vanilla 1/3 at the time to the butter mix until fully incorporated.
  • Add the flour to the wet ingredients. Mix until fully combined, dont overmix.
  • Using a pastry bag with a large star tip, pipe into 5-6cm wide circles into your baking tray.
  • Decorate with glace cherries
  • Bake at 180C for 15 minutes or until lightly golden and well-browned in the edges.
  • Let it cool down

Once of the best biscuits I have done. Very easy to make, quick and tasty! Sold.

Tarta de Zanahoria

This is not the typical “carrot cake”. I have some memories when my mother used to make this cake. I have tried to find the recipe in her papers a couple of times but never found it (I think). So I asked a very good friend of her about this recipe and lucky enough she had it so managed to take a picture of it. And finally this weekend I decide to try.

Ingredients:

  • 250g of sponge fingers
  • 400ml milk
  • 200g sugar
  • 150gr cocunut sherred
  • 500g peeled carrots
  • 1 tin of 1L aprox

Process:

  • Boil the carrots in a sauce pan with just a 2 fingers of water. Check from time to time that there is enough water and they dont stick to the bottom. If they do, just add some water and scrap the bottom. It is the sugar from the carrots so it is good.
  • Once the carrots at soft enough so a fork can easily go through them, remove from the heat. Remove all the water with a sieve or strain.
  • Put the carrots, milk, sugar and 100g of coconut in the food processor. Mix until all combined like a cream.
  • In the tin, cover the bottom with a layer of sponge finger. Then add some carrot cream slowly so the fingers dont move. Press a bit with your hand so all cream gets into the sponges. Add another layer of sponge finger, add another layer of carrot cream. Add a third and final layer of sponge fingers and carrot cream.
  • Put the tin in the fridge for 3-4 hours.
  • You can remove the cake from the tin if you want to present to people. Then add the rest of the coconut on top. You can add some berries on top optionally.
  • Optionally, you can just spread the rest of coconut on top of the tin.

This is the resut:

It is quite tasty and really simple. The only “difficult” ingredient maybe is the coconut shreds and find the sponge fingers.

And to be honest, looks like a carrot “tiramisu” 🙂 And although it is a nice cake somehow it is not what I have in my memory. Anyway, I will keep this recipe.

Pollo en escabeche

I like a lot “atun en escabeche” but it is really difficult to find. And to make it, quite expensive… So during a conversation, a friend of mine, mentioned “pollo en escabeche” as vey tasty dish with similar flavour to “atun en escabeche”. So I decided to give it a go and find a recipe. This one looked very good.

Ingredients:

  • 400g chicken breast
  • 1 big onion sliced
  • 2 large carrots sliced
  • 3 cloves of garlic
    • 1 glass of white wine
    • 1 bay leaf
    • 15 pepper corns
    • 1 glass of vinegar (white wine, apple, etc)
    • 1 glass of water
    • salt + pepper

Process

  • Salt and pepper the chicken breasts.
  • Fry the chicken in a hot pan until golden outside. Put apart.
  • In the same pan, add the onions, carrots and garlic. Fry until soften, aprox 4-5 minutes.
  • Add glass of wine, bay leaf and pepper corns. Keep the high heat so the alcohol evaporates.
  • Then add the glass of vinegar and water.
  • Add the chicken back in.
  • Cook at high heat for 15 minutes so the liquid evaporates a bit and the chicken absorbs some juice.
  • Remove from the heat and pout the content of the pan into a glass dish.

Ready to eat!

Very easy, quick and tasty!

Brioche

After the positive experience with Babka, I wanted to try Brioche. I did all kneading by hand. All videos I have seen use a machine. It took me 1h aprox to do all kneading and adding the butter but it was so worth it to see that I was able to achieve a dough that stopped being sticky, smooth and glossy.

Ingredients:

  • 500g strong white flour
  • 12g fine sea salt
  • 30g caster sugar
  • 8g dry yeast
  • 6 eggs (1 egg aprox 50g)
  • 250g softened unsalted butter. Chopped in small cubes.
  • 1 egg yolk for glazing

Process:

  • Put flour, salt and sugar in a bowl and mix. Then add the yeast and mix well.
  • In another bowl, break all eggs, whisk them and then add them to the flour making a well in the center.
  • Mix all ingredientes with one hand, once it comes together, tip the dough on the work surface. Dont add any flour!
  • Use one hand for kneading and the other for the scraper.
  • With the heel of your hand, push the dough into the table and stretch and tear until it stops being sticky. Use the scrapper to get the dough together and clean your dirty hand. Aprox 10 minutes.
  • Let the dough rest 5 minutes
  • Now, add slowly the butter to the dough in small batches. I did 6 batches… So stretch the dough a bit and add some cubes of butter, try to “integrate” them in the dough with your dirty hand. Always keep the clean hand with the scraper. Then start to stretch/tear the dough. It will become a bit “wet” with the butter but will come together again, and will not stick to the surface after some minutes. It is amazing to see that happening. Repeat the process until all butter is added in the dough.
  • At the end, the dough should no sticky to the table, should be glossy, smooth and elastic.
  • Put the dough back in bowl. Cover and leave at room temperature for 2h or until has doubled in size.
  • Knock back the dough, cover again and put back in the fridge until next day.
  • Next day, line a tin with baking paper or grease it. I used a big tin. You can divide the dough in two if you have smaller tins.
  • Take the dough and divide in 3 pieces. Aprox 360g each. Round each piece gently. Then roll each piece a bit longer than your tin.
  • Time for the “plait”. Join the three ends together, then plait by lifting the middle strand and putting the right strand in the middle. The “lift” strand moves to the right and release it. Now lift again the middle strand, take the left strand and put in the middle. The “light” strand moves to the left side and release. Repeat again the same process, lift middle, move right, lift middle, move left. Until you dont have more to braid. Pinch the ends.
  • Place the brioche in the tin and leave to rise for 2h aprox or reaches the top of the tin.
  • Pre-heat the oven at 180C.
  • Glaze the brioche with the egg yolk.
  • Put the brioche in the oven and lightly spritz the oven with a water spray.
  • Bake for 20 minutes. Then remove from the tin and bake another 5 minutes or until golden brown.
  • Take from the oven and let it cool for a couple of minutes (if you can)

And really happy with the result!

As mentioned earlier, I was quite surprised that I managed again to tame an enriched dough. Still I can improve it:

  • I did 4 strands but I have realized that 3 is better and easier to braid…..
  • I should have used more egg yolk for the glaze.

Raspberry Bavarois

Ingredients for glaze:

  • 75g raspeberry puree
  • 75g stock syrup (37g sugar + 37g water)
  • 2 leaves of gelatine

Process for glaze:

  • Prepare the stock syrup. In a sauce pan, boil the water + sugar. Remove from heat.
  • Soak the gelatine leaves in cold water
  • Heat up the stock syrup and add the softened gelatine. Mix well.
  • Add the raspberry puree to the pan, whisk for 30sec, remove from heat and let it cool down.
  • Pour the glaze into the base of the plastic moulds.
  • Put in the fridge.

Ingredients for bavarois cream filling:

  • 125g raspberry puree
  • 50ml milk
  • 2 egg yolks
  • 15g caster sugar
  • 1.5 gelatine leaves
  • 75ml double cream

Process:

  • Heat lightly the raspberry and milk in a saucepan
  • In a bowl, whisk the egg yolks and sugar
  • Pour the boiling milk into the egg mix and whisk well.
  • Return the mix to the heat and stir for a minute or less. Doesnt have to thicken up!
  • Add the gelatine, mix well.
  • Remove from heat and sieve the mix, leave it to cool down.
  • Whisk the cream to soft picks
  • Fold the soft picks into the raspberry cream.
  • Pour the cream into the moulds and put back in the bridge for 30 minutes.
  • Presentation. Take the moulds from the bridge, to unmould, put the moulds into hot water for a couple of seconds. Then with a sharp knife, make a cut on the base of the mould. Decorate with some mint leaves, cream and fresh red berries.

Babka

This is a enriched dough that I tried some time ago but I wanted to test again. I find this kind of dough quite challenge as it is very messy kneading by hand, but, this time, somehow I managed to get a dough that was smooth, glossy and elastic! It took 45m aprox I think. This is a video to give an idea (although it uses a hand mixer…. I can’t find one with kneading by hand.)

Ingredients for dough

  • 275 strong white flour
  • 6g salt
  • 30g caster sugar
  • 2 medium eggs (75g)
  • 100g milk
  • 4g dry yeast (8g if fresh)
  • 100g butter

Ingredients for filling:

  • 100g dark chocolate
  • 50g butter
  • 1 egg
  • 50g caster sugar
  • 15g cocoa powder
  • eggs wash + flour for dusting

Ingredients for sugar glaze:

  • 100g sugar
  • 80g water

Process:

  • Put all ingredients apart from butter in a bowl. Mix all until combined
  • Tip the dough into a table, without flour, using a scraper with one hand and kneading with the other for 5 minutes. Very important, use one hand for kneading so at least one hand is “clean” and it uses the scrapper. Let the dough rest for 1 minute.
  • Add 1/3 of butter each time and knead until fully combined all butter. This can take a LONG time if doing by hand. I used constantly the scrapper because it was very messy and sticky the dough. Be patience and dont use flour, the dough, surprisingly will start forming gluten because the kneading and will be smooth and stop being so sticky.
  • Once the dough is smooth, glossy and elastic, put it in a bowl and let it prove until double in size. Cover it during that time.
  • Knock the dough and put back into the bowl and keep it in the fridge overnight.

Next day

  • Prepare two tins of 20-25cm long. Line them with baking paper.
  • Remove dough from the bridge. Place it in a lightly floured surface.
  • Prepare the chocolate filling. Melt the butter and chocolate at “bain marie”
  • In another bowl, mix egg, sugar and cocoa powder. Whisk until you get a smooth paste.
  • Add melted chocolate to the paste. Whisk until well combined. Keep in mind you will have to “spread” this mix in the dough, so you dont want something two “hard”.
  • With a floured rolling pin, roll the dough into a rectangle of aprox 40x45cm.
  • Spread the chocolate mix evenly over the dough. Leave 1-2 cm free in the edge nearest to you as we will seal the dough there.

  • Start rolling the dough from the farthest edge from you. Create a tight roll, moving towards you. The seal of the dough should be under side and the smooth side facing up.
  • Dust lightly the top of your dough and with a sharp knife, cut the dough in half lengthways to show the inner layers

  • Each half will be a babka. Form a U shape with each one. Staring with the right side, bring this over the left and place down, then repeat, bringing the right side over the left to form a basic plait.
  • Place each babka into a tin and let it prove for 1h (ie: put in a oven with ligh on and some boiling water to make humid)
  • Preheat the oven at 180C.
  • Eggwash the babkas and bake for 28-30 minutes or until golden brown.
  • Prepare the sugar glaze. Place the sugar and water in a saucepan at medium heat. Stir until sugar is disolved. Bring the mix to the boil, leave it to simmer for a couple of minutes until thickens a bit. Remove from the heat and leave to one side.
  • Remove the babkas from oven and brush with sugar glaze. This is very important to make the babka moist inside.
  • Let is cool down in the tin.

In general I was quite happy with the result.

Some improvements/mistakes:

  • My sacket of yeast was already open so I think it “lost” it strength because my dough and babka didnt really prove….
  • My chocolate spread was a bit too hard and couldnt spread properly, maybe adding a bit more egg to make it a bit more runny?

BTW, this blog is quite good for shaping.

Bread Pudding / Apple Crumble

These are two recipes that wanted to do for some time but never had the chance. And now this week, both in one day. Go figure 🙂

Bread Pudding Ingredients:

  • 250ml milk
  • 300ml double cream
  • 1 tsp vanilla
  • 3 whole eggs + 1 egg yolk
  • 3 tbsp caster sugar
  • 8 slices aprox of stale bread (white bread or even better brioche!!!)
  • 50gr slightly salted butter, softened (need to spread it) + extra for greasing
  • 75g sultanas, currants or any other dried fruit
  • zest 1/2 lemon
  • 2 tbsp demenara sugar

Process:

  • Add the lemon zest to the dried fruit.
  • Make the custard. Heat the milk, cream and vanilla in a sauce pan, just below boiling point!
  • In parallel, whisk the eggs, yolk and sugar.
  • Slowly pour the warm milk into the egg mix, whisking constantly.
  • Lightly grease with butter an ovenproof dish.
  • Cut the crusts from the bread slices (if using white bread), then butter both sides of the bread and cut in triangles.
  • Deep the bread slices in the custard and spread them in the dish. Add some dried fruit between layers.
  • Pour more custard once you assembled all layers. Be sure it doesnt overflow!
  • Finish it with last layer of dried fruit and some demenara sugar.
  • Leave to soak for 30 minutes in the fridge.
  • Pre-heat oven at 180C
  • Bake for 35-40 minutes until golden brown and puffed-up.

Let it cool down and then you can slice it. You can present it with a bit of dust sugar on top and a touch of mint leaves. Use some leftover custard to serve!

Apple Crumble Ingredients:

  • 500gr aprox green apples, peeled, cored and sliced in aprox 1cm thick.
  • 1/2 lemon juice + 2 tbsp caster sugar
  • 2 tbsp caster sugar for cooking apples
  • 2 tbsp cinnamon for cooking apples
  • 175g plain flour
  • 110g golden caster sugar
  • 110g cold butter
  • pinch of salt
  • 1 tbsp oats
  • 1 tbsp demenara sugar

Process:

  • Pre-heat oven at 180C.
  • Toss the sliced apples into a bowl with the 2 tbsp sugar and lemon juice in a bowl with water so they dont get brown.
  • In another bowl, mix flour and sugar. Then rub the butter in the flour with your fingers until it looks like breadcrumbs. Shake the bowl and check there are no big bits in the surface
  • In a sauce pan, add the apples (drained), sugar and cinnamon. Fry until golden and bit soft. Remove from heat
  • Add apples into an ovenproof dish.
  • Pour the crumb mix on top of the apples. Dont over press, use a fork to spread out.
  • Sprinkle the oats and demenara sugar on top.
  • Bake for 35-40m, until top is golden and bubbly! Use a wooden stick to check the apples are soft before removing from oven.
  • Leave to cool down 10 minutes.

You can use some strawberries and mint for presentation. Plus some custard from earlier recipe.

All very tasty! The bread pudding was very tasty the day after. As well, some years ago I tried bread pudding and it was quite different from this one so I will try another recipe another day. It makes a difference the use of brioche 🙂 And somehow, it reminds me to the “pizza venetta”.

The apple crumble was good too. And you can use any fruit to be honest, so it is super flexible.

In general, these two recipes are super easy and quick. So no excuse to try them more often.

Rosquillas

This is nothing new. I make rosquillas each year for Easter to bring back some good memories and keep a personal tradition. I notice that each year I look for a recipe but always follow the same one I saved in my laptop many years ago and I want to celebrate that recipe. The site doesnt exist anymore but at least give it the honors anyway.

Ingredients:

  • 2 eggs
  • 100g sugar
  • 80ml milk
  • 80ml olive oil
  • 50ml anise liquor or sambuca.
  • peel of 1 lemon
  • 1 tsp of bicarbonate of soda
  • 350-400g plain flour
  • 500ml olive oil for frying + plus a bit more for dipping your fingers.
  • A plate with sugar to coat the rosquillas
  • A plate with a fine layer of white wine to dip the rosquillas
  • A plate with kitchen paper to dry the rosquillas after frying.

Process:

  • Add the olive oil to a frying pan at medium-low heat. Add the lemon peel. I use a small frying plan, that fits two rosquillas. So I dont use all oil at once. I refill the frying pan during the process.
  • Whisk eggs and sugar until well combine in a big bowl.
  • Keep whisking and add bit by bit the milk, olive oil and anise to the eggs mix.
  • Add bicarbonate to the flour, and add 300gr aprox to the wet mix. You will have to use a wooden spoon to keep mixing.
  • The dough should be a bit sticky and soft but fully combined. I think I used aprox 375g of flour.
  • Let it rest.
  • Put the frying pan at medium heat. Be sure you have all plates ready (sugar, white wine, kitchen paper)
  • Once you think the oil is hot enough for frying, remove the lemon peel (should be crunchy and not burnt!!!)
  • Dip your fingertips in a bit of olive oil, take a bit of dough, like a small meat ball. Make a ball with your hands, then with one finger make a hole and turn the dough like a gymnastic with a hoop.
  • First time, just fry one rosquilla and see how it goes. You want to be sure the oil is in the correct temperature. If it is too hot, the rosquilla will get brown too quick and the center will not cook. If it is cold, the rosquilla will absorve too much oil.
  • Once one side is fried, turn it. Once both sides are equal, remove from the pan and let it dry with the kitchen paper. The rosquilla should have double the size!!!
  • Now, add two rosquillas to the frying pan.
  • Take the dried rosquilla, dip it both side with a bit of white wine (you may hear a sizzle – that’s good, the rosquilla is still hot) and then coat the rosquilla with sugar. Not too much. Then put it in a plate. Although this is quick, keep an eye on the rosquillas on the frying pan.
  • Repeat the process, remove the rosquillas from the pan, let them dry a bit the excess of oil, add two more to the pan, and dip/coat.
  • You may have to refill the oil in the pan, that’s ok. You want the oil to cover the rosquilla when you add it. The rosquilla will grow that’s expected.
  • Once all done, let the oil to cool down. You can keep it in an oil tin and reuse another day.
  • I put the rosquillas in a biscuit box. After trying a couple of them
  • This recipe can produce 17-18 rosquillas depending on size.

This is the result!

And to be honest, the next day, they were better and still soft!

Leek and Mushroom Pasta

I took “inspiration” in this video to cook something with leeks.

Ingredients:

  • 2 big leeks: cleaned as per video and sliced
  • 200g mushroom: cleaned and sliced
  • 3 cloves of garlic finely chopped
  • 5 sheets of lasagne
  • 1 vegetable or beef stock cube + 500ml boling water
  • 20ml cream
  • 1 tsp chilli paste – optional
  • 2-3 tsp soy sauce – optional
  • Splash of white wine – optional
  • 50g of grated cheese
  • 1 bunch of asparagus
  • 1 green pepper sliced
  • salt + pepper + a bit of butter

Process:

  • In a hot pan, fry the mushrooms, they should sizzle.
  • Add the garlic, be sure doesnt burn!
  • Add the leeks to the pan. Keep stirring so nothings sticks to the pan.
  • Season with salt + pepper.
  • Add the chilli, soy sauce and wine.
  • Disolve the cube stock in the boiling water.
  • Add the stock to the mushrooms and leeks.
  • There will be a look to liquid so keep stirring.
  • Add the cream.
  • After a couple of minutes, add a lasagne sheet at each time into the pan. The sheet should cook in the liquid. Repeat with all of them.
  • The sheets should break down and the sauce shouldnt be very dense anymore.
  • In a baking dish, use a bit of butter to cover the bottom and pour the mushroom and leek mix.
  • Pre-heat the oven at 200C
  • In the same pan, fry the asparagus and green pepper until they are charred.
  • Add them on top of the mushroom and leeks.
  • Add the grated cheese on top of the asparagus
  • Bake in the oven for 15 minutes aprox, until the top is brown.

This is the result:

To be honest, it was quite tasty! I liked the idea to cook the lasagne sheets in the same pan with all vegetables.

Pain aux Raisins

I wasn’t fan of this pastry until some time ago that I tasted it at this bakery. Since then I wanted to try so last weekend was finally the time. I used this video as inspiration (recipe) I used my typical croissant dough, pastry cream and soaked the raising as the bakery mentions.

Pain aux Raisins Ingredints:

  • 1 or 2 bags of your favourite tea
  • 200g or raisins, sultanas and mixed fruit
  • Bloody orange marmelade
  • Splash of spirit (scotch, rum, etc) – optional
  • 1 egg for egg wash.

Process:

  • Boil 500ml of water. Put the tea bags and dry fruit on it. Optional add the spirit.
  • Remove tea bag after a couple of minutes.
  • Let it soak for 1h.
  • ** Do this when doing the croissant folds
  • Filter the liquid (you can drink it) and let the fruit to dry at room temperature

Pastry Cream Ingredients:

  • 500ml milk
  • 2 eggs
  • 4 yolks
  • 125g sugar
  • 75g plain flour
  • 50g butter
  • 1 ts vanilla paste
  • pinch of salt
  • glass sugar to cover the cream

Process:

  • In a pan, put the milk to boil. Add a bit of sugar and dont stir it!
  • In a bowl, mix eggs, yolks, sugar and vanilla. Then Add flour. Mix all well. Add a pinch of salt.
  • Just when the milk starts boiling, remove from the heat, and pour it bit a bit in the egg mix.
  • Return the mix to the pan, and dont stop stirring, this is the key for cooking the flour!
  • Keep stirring until the mix thickes up. You should see bubbles forming up.
  • Remove from the heat and add the butter. Mix until all combined.
  • Spread the cream in a clean tray, spread sugar on top so a crust doesnt form.
  • Cover with cling film and put into the fridge.
  • ** you can do this the day before or while doing the croissant folds.

Croissant Dough Ingredients:

  • 500g strong white flour
  • 12g fine sea salt
  • 55g sugar
  • 40g soft butter
  • 15g dried yeast
  • 140ml cold water
  • 140mg milk
  • 250g butter block – unsalted if possible.

Croissant Dough Process:

  • Put flour, salt and sugar in a bowl. Mix all together
  • Add the butter and crumb it with your fingers until all is mixed.
  • In a another bowl, mix water, milk and dried yeast.
  • Make a well in the center of the flour mix and add the liquid. Mix all until all is combined. Dont over do it.
  • Cover the bowl and put in the bridge for 8-12 hours.
  • Make an envelope of 20x20cm aprox with baking paper. Put the butter block inside and pounce the butter until it fills the paper with a rolling pin. You should have a nice thin flat block of butter. Put the envelope back in the fridge
  • Take the dough out of the bridge and place it on a lightly floured surface.
  • Roll it out to for a rectangle double of your butter blocker.
  • Place the butter in the center and then cover it with the rest of the dough.
  • Tap the dough gently with the rolling pin to help to seal the sides.
  • With the seam running top to bottom, roll the dough out into a rectangular shape, roughly 1/2 rolling wide, 1 1/4 rolling pin long (rolling pin aprox 50cm).
  • Brush any flour and fold the dough in thirds. Tap the dough with the rolling pin. Repeat the same process: roll the dough 1/2 rolling wide, 1 1/4 long and fold. This is a full fold.
  • Wrap the dough in baking paper and cling film. Rest in the fridge for 30 minutes.
  • Take the dough and give it half fold, so only roll and fold once instead of twice. Rest for another 30 minutes in the fridge wrapped in baking paper and cling film.
  • Apply the last half fold and put back in the fridge for 30 minutes.
  • Take the cream pastry cream from the fridge and give it a whisk until becomes manageable, like a cream and not solid as we will have to spread it over the dough.
  • Take the dough out of the fridge. In a lightly floured surface, roll it 3/4 pin wide and 1 1/4 long.
  • Spread the pastry cream with a spatula evenly on top of the dough.
  • Spread the raisins, sultanas, etc on top.
  • Roll the dough as like making a giant cigar or pipe line.
  • Get ready two trays with baking paper.
  • Slide the dough roll with a sharp knife. Clean it after each cut. Put each slide into the trays. I managed 16 slides plus two leftovers.
  • Seal putting the seam underneath each slide.
  • Egg wash all slides.
  • Turn the lights from the oven, put the two trays on it and add a small bowl of boiling water. We want to create a proving room.
  • Let it raise for 1h, check it and be sure they dont over proof
  • Pre-heat the oven at 180C-190C.
  • Egg wash again all slides.
  • Put one tray in the oven and add some splash of water to create steam.
  • Bake for 20m aprox or until all golden on top
  • Remove and add second tray.
  • In a small bowl, add 3-4 tsp of bloody orange mermelade and boiling water so it gets thinner and more liquid.
  • Brush the pastries with the mermelade as soon as you take them from the oven.

This is the result!

To be honest, for being the first time, I was quite happy with the outcome.

Room for improvement:

1- I think I put too much pastry cream

2- I think I over proof them (2h in the oven!) as the pastry wasn’t really crunchy.

3- A bit mor fruit?

4- Pastry cream had only 3 egg yolks. I should try 4 and use full fat milk.