A couple of weeks ago I had to use ginger nuts cookies for a recipe. So now I wanted to make my own, because after eating a cookie you will feel alright.
So searching a bit, a decided to try this version:
Ingredients (10 cookies of decent size)
200g self-raising flour
2 tsp bicarbonate of soda
4-5 tsp ground ginger (if you want a bit more, they will more fiery!)
80g caster sugar
100g melted butter
4 tbsp golden syrup (or honey)
Process
Preheat oven around 190C. Line one baking tray with nonstick baking paper
Sieve flour, bicarbonate and ginger in a bow. Then add the sugar
Make a well in the center of the bowl, add the melted butter and syrup. Stir until combine. In my case, the dough was a bit crumbly. Maybe needs a bit more butter?
From the dough, take pieces and form roughly a ball, then flat it and put it in the tray. It looks delicate but it is fine.
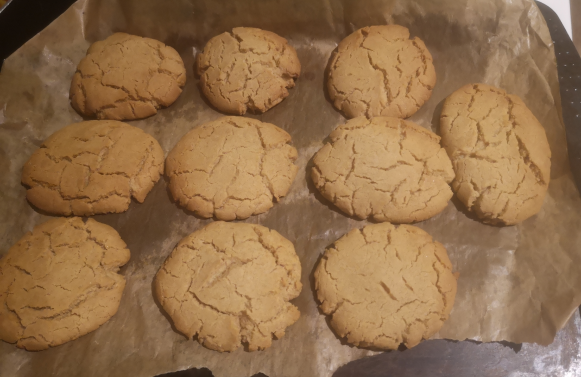
Bake for 10-12 MAX! I did 10 minutes. Just slight golden and with cracks on top.
Remove from oven and let it cool down in a rack if you have. If you touch them they feel soft and not baked, but let it be. Once they cool down, they will firm up!.
It is a quick recipe, the result was tasty!
NOTE: Somehow, after so many years I noticed that tsp = tea spoon (small) and tbsp = table spoon (big)!!! I think I have always used the same measure /o\ Well, still got most things right anyway 🙂
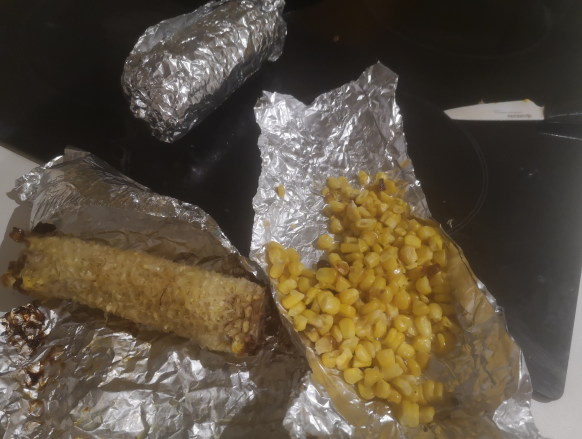
As well, somehow, I bought this week a package with two corns on the cob and baked them in the oven.
Ingredients
A couple of corn on the cob pieces + foil to wrap
a bit of butter
Process
Preheat oven at 200C
Clean with water the corn cobs and wrap it in foil (dont leave any part without cover)
Bake for 40 minutes
Remove from oven, remove foil (you can reuse it) carefully, put a bit of butter (it will melt). Wait a bit and then you can eat it directly or remove the kernels with a knife.
I was really amaze with the flavour! Somehow I felt like eating corn flakes with milk! And actually, I took a gulp of milk after eat.
I want to try more often and using a fresh corn cob.
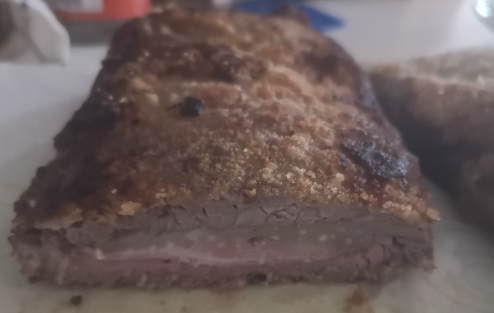
When I was a kid, nearly every week, one night for dinner I had San Jocobo. But then I remember that my mum started buying pre-made ones…. didnt like them. Based on that, I wanted to try something similar, Cachopo.
To be honest, I think the best is to cook a cachopo for one meal, you just buy a piece of meat (I bought beef), prepare in the day and enjoy it warm. Because in my case, I prepared for a whole week, so three big pieces and it is not the same to eat it on the day that 4 days later.
The recipe is quite simple.
Ingredients:
2 steak fillets
6 slices of ham (cure ham is better) – the number will depend on the size of your flatted out fillets
6 slices of cheese (same as above)
Eggs + breadcrumbs
Salt + pepper
Olive oil
Process:
1- Season your fillets, leave them to rest at room temperature for 15 minutes at least. Get ready for the next steps
2- Put one fillet between two sheets of baking paper and then using a rolling pin, flatten it out as much as you can (I didnt do it…) Repeat for the second one. Try to make them match the size.
3- In one flat piece, put your ham and cheese. Then add the second flat piece. Be sure the ham/cheese is fully covered. Try to push the sides with the fingers so it is sealed (it is not going to be perfect). You can use tooth sticks (I didnt have)
4- In a plate, whisk two eggs. In other plate, put the breadcrumbs. Try to use one hand for handling the cachopo so you dont get dirty in both. Get the pan hot with oil
5- Pass the cachopo first by the eggs, both sides, then the breadcrumbs both sides. Fry until golden in both sides.
I have done chocolate baklava before, but I haven’t done my own chocolate spread either filo pastry.
Somehow I came to this video about the history of the most famous chocolate spread. And all started with Napoleon blocking Britain… and then lack of chocolate beans into Italy. To be honest, it was quite interesting all the details and the evolution to the product we have today. Funny enough, in Spain, we had a “local” version called nocilla. And it was amazing. I only found nutella in UK so I always though it was a local thing that chocolate spread. And I remember having nocilla in the fridge during summer time so it was hard and refreshing. And even used to try nocilla with cheese… dont know where that came from but it was an interesting taste of sweet and sour thing. Anyway, I have only bought nutella in the last years for baklava only as it was full of sugar (no much cocoa, hazelnut on it) and full of palm oil.
As well, I have always been keen to try to make filo pastry so I had this video in my to-cook list.
So combining both things, I spend the Saturday morning in my cooking challenge:
Chocolate Spread Ingredients:
400g hazelnuts (not roasted so with skin) = 2 cups
1 cup of powder sugar
1 cup of 100% cocoa powder
pinch of salt
2 tsp of coconut oil
1 tsp vanilla paste (the real thing, no extract)
100g dark chocolate
water
Chocolate Spread process:
Pre-heat oven at 175C. In a baking try spread the hazelnuts. Put in the oven
Remove after 15-20 minutes. Let to cool down a bit and remove skin. I used my hands rubbing the hazelnuts like washing my hands. I tried put some in kitchen towel but at the end I smashed them too much and I continue by hand.
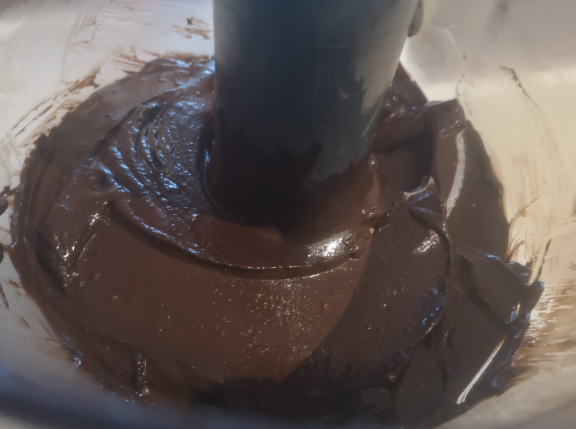
Put all the hazelnut in the food processor. At medium/high speed for several minutes until you start seeing oil from the nuts and becomes more liquid than paste.
Then add the sugar, cocoa, salt, coconut oil and vanilla. Keep blending until everything is combined.
Then add the 100g dark chocolate melted by bain-marie
I didnt get a think paste, it was a bit creamy. I was happy with the taste but I decided to add the water as the video mentioned…. I added a bit of water and not sure what I did but the liquid paste became solid… I got in panic mode….. but I continued adding bit a water and blending until finally got a cream again!! Likely I added a full cup of water…. I tasted it and it was very good. Very dark chocolaty with a kick of the hazelnut at the end. It didnt taste as sugary as nutella so it nice (but it can be an issue if you expect nutella taste). As well, as it has just a bit of coconut oil, it is not going to spread like the commercial versions. I filled a 670ml glass jar and still got left overs that I was planning to use for the baklava.
Once the choco spread cools down, put in the fridge.
I tried the choco spread the next day for breakfast and to be honest, it tastes more like a chocolate mouse than a commercial choco spread.
In summary, quite happy with the result. I would like to compare with the commercial version but I decided that it wasn’t worth it. It is a quick recipe (apart from removing the skin from the hazelnuts) and you can use it as choco spread or mouse for dessert 🙂
In a bowl, add milk, oil, vinager and salt. Mix well. Then add the 500g flour. Mix again until all combined.
Knead the mix on your work surface for 10 minutes or so until you have a smooth dough.
Wrap up in plastic film and let it rest for 1h on your work surface.
Prepare the anti-stick mix: combine the corn and wheat flour.
Dust your work surface with the anti-stick mix.
Divide the dough in 20 small pieces. Highly recommended to use a scale.
Each piece, create a ball and let it rest in a baking try. Cover the try with a kitchen towel or plastic film.
Then starts the “difficult” part. Pick one ball, use a bit of the anti-stick mix in your rolling pin and on the ball. Spread the ball in a circle around 13cm diameter or so. It should just a couple of moves in each direction. Then be generous with the anti-stick mix, as we need to create a stack of 10 pieces and it is critical so they dont stick. Put the first piece with anti-stick mix on top. And repeat the same process with other 9 balls.
Once you have the 10 pieces together, you have to spread all of them at the same time. Again be sure you have plenty of anti-stick mix in your work surface, rolling ping, etc.
Spread slowly in all directions, turning the stack, being careful that all layers spread equally.Likely you get up to 3 or 4 times bigger than the original form.
Now you have to remove each layer from the stack. Be careful, it should be paper thin!
In baking paper, with a layer of anti-stick mix, put each layer adding extra anti-stick mix on top. After adding the 10th layer, use another piece of baking paper and now roll everything together slowly. If you want to keep it in the freezer of fridge, then wrap the roll with plastic film.
Repeat the same process with the final 10 balls.
So at the end you end with two packets with 10 layer each.
Honestly, I failed miserably here. Just in the very beginning, I added by mistake 500ml of milk instead of 250ml. I was surprises of how wet was the dough… until I noticed my mistake. I decided to carry on, just doubling the amount (aprox) of flour. I didnt add extra vinegar neither salt. I think I should have done it…. Then finally I managed to knead the dough as per video and let it rest.
Then again, another mistake, I should have weight the balls as I ended with different size balls that then made different size (and thin) layer.
And final mistake, use plenty of anti-stick mix, so obviously, the layer dont stick when you try to spread the stack of 10 layers.
I couldnt remove any layer form the first stack so I decided not trying with the second stack. So this was my toolkit for baklava….
By the way, as I had a double dough. I left half of it in the fridge so I could decide if trying next day.
Chocolate Baklava Ingredients:
20 layer of filo pastry (as above)
250g of unsalted butter melted (1 cup)
1 cup of choco spread (as above) melted
1 cup of chopped hazelnuts (200g)
1 cup of honey
1/2 cup of chopped pistachios (optional)
Chocolate Baklava Process:
Pre-heat oven at 175C.
I used a rectangular baking glass dish. Use a bit of butter to spread in the bottom of it.
Align all your filo pastries and try to get the form of your baking dish trimming with a sharp knife.
Place one filo layer in the dish. Brush generously with melted butter. Repeat with another 5 layers, brushing the top of each sheet with melted butter.
Drizzle 1/2 cup of the melted choco spread over the first butterd filo layers. Use a spatula. Sprinkle 1/2 cup of chopped hazelnuts. Drizzle 1/4 cup of honey.
Layer 6 more sheets of filo over the choco spread, brushing each sheet generously with the melted butter. After the last buttered, drizzle the other 1/2 cup of melted choco spread, using a spatula. Sprinkle 1/3 of chopped hazelnuts. and drizzle 1/4 of honey.
Add the last 4 filo sheets, buttering each one. Using a sharp knife, cut the baklava in even squares.
Brush the remaining butter over the top the cut baklava. Sprinkle the rest of hazelnuts.
Put in the oven for 30 minutes or until golden on top.
Once removed from the oven, immediately drizzle the last 1/2 cup of honey.
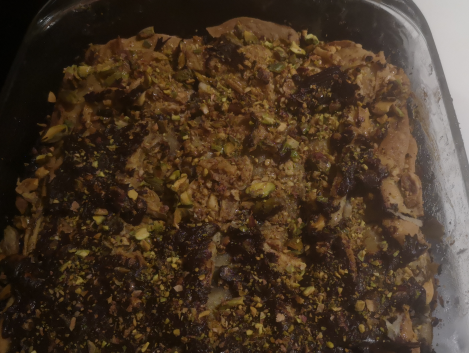
Add the chopped pistachios (optionally). Let is rest for 2 hours.
Drizzle any left over choco spread (it has to be quite liquid – if solid again, use a bit the microwave)
Let the choco spread to set and ready to eat!
To be honest, the taste was quite different from the other times I have done it with filo and choco-spread bought in a shop.
It tastes much less sweet (as I use much less sugar that the commercial version), I didnt use all the honey and the filo pastry wasnt the best. It wasnt very crunchy.
I tried again this morning, and it taste better.
I am happy with the result but I have room for improvement!!!
PD: The chocolate spread becomes a bit sour with the weeks in the bridge so you should eat it quick 😛
For some time I had in my mind to try rice pudding and I found this recipe that looked fun to try as there were some ingredient that I didnt expect. This was a quick, easy and tasty dessert that I really liked as a child but to be honest I failed a bit with this attempt, I think you need to use a rice like Arboreo (rissotto) or Bomba (paella) that has a lot of starch that makes the dish creamier. I didnt follow the recipe to the dot (as usual) as I think using the flaming gun it was a bit too much and I dont have an express pan. But I liked the touch of the anise and cream.
Ingredients:
1 glass of rice (arboreo/paella)
1 glass of water + pinch of salt
1 lemon peel
1 stick of cinnamon
2 glasses of milk
1 glass of cream
Brown sugar (to taste)
Anise (Sambucca) to taste
Process
In a pan, boil the glass of water, add the rice, cinnamon stick, lemon peel and salt.
Once most of the water is gone, add the milk and cream. And lime peel if extra.
Keep stirring at high heat. Milk should reduce and the rice becomes creamy
Then add the anise, I added 4 caps. It gave a touch of anise but not too much.
Add sugar to taste.
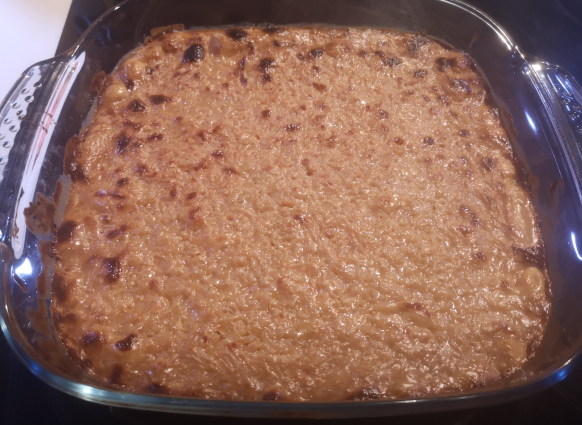
Put the rice pudding in a glass dish and let it rest a bit until a film forms (that’s the cream). Pre-heat the grill in the oven to the max.
Spread some sugar on top and put the glass dish in the oven for 5-10 minutes until the top is golden.
Let it cool down and eat!
The one that my mum used to cook was much simpler. It was just boil the rice, sugar, cinnamon and milk. Once kind of creamy, let it cool and then add extra mix of sugar/cinnamon to your taste.
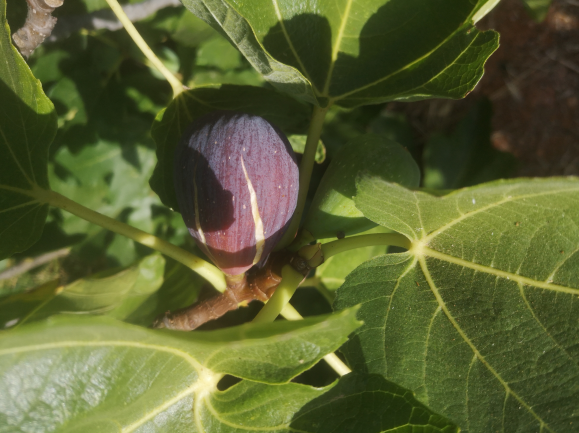
One of my favourite things to do is to pick up a fig from a fig tree and eat it straight away. I lucky to be able to do that a couple of times a year in Algarve. The fig trees are amazing, big, like a huge octopus, very flexible and holding hundreds of figs. And it doesn’t need much attention as much as I know neither lot of water.
But something that is even better, dried figs. I loved them when I was a kid during Christmas but the ones you can make with these natural figs, it is a totally different game.
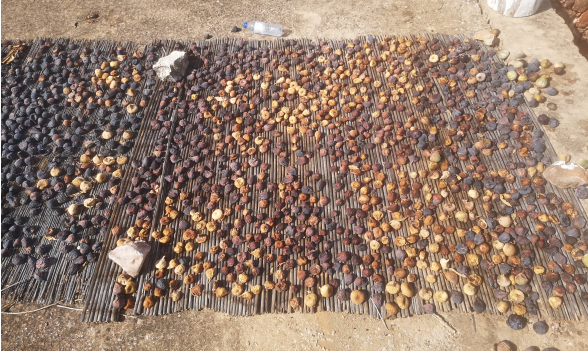
This is how I have seen doing it. As the trees produce a lot of figs, you want to keep them somehow. If not, they will fall down and mainly wasted as even the birds and other animals can’t eat that much. So the ones you can’t eat, you leave them to dry outside. Algarve is very sunny so the nature will do that for you for free.
But I was told that you need to provide a final step. As the figs are outside, a lot of insects will feed from them. So in batches, clean them with water (they will hydrate a bit), then spread a bit of olive oil (just one/two tsp) and put them in a tray in the oven at 75C or so for 30 minutes. After that, use fresh fennel, whole threads of it, not just seeds or the bulb. That will keep insects away and give some anise flavour.
After that you can store them in a dry place (avoid sun light) for months!!!
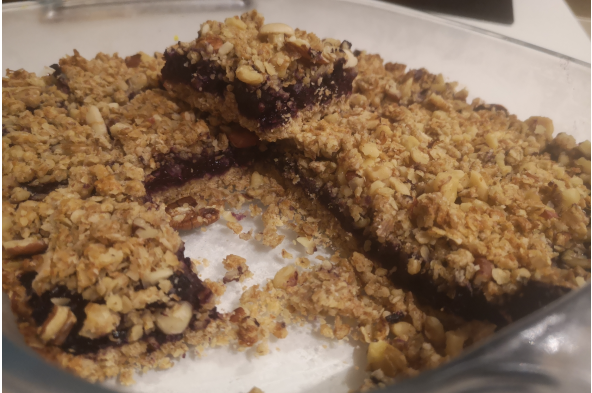
This is a kind of snack dessert that I had in mind for a long time. I found this recipe and decided to give it a go.
Ingredients:
225g oats
100g wholemeal flour
1/2 tsp baking powder
3/4 tsp salt
3 tsp honey
1 medium egg
80ml sunflower oil
50g walnuts chopped
Filling
400g frozen berries
1 tsp lemon juice
2 tsp honey
1 tsp wholemeal flour
Process
Preheat oven at 180C. Prepare a square ovenproof dish. Use a bit butter or oil to spread the bottom.
Mix dry ingredients: oats, flour, baking powder and in a bowl
Mix wet ingredients: honey, egg and sunflower oil in another bowl
Mix wet ingredients into dry ingredients.
Transfer 2/3 of the mix into the dish. Press down firmly with a fork so you have a consistent layer. Bake for 15m
In a saucepan, put the filling ingredients. Cook at medium heat for around 5 minutes until the berries are tender and it is close to a marmalade.
Pour the berries over the baked oat base.
Add the walnuts to the oat mix leftover. Then pour the mix over the berries. Try to press a bit with a fork again the top layer so you get a uniform cover.
Bake for 20m or golden. Then let cool down, cut into pieces, enjoy and to the fridge!
To be honest, the picture from the recipe looks better than mine but I am still happy with the result!
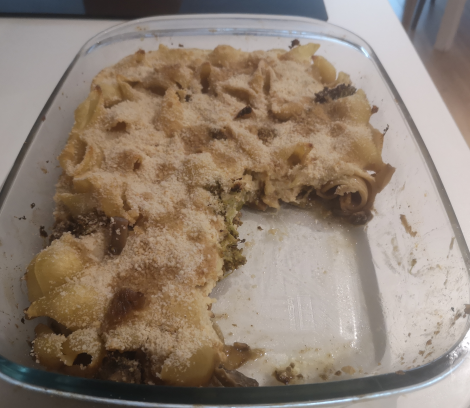
I have a good friend that is vegan and some time ago bought a book to find some recipes so I had some to cook when arranging a meal at home.
So last week, I had a broccoli in the fridge and I wanted to do some nice with it. So checking the book I found a vegan version of “Mac & Cheese”. I didnt follow the recipe to the dot as I used real butter for the white cream.
Ingredients:
1 head of broccoli, cutting the florets
1 onion, chopped
Good splash of olive oil
300g mushrooms, chopped
350g macaroni (or any small pasta)
White sauce:
500ml milk
70g butter
50g flour
garlic powder
1 tsp mustard (optional)
salt, pepper
5-6 tbsp of nutritional yeast (or just Parmesan cheese)
60g breadcrumbs
Marinade
5tbsp soy sauce
20ml honey (or maple syrup or similar)
20ml apple cider vinegar
20ml olive oil
Process
Preheat oven at 180C. Prepare two baking trays. Prepare a large saucepan with boiling water. Lasagne dish
Put the broccoli florets and chopped onion in a baking tray, drizzle some olive oil. Season with a bit of salt and pepper. Put the tray in the top shelf of the oven
Mix all ingredients of the marinade, add the mushroom chunks to the marinade. Be sure all it is coated. Spread the mushrooms over the second baking tray. Put the tray below the broccoli tray in the oven.
Check all veggies are brown/golden after 15 minutes.
While veggies are roasting, put the pasta into the boiling (and salted) water. Cook as per instructions (until al dente). Then drain and put in the lasagne dish
Prepare the white sauce. In the saucepan, melt the butter, then add the flour. Now at low heat, combine with a wooden spoon until you have a paste. Then start adding the milk bit a bit keeping a creamy sauce. Add the garlic powder, mustar, salt, pepper, yeast (or cheese). Taste it.
In the lasagne dish, add the veggies, mix well. Add the white sauce, mix well.
Add the breadcrumbs, a bit of salt/pepper and put back in the over at high temperature until golden the breadcrumbs.
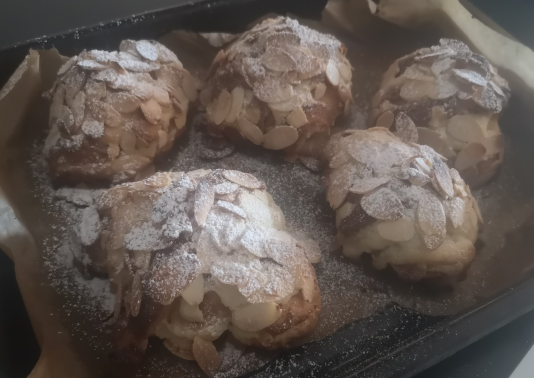
I learned most of my baking from these courses. I baked croissants later last year so last week I decided to give it another go. I was quite happy with the result. I realised that it was easier than donuts. So I enjoyed croissants the whole week. But yesterday, still had some leftovers so I decided to try something that was in my to-do list: almond croissant. The main steps are the filling called frangipane and soaking the croissants in a syrup. But checking this video, I decided to use a typical Portuguese almond liquor, amarguinha.
Frangipane:
100g butter
100g caster sugar (you can use less)
2 medium eggs
100g ground almonds
20g plain flour
zest of 1/2 lemon
Soaking:
100ml (aprox for 5 croissants) of almond liquor or sugar syrup.
Decoration:
sliced almonds
sugar powder
Process:
Slice your croissant horizontally. Soak the inside parts in the almond liquor. Just a bit and this is alcoholic and you dont want a strong liquor flavour. The goal is the almond touch.
Join the croissants again and put them in a tray with baking paper.
Prepare the frangipane. Cream the butter and sugar. I do it manually.
Then add the eggs, bit a bit, and keep mixing.
Then add the almond flour and plain flour, and keep mixing.
Finally add the lemon zest.
With a kitchen spatula, take the croissant and add a good frangipane layer in the middle.
Once you have all croissants filled, spread more frangipane in the top of the croissants.
In a bowl, add the sliced almonds, then take the croissants and press the top into the bowl of almonds. The almonds should stick into the frangipane.
In a pre-heat oven at 210C, bake the croissant for 15 minutes or the almond get golden.
Once ready, taken out of the oven and spread some sugar power. Wait a bit to cool down and enjoy!!!
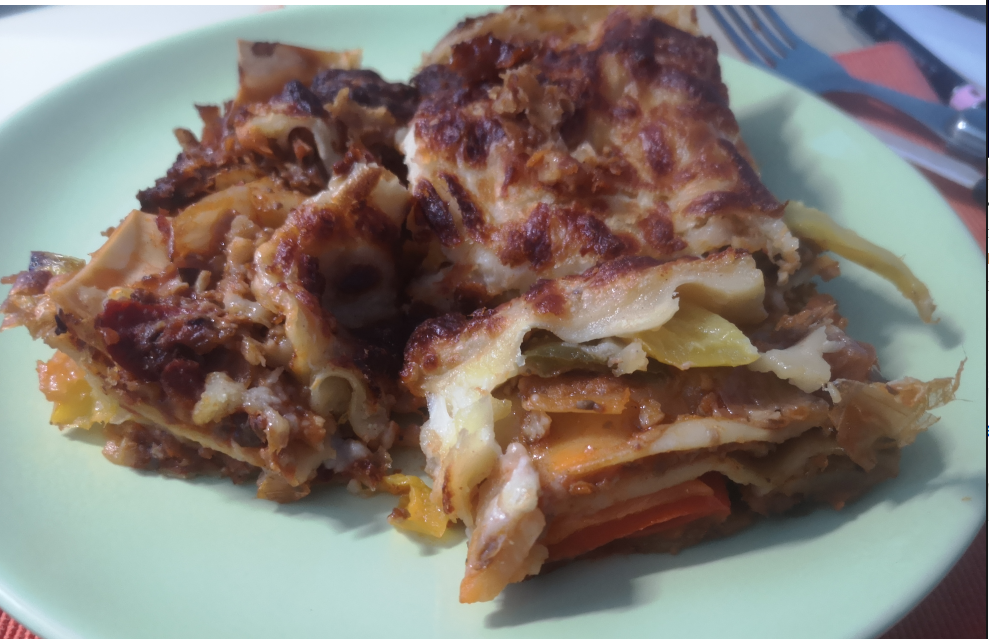
Last week I fancied a lasagne but I didnt have mince meat so I decided to try a veggie version based on a vegan dish I cooked for a friend in Christmas. You replace the mince meat with shredded mushrooms.
Ingredients:
500gr of chestnut mushrooms
garlic + 1 onion, oregano.
tomato sauce, splash of read wine
roasting veggies: 1 onions, 1 red pepper, 1 green pepper, 1 courgette, 1 potato
milk, flour and butter for the white sauce. Nutmeg
lasagne sheets (3 layers, 9 sheets in my case)
grated cheese
olive oil, salt, pepper
Process:
Pre-heat oven at 180C. Chop all roasting veggies, coat with a bit of olive oil and a pinch of pepper/salt. Put in the oven.
In a food processor, put all mushrooms and whizz until shredded.
In a pan, add olive oil, once hot, and the garlic. Cook for a minute, then add the onion, cook for a couple of minutes, then add the mushrooms. Cook for a bit, then add the tomato sauce. Pinch of salt/pepper to taste. Add some oregano and splash of red wine.
Once the mix thickens up, remove from the heat.
Check the roasting veggies.
Prepare the white sauce. In a saucepan at medium heat, put a big know of butter. Once melted, add 3 big tsp of flour. Mix until all combine. Then start pouring some milk, and whisk. Then keep adding milk bit by bit until you have a smooth, not very thick sauce. Add nutmeg, salt, pepper. Taste.
Veggies should be ready.
Time to assemble everything.
In ovenproof glass dish, spread a bit of the white sauce (or butter) in the bottom. Then add a layer of lasagne sheets. Then add half of the mushroom mix, add half of the roasting veggines, add some white sauce. Add a new layer of lasagne sheets, the rest of the mushrooms mix and veggies, add a bit of white sauce. Finally the last layer of lasagne sheets. Pour all the white sauce and spread the grated cheese.
Put the lasagne in the already hot oven for 30 minutes or until cheese is crispy.
This cake doesnt have a specific name. I found it in a magazine from my supermarket. I have a pile of recipes collected over the years and rarely try them. But I fancied cooking something related to ginger and this cake looked ideal.
Ingredients:
125g butter, softened
50g of peeled ginger. Then grate it
150g pitted dates (if they are hard, put them in boiling water for 30 minutes until soft)
100g plain wholemeal flour
75g oats
4 eggs
2 tsp baking powder
3 tsp honey or agave sirup
150g soft cheese
1 lime zested
Process:
Preheat oven at 180C. Prepare a loaf tin with non-stick paper or spread some butter.
In food processor. Cream the butter, then add the grated ginger, dates, flour and oats. Once all combined (pieces of date are ok), add eggs, baking powder and honey.
Pour the mix into the tin. Bake it for 1h. Cover with foil for the last 10-15 minutes if it browns to much. Remove from the oven once you insert a knife and comes out clean
While it rests, whisk the soft cheese, 1 tsp honey and the lime zest. Give a taste, it should have a hint of lime, no too strong.
The spread the mix on top of the cake. Ready to eat!
It doesnt taste too sweet (most sugar comes from the dates). And the ginger taste is not very strong neither. Having the soft cheese with lime I think it balances. Maybe I should have added more lime but for the first time, it was good!