Reflect: client -> clients and non-clients non-client -> clients No Reflect: non-client -> no-client (normal ibgp)
always advertises to eBGP peers (normal ebgp) eBGP learned prefixes, advertised to client and non-clients (normal ebgp)
Full Mesh iBGP:
between RRs
RRs and non-clients
clients just need iBGP to RRs.
Reflects ONLY the best route
RRs dont modify on reflected routes: NEXT_HOP, AS_PATH, LP and MED.
Prevent routing information loops: ORIGINATOR_ID and CLUSTER_LIST
Clustering:
ORIGINATOR_ID: The first RR creates the Originator_ID and sets it to the BGP router ID of the router that originates the route. So when a client receives a route with its own Originator ID, it is dropped.
CLUSTER_LIST: if the local CLUSTER_ID is found in the list, the route is discarded. *This is done ONLY in RRs. This is ONLY created or updated on a RR during Reflection.
Hierarchical Route Reflection:
2 levels:
- level1 RRs are clients of level2 RR -> level1 RR dont need full mesh between them
- level2 RRs are full mesh between them.

Consider:
size of top-level mesh
number of alternative paths
Hierarchical Route Reflection: 2 levels:
– level1 RRs are clients of level2 RR -> level1 RR dont need full mesh between them – level2 RRs are full mesh between them.
Consider:
size of top-level mesh
number of alternative paths
RR Design Priciples:
keep logical and physical topologies congruent to increase redundancy and path optimization and prevent loops — follow physical topology — change physical topology — modify logical topology — follow physical topology — session between RR and non-client shouldnt traverse a client — session between RR and client shouldnt traverse a non-client
use comparable metrics in route selection to avoid convergence oscillations (ie MED – only used between prefixes from same neighbor AS – not used for different AS) — full ibgp mess –> no — always-compare-med –> no — deterministic-med -> ok — med=0 (via RM in) -> ok — bgp communities ->
set proper intra and inter cluster IGP metrics to avoid convergence oscillations — multicluster RR architecture: intracluster metrics lower than intercluster.
modify next-hop with care. Do so only to bring the RRs into forwarding path.
use peer groups with RR to reduce convergence time.
I had my shiny and tiny GCP network for EVE-NG to test vEOS. I built a new VM (vm2) to be my center for automation so I can test stuff like ansible/napalm/nornir etc… But I couldn’t ping from vm2 to the vEOS instances in eve-ng (vm1). Those instances where in a different network attached to vm1 so it had to “route”.
As usual, I missed one step when I created the EVE-NG VM. The official documentation doesnt mention anything regarding enabling routing in the VM. As I am not used to Cloud environments, I assume that any simple Linux VM can forward traffic if configured.
Surprise Surprise. In GCP (not sure in other cloud providers), you need to enable “forwarding” during the VM creation and you can’t change that afterwards in any way.
After checking the second guide I followed, I realised that guide mentioned the point to enable forwarding to avoid the same problem I was facing…
So I had to gave up and had to build both VMs from scratch….
But at the end, I have routing enabled in both VMs and I can ping to the vEOS images.
And another annoying thing. I couldnt update the next hop in a static route defined in the VPC. So I had to delete it and create again pointing to the new VM with the vEOS.
And dealing with the internal IPs…
Moving on, quite frustrating day. But learned several things about GCP netwoking.
I was reading a chat today, and people were talking about issues with EH. As usual, I didn’t pay attention to the very beginning of the conversation. At the end, after reading the initial link from the conversation, this was all related to IPv6 Extended Headers. And it seems they can cause issues even showed in a rfc7872.
This is the agenda from “NPS/CAIDA 2020 Virtual IPv6 Workshop” last week. And this Geoff Huston’s presentation that started the conversation. And one more link from Geoff about measuring IPv6.
And this is an old issue about IPv6, fragmentation, load balancers, anycast networks that was very interesting to read. IPv6 MTU is 1280.
I don’t have production experience with IPv6 so I try to learn from others. At some point I need to create a proper IPv6 lab with IPv6 services (NTP, DNS, DHPC, HTTPs, etc)
Once you have installed the vagrant box (it takes a while) you can “vagrant halt” and start again:
~/storage/technology/linux/bpftracing master$ vagrant status
Current machine states:
default poweroff (virtualbox)
The VM is powered off. To restart the VM, simply run vagrant up
~/storage/technology/linux/bpftracing master$ vagrant up
Bringing machine 'default' up with 'virtualbox' provider…
==> default: Checking if box 'ubuntu/bionic64' version '20200525.0.0' is up to date…
==> default: Clearing any previously set forwarded ports…
==> default: Clearing any previously set network interfaces…
==> default: Preparing network interfaces based on configuration…
default: Adapter 1: nat
==> default: Forwarding ports…
default: 22 (guest) => 2222 (host) (adapter 1)
==> default: Running 'pre-boot' VM customizations…
==> default: Booting VM…
==> default: Waiting for machine to boot. This may take a few minutes…
default: SSH address: 127.0.0.1:2222
default: SSH username: vagrant
default: SSH auth method: private key
==> default: Machine booted and ready!
==> default: Checking for guest additions in VM…
default: The guest additions on this VM do not match the installed version of
default: VirtualBox! In most cases this is fine, but in rare cases it can
default: prevent things such as shared folders from working properly. If you see
default: shared folder errors, please make sure the guest additions within the
default: virtual machine match the version of VirtualBox you have installed on
default: your host and reload your VM.
default:
default: Guest Additions Version: 5.2.34
default: VirtualBox Version: 6.1
==> default: Mounting shared folders…
default: /vagrant => /home/xxx/storage/technology/linux/bpftracing
==> default: Machine already provisioned. Run vagrant provision or use the --provision
==> default: flag to force provisioning. Provisioners marked to run always will still run.
~/storage/technology/linux/bpftracing master$ vagrant ssh
Welcome to Ubuntu 18.04.4 LTS (GNU/Linux 4.15.0-106-generic x86_64)
Documentation: https://help.ubuntu.com
Management: https://landscape.canonical.com
Support: https://ubuntu.com/advantage
System information as of Sun Jun 21 19:25:26 UTC 2020
System load: 0.35 Processes: 99
Usage of /: 32.2% of 9.63GB Users logged in: 0
Memory usage: 12% IP address for enp0s3: 10.0.2.15
Swap usage: 0%
0 packages can be updated.
0 updates are security updates.
Last login: Sun Jun 21 19:22:37 2020 from 10.0.2.2
vagrant@ubuntu-bionic:~$
vagrant@ubuntu-bionic:~$ cd /vagrant/
vagrant@ubuntu-bionic:/vagrant$ ls
Makefile Vagrantfile bpf_program.o monitor-exec
README.md bpf_program.c loader.c ubuntu-bionic-18.04-cloudimg-console.log
vagrant@ubuntu-bionic:/vagrant$
You can find tools (under /usr/sbin)(already compiled and ready to use) or examples (under /usr/share/doc/bpfcc-tools/examples)
These are the tools you can find in the system:
vagrant@ubuntu-bionic:~$ ls -ltr /usr/sbin | grep -i bpfcc
-rwxr-xr-x 1 root root 3496 Nov 29 2017 reset-trace-bpfcc
-rwxr-xr-x 1 root root 7105 Nov 29 2017 deadlock_detector.c-bpfcc
-rwxr-xr-x 1 root root 9029 Mar 27 2018 zfsslower-bpfcc
-rwxr-xr-x 1 root root 5131 Mar 27 2018 zfsdist-bpfcc
-rwxr-xr-x 1 root root 8184 Mar 27 2018 xfsslower-bpfcc
-rwxr-xr-x 1 root root 4431 Mar 27 2018 xfsdist-bpfcc
-rwxr-xr-x 1 root root 6825 Mar 27 2018 wakeuptime-bpfcc
-rwxr-xr-x 1 root root 2636 Mar 27 2018 vfsstat-bpfcc
-rwxr-xr-x 1 root root 1177 Mar 27 2018 vfscount-bpfcc
-rwxr-xr-x 1 root root 2978 Mar 27 2018 ttysnoop-bpfcc
-rwxr-xr-x 1 root root 31977 Mar 27 2018 trace-bpfcc
-rwxr-xr-x 1 root root 4159 Mar 27 2018 tplist-bpfcc
-rwxr-xr-x 1 root root 17766 Mar 27 2018 tcptracer-bpfcc
-rwxr-xr-x 1 root root 9327 Mar 27 2018 tcptop-bpfcc
-rwxr-xr-x 1 root root 5631 Mar 27 2018 tcpretrans-bpfcc
-rwxr-xr-x 1 root root 11996 Mar 27 2018 tcplife-bpfcc
-rwxr-xr-x 1 root root 6858 Mar 27 2018 tcpconnlat-bpfcc
-rwxr-xr-x 1 root root 6963 Mar 27 2018 tcpconnect-bpfcc
-rwxr-xr-x 1 root root 5782 Mar 27 2018 tcpaccept-bpfcc
-rwxr-xr-x 1 root root 12809 Mar 27 2018 syscount-bpfcc
-rwxr-xr-x 1 root root 1231 Mar 27 2018 syncsnoop-bpfcc
-rwxr-xr-x 1 root root 4560 Mar 27 2018 statsnoop-bpfcc
-rwxr-xr-x 1 root root 15860 Mar 27 2018 stackcount-bpfcc
-rwxr-xr-x 1 root root 6244 Mar 27 2018 sslsniff-bpfcc
-rwxr-xr-x 1 root root 6277 Mar 27 2018 solisten-bpfcc
-rwxr-xr-x 1 root root 4048 Mar 27 2018 softirqs-bpfcc
-rwxr-xr-x 1 root root 3409 Mar 27 2018 slabratetop-bpfcc
-rwxr-xr-x 1 root root 5643 Mar 27 2018 runqlen-bpfcc
-rwxr-xr-x 1 root root 5998 Mar 27 2018 runqlat-bpfcc
-rwxr-xr-x 1 root root 58 Mar 27 2018 rubystat-bpfcc
-rwxr-xr-x 1 root root 60 Mar 27 2018 rubyobjnew-bpfcc
-rwxr-xr-x 1 root root 56 Mar 27 2018 rubygc-bpfcc
-rwxr-xr-x 1 root root 58 Mar 27 2018 rubyflow-bpfcc
-rwxr-xr-x 1 root root 59 Mar 27 2018 rubycalls-bpfcc
-rwxr-xr-x 1 root root 60 Mar 27 2018 pythonstat-bpfcc
-rwxr-xr-x 1 root root 58 Mar 27 2018 pythongc-bpfcc
-rwxr-xr-x 1 root root 60 Mar 27 2018 pythonflow-bpfcc
-rwxr-xr-x 1 root root 61 Mar 27 2018 pythoncalls-bpfcc
-rwxr-xr-x 1 root root 9831 Mar 27 2018 profile-bpfcc
-rwxr-xr-x 1 root root 1139 Mar 27 2018 pidpersec-bpfcc
-rwxr-xr-x 1 root root 57 Mar 27 2018 phpstat-bpfcc
-rwxr-xr-x 1 root root 57 Mar 27 2018 phpflow-bpfcc
-rwxr-xr-x 1 root root 58 Mar 27 2018 phpcalls-bpfcc
-rwxr-xr-x 1 root root 4858 Mar 27 2018 opensnoop-bpfcc
-rwxr-xr-x 1 root root 2337 Mar 27 2018 oomkill-bpfcc
-rwxr-xr-x 1 root root 11141 Mar 27 2018 offwaketime-bpfcc
-rwxr-xr-x 1 root root 10464 Mar 27 2018 offcputime-bpfcc
-rwxr-xr-x 1 root root 58 Mar 27 2018 nodestat-bpfcc
-rwxr-xr-x 1 root root 56 Mar 27 2018 nodegc-bpfcc
-rwxr-xr-x 1 root root 9289 Mar 27 2018 nfsslower-bpfcc
-rwxr-xr-x 1 root root 4587 Mar 27 2018 nfsdist-bpfcc
-rwxr-xr-x 1 root root 3221 Mar 27 2018 mysqld_qslower-bpfcc
-rwxr-xr-x 1 root root 12023 Mar 27 2018 mountsnoop-bpfcc
-rwxr-xr-x 1 root root 17963 Mar 27 2018 memleak-bpfcc
-rwxr-xr-x 1 root root 2262 Mar 27 2018 mdflush-bpfcc
-rwxr-xr-x 1 root root 3429 Mar 27 2018 llcstat-bpfcc
-rwxr-xr-x 1 root root 3295 Mar 27 2018 killsnoop-bpfcc
-rwxr-xr-x 1 root root 61 Mar 27 2018 javathreads-bpfcc
-rwxr-xr-x 1 root root 58 Mar 27 2018 javastat-bpfcc
-rwxr-xr-x 1 root root 60 Mar 27 2018 javaobjnew-bpfcc
-rwxr-xr-x 1 root root 56 Mar 27 2018 javagc-bpfcc
-rwxr-xr-x 1 root root 58 Mar 27 2018 javaflow-bpfcc
-rwxr-xr-x 1 root root 59 Mar 27 2018 javacalls-bpfcc
-rwxr-xr-x 1 root root 5154 Mar 27 2018 hardirqs-bpfcc
-rwxr-xr-x 1 root root 3852 Mar 27 2018 gethostlatency-bpfcc
-rwxr-xr-x 1 root root 7124 Mar 27 2018 funcslower-bpfcc
-rwxr-xr-x 1 root root 7442 Mar 27 2018 funclatency-bpfcc
-rwxr-xr-x 1 root root 12448 Mar 27 2018 funccount-bpfcc
-rwxr-xr-x 1 root root 5847 Mar 27 2018 filetop-bpfcc
-rwxr-xr-x 1 root root 7235 Mar 27 2018 fileslower-bpfcc
-rwxr-xr-x 1 root root 3718 Mar 27 2018 filelife-bpfcc
-rwxr-xr-x 1 root root 9605 Mar 27 2018 ext4slower-bpfcc
-rwxr-xr-x 1 root root 5674 Mar 27 2018 ext4dist-bpfcc
-rwxr-xr-x 1 root root 5944 Mar 27 2018 execsnoop-bpfcc
-rwxr-xr-x 1 root root 20036 Mar 27 2018 deadlock_detector-bpfcc
-rwxr-xr-x 1 root root 3920 Mar 27 2018 dcstat-bpfcc
-rwxr-xr-x 1 root root 4009 Mar 27 2018 dcsnoop-bpfcc
-rwxr-xr-x 1 root root 3780 Mar 27 2018 dbstat-bpfcc
-rwxr-xr-x 1 root root 7130 Mar 27 2018 dbslower-bpfcc
-rwxr-xr-x 1 root root 12614 Mar 27 2018 cpuunclaimed-bpfcc
-rwxr-xr-x 1 root root 4975 Mar 27 2018 cpudist-bpfcc
-rwxr-xr-x 1 root root 57 Mar 27 2018 cobjnew-bpfcc
-rwxr-xr-x 1 root root 4142 Mar 27 2018 capable-bpfcc
-rwxr-xr-x 1 root root 6960 Mar 27 2018 cachetop-bpfcc
-rwxr-xr-x 1 root root 4932 Mar 27 2018 cachestat-bpfcc
-rwxr-xr-x 1 root root 9887 Mar 27 2018 btrfsslower-bpfcc
-rwxr-xr-x 1 root root 6214 Mar 27 2018 btrfsdist-bpfcc
-rwxr-xr-x 1 root root 2392 Mar 27 2018 bpflist-bpfcc
-rwxr-xr-x 1 root root 1721 Mar 27 2018 bitesize-bpfcc
-rwxr-xr-x 1 root root 6171 Mar 27 2018 biotop-bpfcc
-rwxr-xr-x 1 root root 4869 Mar 27 2018 biosnoop-bpfcc
-rwxr-xr-x 1 root root 4023 Mar 27 2018 biolatency-bpfcc
-rwxr-xr-x 1 root root 1567 Mar 27 2018 bashreadline-bpfcc
-rwxr-xr-x 1 root root 33534 Mar 27 2018 argdist-bpfcc
vagrant@ubuntu-bionic:~$
I finished this weekend Marcus Aurelius Meditations. Yes, this is the Emperor in the movie Gladiator. Since I have reading about Stoicism, watching videos and actually doing meditation, I was curious about MA’s writings. I have read about Epictetus so looked like a good follow up.
The intro of the book is quite good. Give you a lot of background about MA, his time and his “meditations” itself. To be honest, I gathered more from the intro that the book itself. The meditations are divided in 12 books but doesnt looks like there is a plot. I felt that MA was repeating his stoicism mantra in all books.
I was surprised about his very stoicism believe with insisting points about anything outside your soul, it is something you can’t control and it is going to perish sooner or latter. You should care only about your reasoning and following the “rational” nature.
Any pain, insult, feeling is is something external and if it affects you is because you are not following the human nature. Dont look for fame, fortune, etc. At the end, the atoms of our body will go back to the nature, the source. And this is for everybody.
And very interesting, he is very clear in the existence of a god and there is a reason for everything.
In summary, I am taking several points of stoicism in my own believe. It fits in my core values and find it useful. Like meditation itself.
So I just created an empty repo and started working on it:
$ git clone https://github.com/thomarite/test-ci.git

$ cd test-ci
$ pyenv local 3.7.3
$ python -m venv virt_env
$ source virt_env/bin/active

$ python -m pip install pylama
$ python -m pip install black
$ python -m pip install pytest
$ python -m pip install tox

$ mkdir tests

$ vim tests/test_sample.py
def increment(x):
return x + 1


def test_answer():
assert increment(4) == 5

$ vim requirements.txt
pytest==5.4.3
pylama==7.7.1
black==19.10b0

$ vim .travis.yml
language: python
python:
"3.7"
# command to install dependencies
install:
pip install -r requirements.txt
# command to run tests
script:
pylama .
black --check .
py.test -s -v tests/
Then you create an account with Travis-ci.org that is “free” and you link up to your repo. As soon as you commit, you will how the tests run and if they are successful.
As I have now a basic setup, I hope I carry on using it to any new python stuff I try.
As my last attempt to build a MPLS-SR Arista lab failed usin cEOS. I decided to try a different approach as I need more resources that my laptop has. For sometime, I wanted to use tesuto but I am not sure if it is still on business. From the main page, you can’t find any link to register (and pay) for the service. Although if you search for “pricing” you can find a link to that. That’s it.
The other option was to use EVE-NG. You can use it in your own bare-metal server or in the cloud.
So finally, I decided to spend some money. I signed up for GCP with a $300 free computing offer. So at least I dont pay for GCP yet and then I bought one year of EVE-NG professional. Let’s see how it goes.
Before buying the license, you need to install eve-ng. So I followed the official documentation to use it in GCP as it is quite up to date.
I consulted other links too just to compare other users experiences like these:
I had an issue during the process. When I had to configure DHCP, the IP wizard was showing garbage in the script. Hopefully I didnt have to add anything just accept all default values.
So once it is done, you need to https to the VM…. it didnt work. Somehow “apache” was started. So after startup, got access. I can login and change the default password.
root@eveng01:/var/www/html# service apache2 start
root@eveng01:/var/www/html# service apache2 status
So far, I am not planning to give it a static IP to the VM and a FQDN from my domain. Maybe in the future if I use it often.
Now, I need to create the Arista lab. I followed one of the links earlier, it was quite handy.
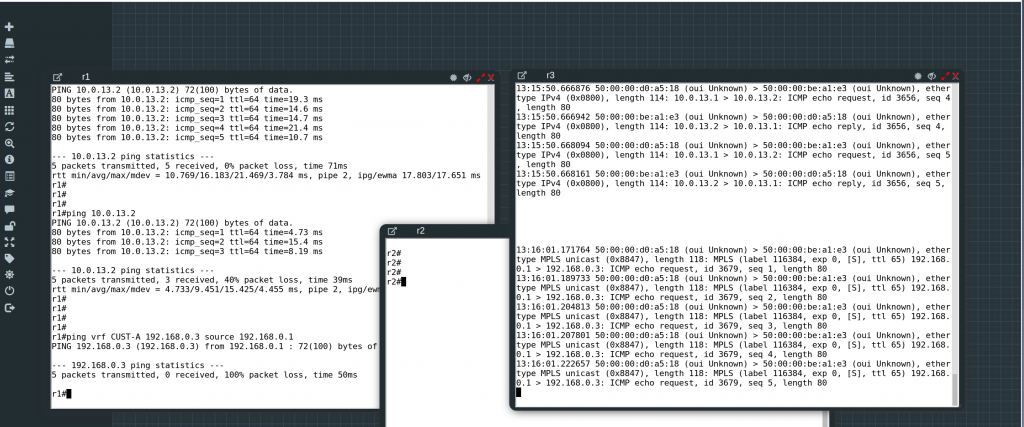
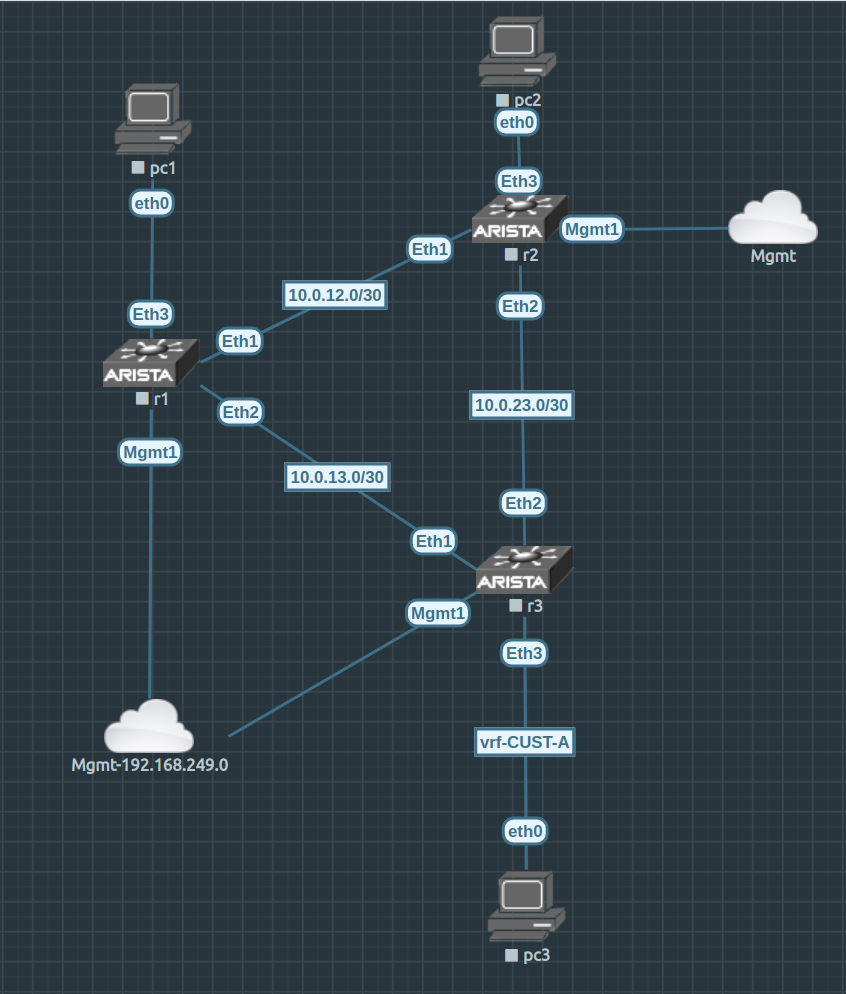
I created my small 3 nodes lab, apply the config. All this with a couple of reboots in each device and you have the lab up and running!
It is nice to work in a system with plenty of RAM. The VM has 60GB of RAM and 16vCPU. So I should be able to create a lab with 14 vEOS (each one needs 4GB and 1CPU).
$ top
top - 13:00:27 up 1:33, 1 user, load average: 2.12, 1.37, 1.04
Tasks: 266 total, 1 running, 168 sleeping, 0 stopped, 0 zombie
%Cpu(s): 10.3 us, 5.9 sy, 0.0 ni, 83.4 id, 0.0 wa, 0.0 hi, 0.4 si, 0.0 st
KiB Mem : 10.2/61838576 [ ]
KiB Swap: 0.0/0 [ ]
PID USER PR NI VIRT RES SHR S %CPU %MEM TIME+ COMMAND
27623 root 20 0 3034100 1.992g 25696 S 100.4 3.4 11:21.40 qemu-system-x86
26120 root 20 0 3034100 1.951g 26068 S 100.0 3.3 8:54.66 qemu-system-x86
24536 root 20 0 3034100 1.915g 26072 S 43.3 3.2 9:16.11 qemu-system-x86
245 root 25 5 0 0 0 S 8.2 0.0 2:05.36 uksmd
7500 www-data 20 0 377908 30744 12732 S 4.5 0.0 0:17.27 apache2
4262 root 20 0 1138416 15732 13508 S 0.8 0.0 0:25.40 janus
5526 tomcat8 20 0 5925452 348168 17676 S 0.8 0.6 0:43.17 java
159 root 20 0 0 0 0 I 0.4 0.0 0:01.13 kworker/6:1-eve
4363 mysql 20 0 2493932 85712 20408 S 0.4 0.1 0:10.80 mysqld
7210 www-data 20 0 377900 31024 12724 S 0.4 0.1 0:07.08 apache2
Unfortunately, I am hitting the same problem, and this time, the MAC addresses are the ones you expect to see based on the interface outputs:
I have asked again Arista if this is expected…
In the main time, I need to learn how to map the devices in the VM to external ports so I can access directly from my laptop.
UPDATE
My Arista SE confirmed that cEOS doesnt support MPLS Data Plane. And this should work with vEOS. So I asked in Arista forum about this problem with vEOS and turns out that this works but you need to be sure that a “physical” interface is attached to the VRF, a Loopback or SVI is not enough.
This seems to be the original post about the problem:
I have a supplier at my employer that requires to use a FTP server to send big files when you open a support ticket. For a long time (a couple of years) whenever I had to upload big files, I had to use my personal VM because my ftp connections failed from the office. I always blamed the super-smart firewall.
One day, I decided to fix the issue and allow the connection in our corporate firewall. I failed. Still couldnt upload files from the office. So keep using my personal VM.
This week I had to upload again a big file. This time I am working from home, so pretty much it is going to work the upload. Wrong! It fails. Ok, I checked a bit and got to the conclusion that it is my ISP or modem at home that is blocking FTP. Most ISP use CGN to stretch as much as possible the limited IPv4. I have IPv6 at home and my VM has IPv6 too… but the ftp server doesnt.
I checked the internet if there was any know issue with my ISP and FTP connections. No luck. I connected to my modem, nothing obvious messing around with FTP.
I decided to give it a proper go to this issue. I knew that it worked from my VM and it didnt from home. I noticed that I was running the same ftp client version in the VM and at home. So let’s debug the ftp client and take a packet capture in both locations.
CLI from the VM:
$ ftp -vd b.b.b.b
ftp: setsockopt: Bad file descriptor
Name: ftp
---> USER ftp
331 Please specify the password.
Password:
---> PASS XXXX
230 Login successful.
---> SYST
215 UNIX Type: L8
Remote system type is UNIX.
Using binary mode to transfer files.
ftp> cd support
---> CWD support
250 Directory successfully changed.
ftp> cd 211211
---> CWD 211211
250 Directory successfully changed.
ftp> put TEST.txt
local: TEST.txt remote: TEST.txt
---> TYPE I
200 Switching to Binary mode.
ftp: setsockopt (ignored): Permission denied
---> PORT a,a,a,a,162,57
200 PORT command successful. Consider using PASV.
---> STOR TEST.txt
150 Ok to send data.
226 Transfer complete.
28 bytes sent in 0.00 secs (854.4922 kB/s)
ftp> quit
---> QUIT
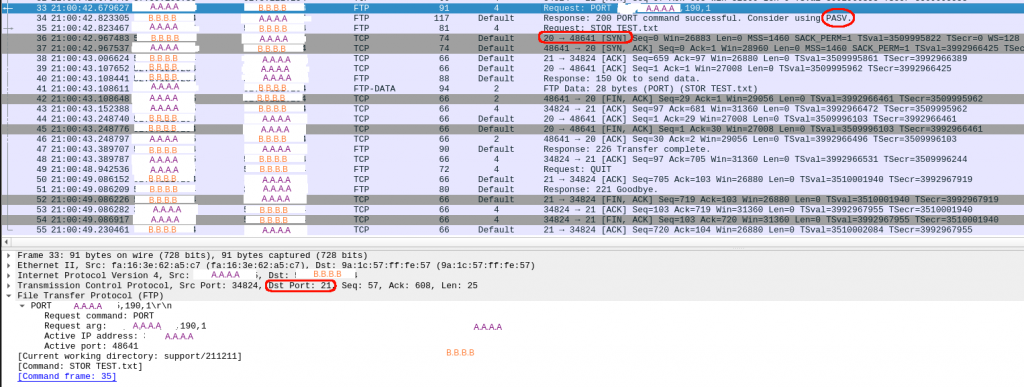
And this is the packet capture:
After typing “put” in packet 33, I see a “PASV” message from the server and a new connection (initiated by the server!) is established for the data transfer. All good.
So now, make the same from home and compare.
CLI from home without debug:
$ ftp b.b.b.b
Connected to b.b.b.b.
Name: ftp
331 Please specify the password.
Password:
230 Login successful.
Remote system type is UNIX.
Using binary mode to transfer files.
ftp> cd support
250 Directory successfully changed.
ftp> cd 211211
250 Directory successfully changed.
ftp> put TEST.txt
local: TEST.txt remote: TEST.txt
500 Illegal PORT command.
ftp: bind: Address already in use
ftp> quit
221 Goodbye.
CLI from home with debug:
$ ftp -vd b.b.b.b
ftp: setsockopt: Bad file descriptor
Name: ftp
---> USER ftp
331 Please specify the password.
Password:
---> PASS XXXX
230 Login successful.
---> SYST
215 UNIX Type: L8
Remote system type is UNIX.
Using binary mode to transfer files.
ftp> cd support
---> CWD support
250 Directory successfully changed.
ftp> cd 211211
---> CWD 211211
250 Directory successfully changed.
ftp> put TEST.txt
local: TEST.txt remote: TEST.txt
---> TYPE I
200 Switching to Binary mode.
ftp: setsockopt (ignored): Permission denied
---> PORT 192,168,1,158,202,145
500 Illegal PORT command.
ftp: bind: Address already in use
ftp> quit
---> QUIT
221 Goodbye.
So with and without debug I keep seeing “ftp: bind: Address already in use”…..
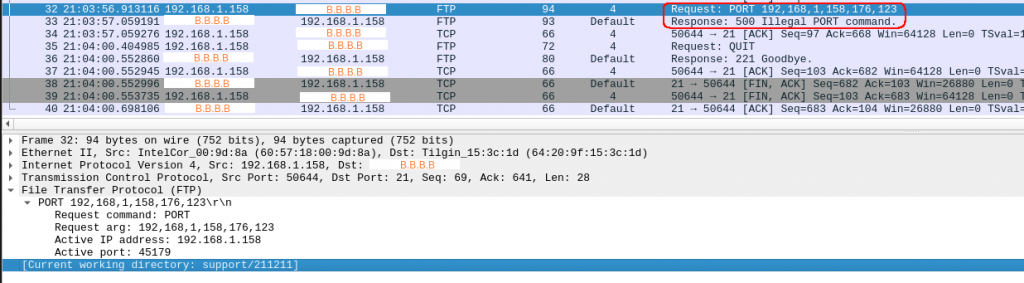
And this is the packet capture from home:
So after I type “put” in packet 32, the answer from the server is a “500”.
I wasnt clearly paying attention to the clues. I was still banging my head why the server was sending a “500 Ilegal PORT command”.
I was comparing both captures and both debug outputs… but still didnt it.
I thought I understood FTP. I knew that you use port TCP 21 to establish the control session and the data session / transfer is via new TCP session using a random port. That’s one of the reasons that using NAT or CGN can screw up your FTP sessions.
So I assumed that the issues wasnt my ISP. So it had to be my side (or me).
So finally, I decided to search for “ftp: bind: Address already in use” as it was the message that came up with and without debugging.
An entry from 2004…. it can’t fix my problem for sure…. keep reading and update from 2020… it says it works…. oh boy II
try using a passive connection with "ftp -p" instead, see if it helps...
There we go:
$ ftp -vdp b.b.b.b
ftp: setsockopt: Bad file descriptor
Name: ftp
---> USER ftp
331 Please specify the password.
Password:
---> PASS XXXX
230 Login successful.
---> SYST
215 UNIX Type: L8
Remote system type is UNIX.
Using binary mode to transfer files.
ftp> cd support
---> CWD support
250 Directory successfully changed.
ftp> cd 211211
---> CWD 211211
250 Directory successfully changed.
ftp> put TEST.txt
local: TEST.txt remote: TEST.txt
---> TYPE I
200 Switching to Binary mode.
ftp: setsockopt (ignored): Permission denied
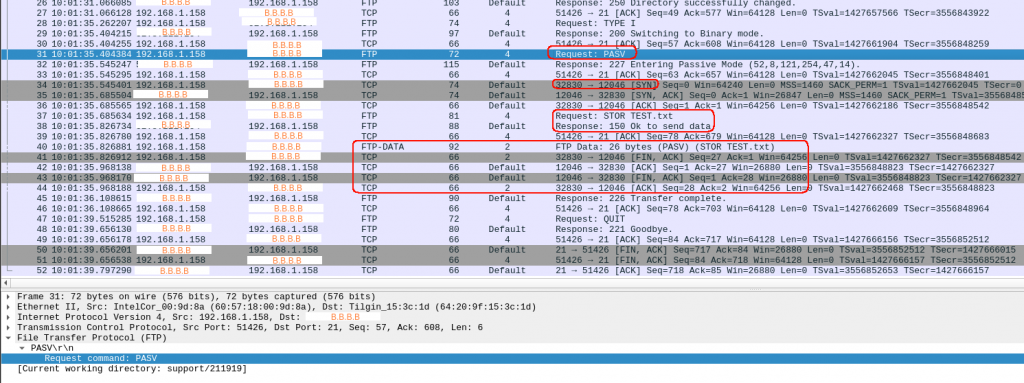
---> PASV
227 Entering Passive Mode (b,b,b,b,46,248).
---> STOR TEST.txt
150 Ok to send data.
226 Transfer complete.
26 bytes sent in 0.00 secs (12.5386 kB/s)
ftp> quit
---> QUIT
221 Goodbye.
it worked !!!
I felt embarrassed. Time to search for FTP passive vs active…
Really good explanation. I hope I will never forget it.
FTP Active: The client issues a PORT command to the server signalling that it will “actively” provide an IP and port number so the server opens the Data Connection back to the client.
FTP Passive: The client issues a PASV command to indicate that it will wait “passively” for the server to supply an IP and port number, after which the client opens a Data Connection to the server.
So it worked in my VM because somehow the ftp server sent a PASV command (maybe because it detects there is no NAT as I have a public IP???).
From home, it failed because, by default, the connection is ftp active, so when the server tried to open the new data connection to me(something I couldnt see in the packet capture…) it failed as my ADSL modem wouldnt allow inbound connections.
Once I enabled “-p” in my connection to the server, all worked because it was me who started the new data connection and my firewall allows everything outbound.
Happy to solve the problem after a couple of years, and after a couple of hours of “serious” troubleshooting. It was shocking how blind I was. I had the ftp error message and the PASV from the trace.