From the AlphaSignal email list, that most of the times go over my lame knowledge, I found this piece of info, quite interesting:
FP8-LM: Training FP8 Large Language Models
Goal: Optimize LLM training with FP8 low-bit data formats. Issue: High cost of LLM computational resources. Solution: FP8 automatic mixed-precision framework for LLMs. Results: Reduced memory by 42%, increased speed by 64%. Insight: FP8 maintains accuracy, optimizes training efficiency.
This is something I want to really understand at one point. FP (Floating-Point) instructions can be from several sizes (8, 16, 32, 64). So the bigger, the better precision. I guess for some scientific tasks that is important. But looks like for AI, with FP8 could be good enough.
Reading across this blog, I came to this statement:
What limits computer performance today is predictability, and the two big ones are instruction/branch predictability, and data locality.
That is from this interview. I dont kown Jim Keller but it is a long and interesting conversation. I liked it when he says he was the laziest person at Tesla!
Before moving, I went through some piles of papers and found a couple of pieces with the note “Love is not enough”. I am pretty sure they were notes I took from a book of Mark Manson (likely The Subtle Art of Not Giving a F*ck – I need to re-read) And somehow this morning, I got this video in youtube.
Summary:
Love is not enough:
Love doesnt equal compatibility: Love is emotional. Compatibility is logical
Love doesnt solve your relationship problems (amen)
Love is not always worth sacrificing yourself: Dont tolerate behaviours in your partner that you wouldn’t do with your best friend. A loving relationship is supposed to supplement your individual identity, not damage it or repace it.
The only way you can fully enjoy the love in your life is to choose to make something else more important than love.
Friendship > Love
In my case, I dont really think about love but companionship. I think too many times about that “perfect” companion to go through life (good and bad moments). And then I am very solitary person (it gets worse with age). And then you are not sociable, and many things you read tell you that having a strong social support is critical in mental health, life satisfaction, etc. So it is like in the middle of two paths.
I really want to try one day access the darkweb. No idea if this video is good but could be a starting point.
Unrelated, I am trying to get better at playing chess (extremely slowly if any progress). This video is amazing. And learn Go some day… (as usual no enough time)
This is a conference about networks that I was interested and I finally got some emails with the presentations. They are mainly from Meta.
Meta’s Network Journey to Enable AI: video – second part interesting.
AI fabric (backend: gpu to gpu) hanging from DC fabric.
SPC (Space, Power, Cooling)
Fiber, Automation
RDMA requires (lossless, low-latency, in-order) -> ROCEv2(Ethernet) or IB
Servers have 8x400G to TOR. Tor 400G to Spines
1xAI zone per DH. 1xDC has several DHs.
Oversubscribed between zones, eBGP, ECMP.
Scaling RoCE Networks for AI Training: video — Really really good.
RMDA/IB used for long time in Research.
Training: learning a new capability from existing data (focus of the video)
Inference: Applying this capability to new data (real time)
Distributed training for complex models. GPU to GPU sync -> High BW and low/predictable latency.
ROCEv2 with (tuned) PFC/ECN. TE + ECMP (flow multplexing)
Oversubscription is fine in spine (higher layer)
Challenges: Load balancing (elefant flows), Slow receivers/back pressure, packet loss from L1 issues (those flapping links, faulty optics, cables, etc xD), debugging (find jobs failures)
Traffic Engineering for AI Training Networks : video – interesting both parts.
Non-blocking. RTSW=TOR. CTSW=Spine. Fat-Tree Architecture. 2xServer per rack. 1xserver=8xGPU. CTSW=16 downlinks -> 16 uplinks. Up to 208 racks?
ROCE since 2020. CTSW are high redix and deep buffer switches.
AI Workload challenges: low entropy (flow repetitive, predictable), bursty, high intensity elephant flows.
SW based TE: dynamic routing adapted on real-time. Adaptive job placement. Controller (stateless)
Data plane: Overlay (features from broadcom chips) and Underly (BGP)
Flow granularity: nic to host flow.
Handle network failures with minimum convergence time. Backdoor channel with inhouse protocol.
Simulation platform. NCCL benchmark.
Networking for GenAI Training and Inference Clusters: video Super Good!
Recommendation Model: training 100GFlops/interation. inference: few GFlops/s for 100ms latency.
LLM: training 1PetaFlops/sentence (3 orders magnitude > recommendation), inference: 10PF/s for 1sec time-to-first token. +10k GPUs for training. Distributed inferencce. Need Compute too.
LLama2 70Billion tokens -> 1.7M hours of GPU. IB 200G per GPU, 51.2 TB/s bisection bw. 800 ZetaFlops. 2 Trillion dataset. 2k A100 GPUs. As well, used ROCEv2 (LLama2 34B).
+30 ExaFlops (30% of H100 GPUs fp8 peak) + LLama65B training < 1day.
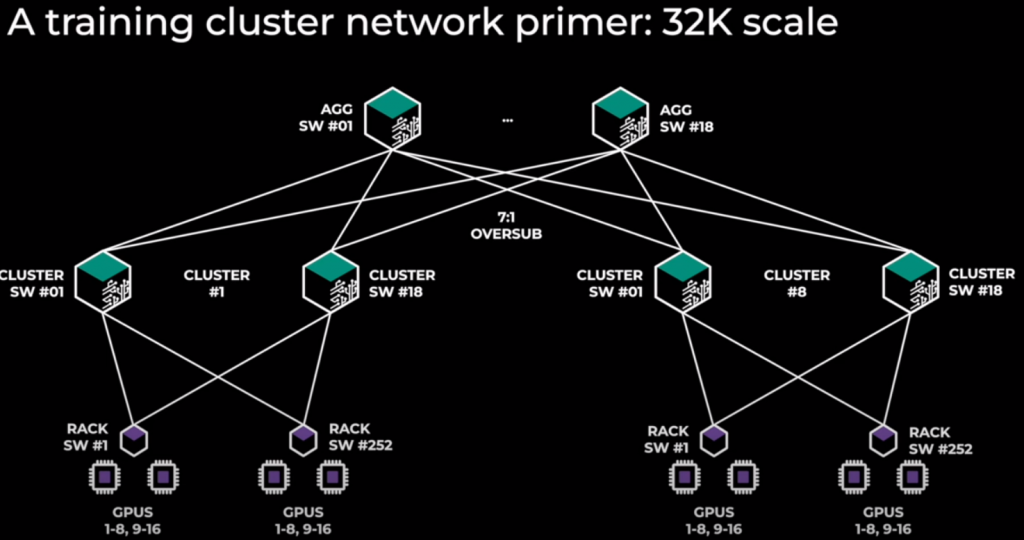
Massive cluster: 32k GPUs! Model Parallelism.
LLM inference: dual-edge problem. Prefill large messages (High BW) + Decode small messages (latency sensitive).
Scale out (-bw, large domain. Scalable RDMA (IB or Ethernet), data parallel traffic) + Scale up (+BW, smaller domain. NVLink 400G, model parallel traffic)
32k GPU. TOR (252), Spine (18), AGG (18). 3 levels. Oversubscription Spine-Agg 7:1. 8 clusters. 252 racks per cluster. 16 GPUs per rack (8x252x16=32k GPUs). ROCEv2!
Model Parallelism harder for computation. Model Parallel traffic: all-reduced/all-to-all, big messages (inside cluster = sclae-up). Data Parallel traffic: all-gather & reduce-scatter (between cluster = scale-out, NVLink)
Challenges: Latency matters more than ranking. Reliability !!!!!
From ESNOG (although I am subscribed, I dont really receive notifications…) I saw this presentation, and then I found the main video reference.
BUM: 1.5Mbps -> that goes to all customer ports!! Small devices can’t cope with that.
Ratelimiting for BUM ingress/egress
Originally IXP is VPLS. Issue with long lasting flows / long lasting MACs
Solution: EVPN + ProxyARP/ND Agent.
I know EVPN is mainly for Datacenters but it is interesting the move to IXP. Although I remember reading about EVPN into Cisco IOS-XR platform that is mainly a ISP device.
I didnt know anything about this conference until the last two months started to read news about it from different blogs. I am surprised the webpage doesnt link to the videos. This one is quite interesting but after the 15 minute becomes very hardcode for me.
I guess there are hundreds of project that try to use GPT to build apps. I found this one and looks very nice. I would like to use it if I find time for one idea.