Pastry Cream (creme patissiere) Ingredients
- 250ml milk
- 1 egg
- 2 yolks
- 62g caster sugar
- 37g plain flour
- 8g butter
- 1/2 tsp vanilla paste
Process:
- In a sauce pan, put the milk until boil. Pour a bit of sugar and dont stir!!!
- In a bowl, mix egg, yolks, sugar and vanilla until smooth. Then add flour.
- Add the boiling milk gradually to the egg mix. Whisk properly.
- Return the mix to the heat. Stir until thickens. Dont stop stirring! You should see bubbles.
- Remove from heat and add the butter. Mix properly.
- In a clean tray, pour the mix, wrap with cling film and let it rest in the fridge.
Chox pastry Ingredients
- 250ml water
- 100g butter in cubes
- 150g plain flour
- 4 eggs
- 1 tsp sugar
- 1 tsp salt
Process:
- In a saucepan, heat the water until boil. Add sugar and salt.
- Melt the butter in the boiling water.
- Remove the pan from the heat and add the flour. Whish properly and return to the heat.
- Keep stirring the mix until if stops sticking to the pan. Be sure is properly cooked the flour.
- Spread the mix in a cold surface to cool down a bit.
- Using the back of a tray, wash it with a bit of melted butter and then dust some flour. Smack the tray in a side so the excess flour falls. You should have a neat unti-stick proof tray.
- With a block of butter, pinch it with your thumb and index finger. Your index finger should touch the edge of the tray. Use this method to make a straight line in each side of the tray.
- Beat the 4 eggs.
- Pre-heat oven at 190C
- Take the dough back into a bowl. This is a critical point! Add a bit of egg at each time. You should stop adding egg once you can create a solid “V” when dropping a big dollop of the mix with the spoon 2-3 times in a row. Maybe you need to bit an extra egg or dont need to add the 4 eggs. So keep it in mind.
- Prepare a piping bag. Twist the bag with a finger, fold the bag around half and add the mix. Tight the bag carefully, twisting it. Hands on the bottom.
- Over the tray where you made the two vertical lines, pipe in each side a small line between the edge of the tray and the vertical line. Leave space between each eclair as they will raise.
- With a fork, dip it in egg wash, an score the top of each eclair length way
- Bake for 35 minutes, they should raise and be golden brown. Then drop to 120C for a couple of minutes before removing from the oven.
- Let the eclairs to cool down in a racket.
- Take the cream from the fridge, put it back in a bowl and whisk until became a cream again.
- Prepare a new piping bag. As usual, use the index finger to twist the bag, fold until half and then pour the cream. Tight the bag twisting carefully.
- Once the eclairs are cold. Using a small knife, on the bottom of the eclair, make two holes in each edge. You will pipe the cream through those holes:

- Be sure the tip of the piping bag is big enough to fit in the hole. If the tip is too small, is very likely the piping bag will break.
- Once piping, you need to feel the eclair filling and become heavy. Try to pipe through both holes.
Chocolate Foundant Ingredients:
- 100g of dark cooking chocolate (at least 65% cocoa)
- Sugar glass for decoration
Process:
- Melt the chocolate using bain-marie.
- Dip the top of the eclairs in the melted chocolate. Use your thumb and index fingers. Try to dip just a third of the eclair. Till the eclair so the chocolate drops by one side and then with a finger smooth the chocolate run so it stops and looks smooth.
- Let the eclairs rest until the chocolate settles.
- Powder a bit of sugar glass on top of the dry chocolate.
Ready to eat!
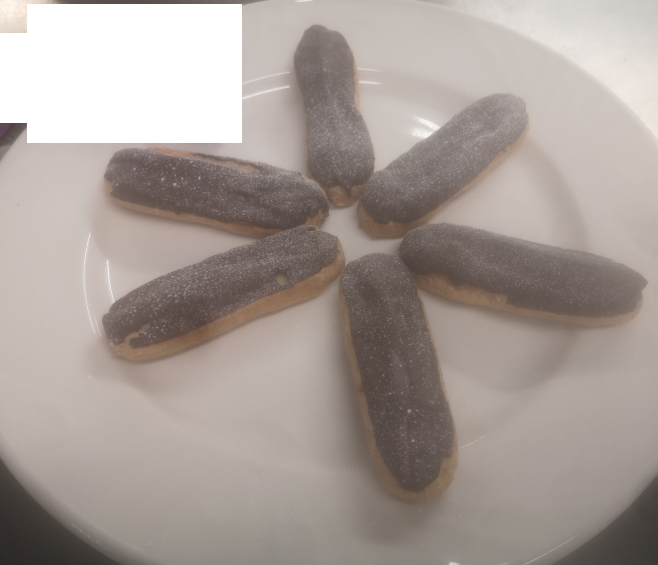
They were tasty and not bad for the first time. The pastry didnt raise much to be honest. It seems the oven needs a bit of steam for that.