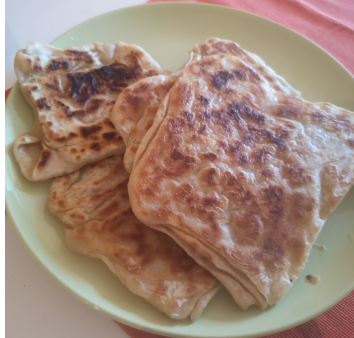
Canelones de espinacas

Pasta bolognesa was my favourite dish as a kid. We had it I think once every week. Canelones was another big one but my mum didnt cook it that often as it was more time consuming assembling the canelones and preparing the white sauce.

Anyway, I wanted to try the spinach version so I found this recipe that looked nice. I used lasagna sheets cut in two for the canelones and worked nicely.

Ingredients for filling

  • 12 lasagna sheets
  • 250g frozen spinach (put in boiling water to unfreeze)
  • 1 chopped onion
  • 1 piece of garlic
  • 1 boiled egg
  • 20g of pine nuts
  • a bit of grated parmesan cheese (or similar hard cheese)

Ingredients for bechamel sauce:

  • 2-3 big tsp of plain flour
  • 25g of butter
  • nutmeg
  • salt and pepper
  • 200ml milk
  • grated parmesan cheese

Process

  • Boil 1l water in a pan, with salt and a bit of olive oil. Once boiling, put lasagna sheet in 2-3 at each time. They should be ready in a couple of minutes (they should float). Remove and leave it rest.
  • In a sauce pan, heat some oil, add the onion and garlic. Until soft
  • Add the unfrozen spinach, keep stirring.
  • Add the pine nuts and the boiled egg (cut in small pieces). Salt and pepper.
  • Add a bit of cheese.
  • Retire from the heat.
  • In a saucepan, melt the butter, add the flour little by little until forming a paste.
  • Start adding the milk, again little by little stirring without stopping. This is at low-medium heat. Add nutmet, salt and pepper. Taste from time to time. Add the cheese at the end.
  • Once you have a sauce that is not very liquid neither thick, we are ready to assemble everything.
  • Pre-heat oven at 200C
  • Put some of the bechamel in the spinach mix and stir.
  • Prepare an oven dish. Put some butter or bechamel sauce in the dish to avoid stickiness.
  • Take the cold lasagne sheets, cut in two squares. In each square put a spoon of the spinach mix and roll like a canelone. Put in the oven dish in lines.
  • Once you the oven dish covered with canelones, pour the bechamel soauce on top of them. Add some grated cheese. I had some tomato sauce left over and I add it too.
  • Put the oven dish in the oven. 30m or until the top is grilled.
  • Let it cool down a bit and ready to eat!

Kombucha

I read this book in 2019 about fermentation as I was already doing sourdough and wanted to learn more things. It is a great about anything related to fermentation. From there I started doing sauerkraut (still haven’t achieved the required results though). Another thing I wanted to try was kombucha, a fermented fizzy drink. I thought it was difficult to develop the scoby until I watched this video and learned that I can buy it! So I got my scobby and started the process:

1- Boil 900ml filtered water. Then add 50-60g sugar, stir well.

2- Add two bags of black tea for 10 minutes, then remove the bags.

3- Let it cool down to room temperature

4- Add the mixture to a 1 litre jar, add the scoby with its liquid.

5- Cover the jar with a cloth and leave it somewhere warm for 5 days without direct sunlight (I put it under the sink)

6- Remove the scoby and 100ml of the mix into a small jar, keep it in the fridge for the next batch.

7- Put the rest of the mix into a airtight glass 1l bottle at room temperature for 3-7 days until fizzy. I put it under the sink again. You may release a bit of gas after a couple of days if you dont want to see the bottle explode when opening…

8- Put the bottle in the fridge, and afterwards you can enjoy a refreshing fizzy homemade drink!!!

It is a slow process but it is easy. In my first bottle, I was surprised because it was actually quite fizzy!!! The taste was a kind of cider, redbull , etc without the after taste of dead by sugar.

I am doing my second bottle and at some point I would like to add flavours, like ginger… I need to check if this is consider ginger beer. Although no idea if it generates any alcohol… (there is a fermentation process involved and breakdown of sugars….)

Happy with it, and hopefully adding to my routine.

Roscon-de-Reyes

It is never too late. I have never tried “Roscon de Reyes” before. But this year (although over a week later) I wanted to make it as it is the only thing I miss from (my child time) Christmas (Sorry Santa, you dont belong to my culture)

So I used as inspiration this video.

Ingredients for dough:

  • 580g Strong white flour (I guess you can use plain too)
  • 180 ml milk (I use semi-skim)
  • 100g sugar
  • 2 egg
  • 7g instant yeast (1 sacket – I can’t get fresh yeast)
  • 80g butter (room temperature)
  • zest of 1 orange
  • zest of 1 lemon
  • pinch of salt
  • 1 tsp of vanilla paste (I dont have “agua de azahar”)

Decoration:

  • Cherry glacier
  • Italian mixed peel (orange and lemon glacier peel)
  • almond flakes
  • Egg wash

Ingredients for the filling / cream:

  • 500ml of double cream (cold from the fridge)
  • 50g sugar
  • 20ml milk

Process:

In a bowl, put the flour, sugar, yest, zest of lemon, zest of orange, pinch of salt, vanilla paste. Mix everything.

Make a whole in the middle, add the milk, eggs. Mix everything until nearly combine. Finally the butter. Mix again, you will reach a point it is not possible in the bowl.

Put the dough in a work surface. Start knelling a bit. Once your hands are quite sticky with the dough. Stop for a couple of minutes while you scrap the dough from your hands into the main ball. Start knelling again, it should be much easier now and you should get a soft dough after 5-7 minutes.

Put a couple of oil drops in the bowl and spread it so we are going to put the dough in it. Cover with plastic film and let it rest until double in size. It can be over a couple of hours as it is winter.

Once the dough is double in size, remove it from the bowl. Remove the air bubbles knelling a bit, let it rest of a couple of minutes in the bowl.

Take the dough and make a whole in the middle. Spin the dough so you create a “wheel”. Put it in a try with baking paper. Let it rest until double in size again (this time will be quicker)

Now, start preparing the filling. Put in a bowl the double cream, sugar and milk. I used a hand blender and it was perfectly fine. The cream became solid quite quickly to be honest. Give it a taste, you can add more sugar if you want. Let it rest in the fridge.

Once the ring-dough has double up. Pre-heat the oven at 180C. Egg wash the dough very well, this will make it golden. Then add as much Italian mixed peel, glacier cherries and almond flakes as you can. The egg should help to stick it.

Once the oven is hot. Put the “roscon” in until golden. My case was nearly 30 minutes.

Once it is golden, remove from the oven. Check with a tooth stick that is cook inside. Let it cool down properly. With a bread knife, cut it in two slices. Be careful dont break the top, put it aside. Now spread all your cream / “nata” in the base. Put back the top over the cream. And that’s it.

It brought me very good memories (and it is tasty!!!)

Before getting into the oven

Test passed !!!

Chilli-no-carne

I cooked a vegan dish last night for a friend. It is a mix of something similar I did some time ago but now with mushrooms and red wine.

Ingredients:

  • 300g mushrooms shredded via food processor
  • 1 small potato cut in small slides + olive oil
  • 1 red pepper
  • 1 can of passata (tomate sauce)
  • oregano + salt + pepper + splash red wine vinegar
  • 1 can of mix beans
  • red wine (100ml)
  • 2 small pieces of dark chocolate (85%)

Process:

1- In a saucepan, heat some oil, add the potatoes and red pepper. Fry them. Keep stirring so they dont stick in the bottom.

2- Add the tomate sauce, stir for a couple of minutes, adding the oregano, salt, pepper.

3- Add the mushrooms.

4- Add the can of beans, keep stirring. And add the red wine

5- At no low-medium heat, keep stirring form time to time. Sauce should thicken up and not stick in the bottom. Taste, add salt/pepper if needed.

6- 10-15 minutes later, taste. Check pepper and beans are soft. Add chocolate, it should melt quickly and darken the sauce.

7- Remove from the heat, and serve in bowls!

To be honest, it was tasty, not difficult and quick.

Patatas-con-ajo

“Patatas con ajo” was a typical side dish I had with a beef steak when I was a kid. I remember that acid/strong flavour of the potatoes. I have tried a couple of time lately and I couldn’t find the flavour. So I check a couple of videos, and this one gave me the clue, vinager! And then I realised that very likely in each household, this recipe has a different name like “patatas a la vinagreta”.

In my case, the potatoes are fried with much less olive oil so they dont get that crispy. Once they are cooked, removed from the pan, and put chopped garlic, parsly and vinager (I used white wine one). Cooked for 30 sec and then add again the potatoes. Be sure everything gets mixed. Then remove from the heat.

I found that childhood taste! And the day after, they were even better!

Shortbread

This is a very tasty biscuit and very simple to make. Just three ingredients plus a pinch of salt: flour, sugar and butter. I tried a couple of weeks ago for the base of a cake and really liked the buttery flavour. This biscuits are supercheap so not sure how much real butter they have. Last week I tried this recipe and I failed miserably. So I decided to try again but using a video so I can be sure the dough has the expected texture. So I tried this video. And it was quite good!

Ingredients:

250g unsalted butter – room temperature

125g custer suggar

375g plain flour

pinch of salt

Process:

Mix everything in a bowl using your hands until getting a solid ball. Then you can spread with a rolling pin. I like thick, so a bit less than a finger. Then cut them in the shape you prefer. Use a fork to make some holes. Dust a big of sugar on top. Put in the fridge while preheat the oven at 175C. Once it is hot, put inside until slightly golden. Let them cool down in a rack. It is ok if they look soft.

This time they looked nice! Maybe I should have remove them a bit earlier from the oven.

To be honest, the taste wasn’t as buttery as the ones from the shop (the ingredients list wasnt 3…) but I am quite happy with them. Only 3 (basic) ingredients. Pretty quick to bake. And still had a dough ball in the fridge because my try was small. So you can have biscuits quickly next weekend.

Ribs

Ribs is something I tried for first time some years a go in a BBQ restaurant. I wanted to try for some time. So I checked these two videos: american versionspanish version.

I followed the American version mainly. I bought two rack of small pork ribs. Whatever my butcher had left.

First thing, I salt them as I was going to cook them the next day.

Pre-heat oven at 150C

Rib Rub: Salt, pepper, garlic powder, paprika. (for nex time, I need to add coffee)

BBQ Sauce: ketchup, mustard, sugar, soy sauce, apple vinegar, salt, garlic powder, paprika.

Dry the ribs with kitchen paper. Spread your rib rub thoroughly in the rack. Spread a bit of vinegar to give some moist. Wrap the ribs very tightly with aluminium foil.

Put the ribs in the oven at 150C for 2.5h – 3h.

The challenge here is to be sure if the ribs are cooked as you can’t see them. But the result was good:

They looked tender! And there was sauce around so I think it is a good sign that they are not dry! And could pull a bone easily!

Now last part. Use a brash to spread your bbq sauce on the top and put then back in the oven at 200C for 10 minutes (or until the sauce is a bit dry)

Then you are ready!

It was really testy for the first time!

A couple of days later, I tried the second rack…. and the result wasnt that good. I put the ribs at 200C for nearly 3h.. they turned up dry 🙁

Well, that’s experience. But I am glad of trying!

Marmalede-p1

This weekend I have tried something I had in mind of some time. Home-made marmalade!

I had done before membrillo! (quince) And it was great! Such a good memories came back. And you realize how is done the one you used to buy in shops…

I decided to try the same method with berries (strawberry, blueberries, rasberries, etc). The recipe is quite simple.

Ingredients

-1 kg of frozen berries (if you can get them fresh, even better)

– 100g sugar ( maybe you can add more)

– 1 glass recipient of 600ml. Disinfected with boiling water.

Process:

Heat up a big saucepan (middle heat), put the frozen berries and the sugar. Stir frequently.

The fruit will start to unfrozen. Once fruit is soft, reduce the heat a bit and keep stirring.

The fruits will release water so dont add any.

Once they are looking like a pure, taste with a spoon (dont burnt your tongue!!)

If you want to get rid of the big bits of fruit, use a hand blender.

Once you have the texture you want, it is done.

Let it cool off properly before transfer to the glass and then to the fridge.

Notes

Dont add water!!!! If you do, the marmalade will be quite liquid.

– Sugar levels. This is quite personal. Most marmalades I have checked have at least 40% sugar. I have decided with a 10%. 1kg fruit, 100g sugar. To be honest, depending on the fruit, it can be still a bit acid and you can add more. In my next attempt I will try 150g sugar.

2nd Attempt:

I followed the same process but without adding water. Still it was very liquid so i used a cooking filter to drain the mix and the result was quite good! Now it is more solid and you can drink the liquid (nothing to waste), it is super tasty!!!

Apple-Pie

To celebrate a new lockdown season, I wanted to cook an apple pie like my mum used to make and I think I found a recipe that looks like that.

Ingredients:

1- 150g of biscuits smashed (my tin was a bit bigger than the video)

2- 70g melted butter

3- 8 apples, peeled and core removed – 6 for the sauce and 2 for decoration

4- 1 glass of milk (around 250ml)

5- 1 glass of plain flour (same glass as above)

6- 1/2 glass of suggar (same glass as above)

7- a pintch of cinnamon

8- Some tbsp of marmalade (or maple syrup as I ran out)

Process

1- Use a bit of butter to cover the bottom of your tin. Mix your crashed biscuits with the butter and fill the bottom of the tin. Be sure it looks like a firm surface. Put the tin in the fridge to cool down.

2- Pre-heat oven at 180C

3- In a blender, put the 6 chopped apples, milk, flour, sugar and cinnamon. After a couple of minutes, check everything is fully combined and liquid-like.

4- Take the tin from the bridge, and pour the apple mix on the tin. Be sure it is level. Then cut the other two apples in slices and cover the apple mix.

5- Put the cake in the over for around 60 minutes. The top should be brown and if you push a knife in the cake should come out clean.

6- Once the cake is out of the oven. Use the marmalade to bright up the surface of the cake.

7- Let the cake to cool in the fridge (1h) and ready to eat!

I actually liked it and I think it is similar to the one I used to have as a kid. Good memories!

Pisto

Another dish I wanted to try for some time has been pisto. I had to be a teenager since last time. I found several good videos like this. But I tried to do it my way.

Ingredients:

  • 1 courgette
  • 1 big potato
  • 1 big onion
  • 2-3 garlic cloves
  • 3 peppers (red, green, whatever)
  • Salt, olive oil, any spice you fancy
  • 1 can tomato sauce

Process

1- Preheat oven at 200C

2- Chop your vegetables, put everything in a tray. Add salt, spices and coat in oil everything.

3- Put the tray in the oven, kind of 30 minutes. Be sure, they dont burn!

4- Heat up a frying pan. Add some oil, add the can of tomato sauce. Stir, add a bit of salt, and sugar (optional). It should thicken up a bit.

5- Once your vegs are grilled, add them to the tomate sauce (dont throw the liquid from the tray). Stir everything for some minutes and ready to serve.

6- Optional, you can fry an egg and add it on top!

Super easy, quick and healthy!