In November 2020, I got an email from the FRR email list about using MPLS with FRR. And the answer that you could do already natively (and easily) MPLS in Linux dumbfound me. So I add in my to-do list, try MPLS in Linux as per the blog. So all credits to the author, that’s a great job.
So reading the blog, I learned that the kernel supported MPLS since 4.3 (I am using 5.10) and creating VRF support was challenging until Cumulus did it. Thanks! So since April 2017 there is full support for L3VPNs in Linux… I’m getting a bit late in the wagon.
Anyway, I want to test myself and see if I can make it work. I downloaded the repo from the author to start working on it.
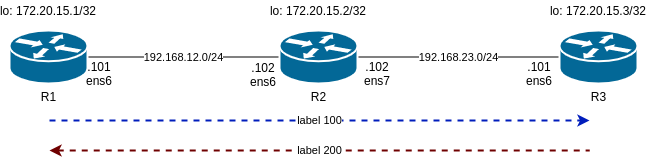
So I am following the same steps as him and will start with a lab consisting of static LSP. This is the diagram:
Main differences in my lab are:
1- I use libvirt instead of VirtualBox
2- I am using debian10 buster64 as VM
This affect the Vagrant file and the script to configure the static LSP. The libvirt_ commands I am using in Vagrantfile are ignored as I am not able to name the interfaces as I want. As well, I had to change the IP addressing as I had collisions with .1. And debian/buster64 has specific interfaces names that I have to use.
So, now we can turn up the lab.
/mpls-linux/lab1-static-lsps$ vagrant up
 Bringing machine 'r1' up with 'libvirt' provider…
 Bringing machine 'r2' up with 'libvirt' provider…
 Bringing machine 'r3' up with 'libvirt' provider…
 ==> r2: Checking if box 'debian/buster64' version '10.4.0' is up to date…
 ==> r3: Checking if box 'debian/buster64' version '10.4.0' is up to date…
 ==> r1: Checking if box 'debian/buster64' version '10.4.0' is up to date…
 ==> r1: Creating image (snapshot of base box volume).
 ==> r2: Creating image (snapshot of base box volume).
 ==> r3: Creating image (snapshot of base box volume).
 ==> r2: Creating domain with the following settings…
 ==> r1: Creating domain with the following settings…
...
/mpls-linux/lab1-static-lsps master$ vagrant status
 Current machine states:
 r1                        running (libvirt)
 r2                        running (libvirt)
 r3                        running (libvirt)
So we can check R1. One important detail here, is how we can defined a static route to reach R3 loopback and it is encapsulated in MPLS with label 100.
/mpls-linux/lab1-static-lsps$ vagrant ssh r1
...
vagrant@R1:~$ lsmod | grep mpls
 mpls_iptunnel          16384  1
 mpls_router            36864  1 mpls_iptunnel
 ip_tunnel              24576  1 mpls_router
 vagrant@R1:~$
 vagrant@R1:~$ ip route
 default via 192.168.121.1 dev ens5 proto dhcp src 192.168.121.124 metric 1024
 172.20.15.3  encap mpls  100 via 192.168.12.102 dev ens6
 192.168.12.0/24 dev ens6 proto kernel scope link src 192.168.12.101
 192.168.121.0/24 dev ens5 proto kernel scope link src 192.168.121.124
 192.168.121.1 dev ens5 proto dhcp scope link src 192.168.121.124 metric 1024
 vagrant@R1:~$
 vagrant@R1:~$ ip -4 a
 1: lo:  mtu 65536 qdisc noqueue state UNKNOWN group default qlen 1000
     inet 127.0.0.1/8 scope host lo
        valid_lft forever preferred_lft forever
     inet 172.20.15.1/32 scope global lo
        valid_lft forever preferred_lft forever
 2: ens5:  mtu 1500 qdisc pfifo_fast state UP group default qlen 1000
     inet 192.168.121.124/24 brd 192.168.121.255 scope global dynamic ens5
        valid_lft 3204sec preferred_lft 3204sec
 3: ens6:  mtu 1500 qdisc pfifo_fast state UP group default qlen 1000
     inet 192.168.12.101/24 brd 192.168.12.255 scope global ens6
        valid_lft forever preferred_lft forever
 vagrant@R1:~$
Now check R2 as it is our P router between R1 and R3 as per diagram. Important bit here is “ip -M route show”. This shows the MPLS routing label that is based in labels. In the standard “ip route” you dont seen any reference to MPLS.
vagrant@R2:~$ ip -4 a
 1: lo:  mtu 65536 qdisc noqueue state UNKNOWN group default qlen 1000
     inet 127.0.0.1/8 scope host lo
        valid_lft forever preferred_lft forever
     inet 172.20.15.2/32 scope global lo
        valid_lft forever preferred_lft forever
 2: ens5:  mtu 1500 qdisc pfifo_fast state UP group default qlen 1000
     inet 192.168.121.103/24 brd 192.168.121.255 scope global dynamic ens5
        valid_lft 2413sec preferred_lft 2413sec
 3: ens6:  mtu 1500 qdisc pfifo_fast state UP group default qlen 1000
     inet 192.168.12.102/24 brd 192.168.12.255 scope global ens6
        valid_lft forever preferred_lft forever
 4: ens7:  mtu 1500 qdisc pfifo_fast state UP group default qlen 1000
     inet 192.168.23.102/24 brd 192.168.23.255 scope global ens7
        valid_lft forever preferred_lft forever
 vagrant@R2:~$ ip route
 default via 192.168.121.1 dev ens5 proto dhcp src 192.168.121.103 metric 1024
 192.168.12.0/24 dev ens6 proto kernel scope link src 192.168.12.102
 192.168.23.0/24 dev ens7 proto kernel scope link src 192.168.23.102
 192.168.121.0/24 dev ens5 proto kernel scope link src 192.168.121.103
 192.168.121.1 dev ens5 proto dhcp scope link src 192.168.121.103 metric 1024
 vagrant@R2:~$
 vagrant@R2:~$ lsmod | grep mpls
 mpls_router            36864  0
 ip_tunnel              24576  1 mpls_router
 vagrant@R2:~$
 vagrant@R2:~$ ip -M route show
 100 via inet 192.168.23.101 dev ens7
 200 via inet 192.168.12.101 dev ens6
 vagrant@R2:~$
So let’s see if pinging the loopback in R1 and R3 gets labelled traffic:
R1 to R3 (on R2)
root@R2:/home/vagrant# tcpdump -i ens6 -U -w - | tee mpls-r1tor3.pcap | tcpdump -r -
 reading from file -, link-type EN10MB (Ethernet)
 tcpdump: listening on ens6, link-type EN10MB (Ethernet), capture size 262144 bytes
 17:14:01.284942 STP 802.1d, Config, Flags [none], bridge-id 8000.52:54:00:de:61:f2.8001, length 35
 17:14:03.300756 STP 802.1d, Config, Flags [none], bridge-id 8000.52:54:00:de:61:f2.8001, length 35
 17:14:05.284915 STP 802.1d, Config, Flags [none], bridge-id 8000.52:54:00:de:61:f2.8001, length 35
 17:14:07.183328 MPLS (label 100, exp 0, [S], ttl 64) IP 192.168.12.101 > 172.20.15.3: ICMP echo request, id 1771, seq 1, length 64
 17:14:07.300556 STP 802.1d, Config, Flags [none], bridge-id 8000.52:54:00:de:61:f2.8001, length 35
 17:14:08.186983 MPLS (label 100, exp 0, [S], ttl 64) IP 192.168.12.101 > 172.20.15.3: ICMP echo request, id 1771, seq 2, length 64
 17:14:09.188867 MPLS (label 100, exp 0, [S], ttl 64) IP 192.168.12.101 > 172.20.15.3: ICMP echo request, id 1771, seq 3, length 64
I can see the labelled packet from R1 to R2 with label 100 as expected, but I dont see any “echo reply”…..
But ping is successful based on R1:
vagrant@R1:~$ ping 172.20.15.3
 PING 172.20.15.3 (172.20.15.3) 56(84) bytes of data.
 64 bytes from 172.20.15.3: icmp_seq=1 ttl=63 time=0.746 ms
 64 bytes from 172.20.15.3: icmp_seq=2 ttl=63 time=1.18 ms
 64 bytes from 172.20.15.3: icmp_seq=3 ttl=63 time=1.11 ms
 64 bytes from 172.20.15.3: icmp_seq=4 ttl=63 time=0.728 ms
Something is wrong. As per pic below, with tcpdump in all interfaces, R3 is seeing the echo request from a different source (not R1).
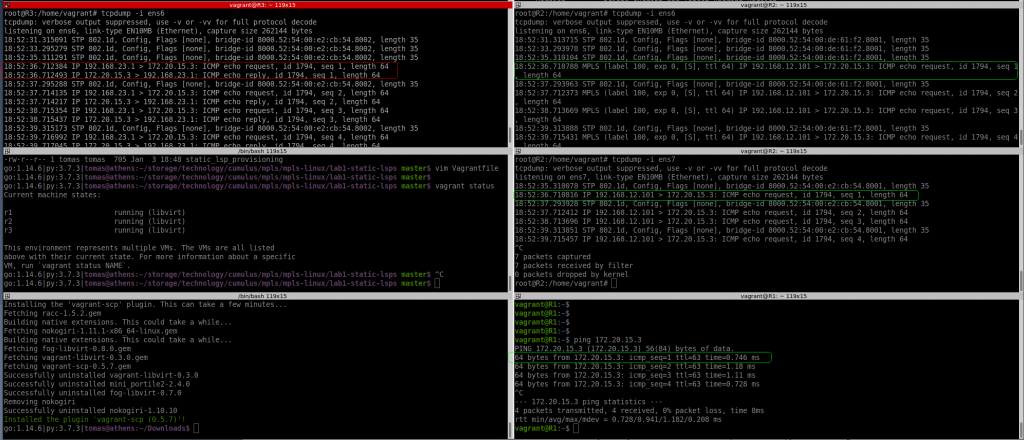
And if I ping using R1 loopback, I can’t see anything leaving R1 ens6 interface.
vagrant@R1:~$ ping 172.20.15.3 -I lo
 PING 172.20.15.3 (172.20.15.3) from 172.20.15.1 lo: 56(84) bytes of data.
 ^C
 --- 172.20.15.3 ping statistics ---
 25 packets transmitted, 0 received, 100% packet loss, time 576ms
Based on the original blog post, this should work. The main difference here is I am using libvirt. Need to carry on investigating
This is my IP config, 23.1 is my laptop:
9: virbr3:  mtu 1500 qdisc noqueue state UP group default qlen 1000
     inet 192.168.121.1/24 brd 192.168.121.255 scope global virbr3
        valid_lft forever preferred_lft forever
 10: virbr8:  mtu 1500 qdisc noqueue state UP group default qlen 1000
     inet 192.168.12.1/24 brd 192.168.12.255 scope global virbr8
        valid_lft forever preferred_lft forever
 11: virbr9:  mtu 1500 qdisc noqueue state UP group default qlen 1000
     inet 192.168.23.1/24 brd 192.168.23.255 scope global virbr9
        valid_lft forever preferred_lft forever
NOTES:
How to scp files from vagrant box: link
$ vagrant plugin install vagrant-scp
$ vagrant scp r2:~/*.pcap .
How to ssh to a vagrant box without using “vagran ssh”: link
# save the config to a file
vagrant ssh-config > vagrant-ssh

# run ssh with the file
ssh -F vagrant-ssh default

# update your .gitignore for not tracking this file!!!!
How to write and read tcpdump at the same time:
# tcpdump -i ens7 -U -w - | tee mpls-r3tor1.pcap | tcpdump -r -
UPDATE:
Ok, I have tried again. I rebooted my laptop, rebuilt the VMs, etc. And now it works
9: virbr3:  mtu 1500 qdisc noqueue state UP group default qlen 1000
     inet 192.168.121.1/24 brd 192.168.121.255 scope global virbr3
        valid_lft forever preferred_lft forever
 10: virbr8:  mtu 1500 qdisc noqueue state UP group default qlen 1000
     inet 192.168.12.1/24 brd 192.168.12.255 scope global virbr8
        valid_lft forever preferred_lft forever
 11: virbr9:  mtu 1500 qdisc noqueue state UP group default qlen 1000
     inet 192.168.23.1/24 brd 192.168.23.255 scope global virbr9
        valid_lft forever preferred_lft forever
 root@athens:/boot# uname -a
 Linux athens 5.9.0-5-amd64 #1 SMP Debian 5.9.15-1 (2020-12-17) x86_64 GNU/Linux
 root@athens:/boot#
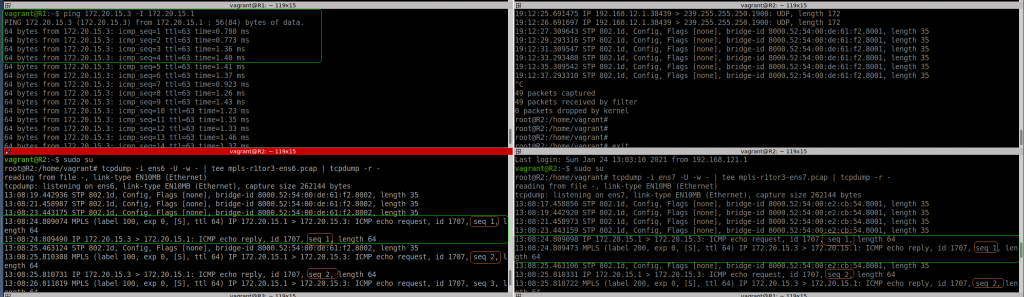
I can see now clearly, how the ICMP request packet is encapsulated with MPLS tag 100 from R1 to R2 (ens6 interface), then the label is popped in R2, and you can see the same ICMP request leaving R2 via ens7 to R3.
Then the ICMP reply is encapsulated with MPLS tag 200 in R3 to R2 (ens7) and again, the labels is popped in R2, and you see the packet again from R2 (ens6) to R1.
So this test is successful at the end although not sure what I have been doing wrong before.